


STM32H7 Ethernet with Mongoose: Web device dashboard LED control
Summary
This article provides a step-by-step guide to integrating and customizing a Mongoose web user interface (UI) device dashboard. By the end of this guide, the user can:
- Run a web dashboard on a development board
- Bind UI toggle controls to hardware LEDs
- See how dashboard state is synchronized between multiple users
Prerequisites
Introduction
Mongoose is a lightweight, open-source, dual-licensed network library that consists of two files. It includes a built-in embedded web server, Message Queuing Telemetry Transport (MQTT) client, TCP/IP stack, Transport Layer Security (TLS) 1.3 stack, and firmware update support. Mongoose works with existing TCP/IP stacks such as lwIP, or it can run independently.
This guide uses the NUCLEO-H723ZG development board, but the same approach applies to any STM32 microcontroller with a built-in Ethernet media access control (MAC).
To get started quickly, use a preconfigured project from the Full Production Dashboard Example download section:
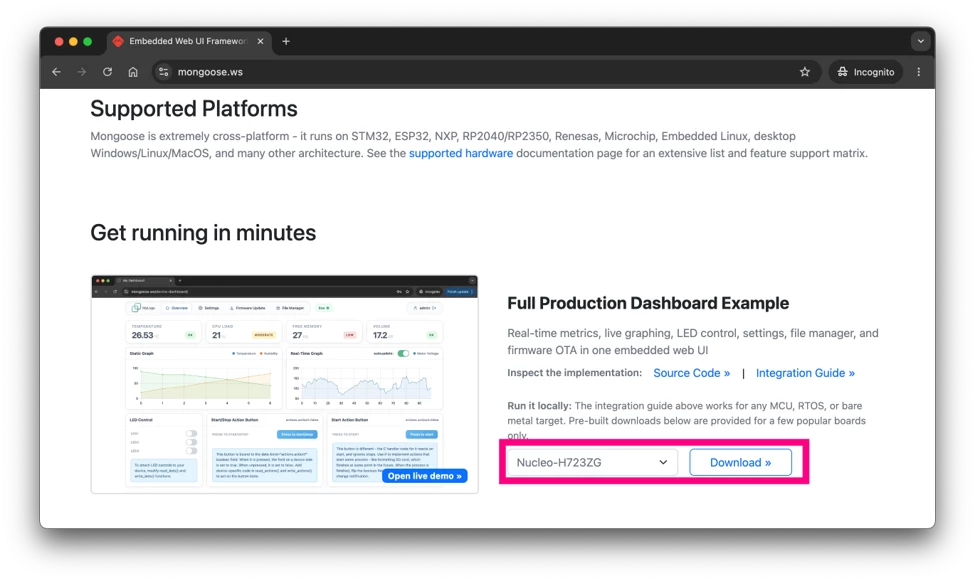
Otherwise, follow the steps below.
1. Integrate Mongoose
Follow the getting started guide to integrate Mongoose into your firmware. Make sure to install I-CUBE-Mongoose pack version 7.21.7 or later.
After the integration is complete, run a simple "Hello, world" web server on the board. After confirmation that it works, remove the “mg_http_listen()” call and the “http_ev_handler()” function from “main.c”. The next section replaces them with the Mongoose-based device dashboard.
2. Implement a baseline LED control dashboard
In this step, integrate the prebuilt minimal LED control dashboard example from the Mongoose repository.
Create Mongoose top-level directory in your project. Then copy the following three files to that directory:
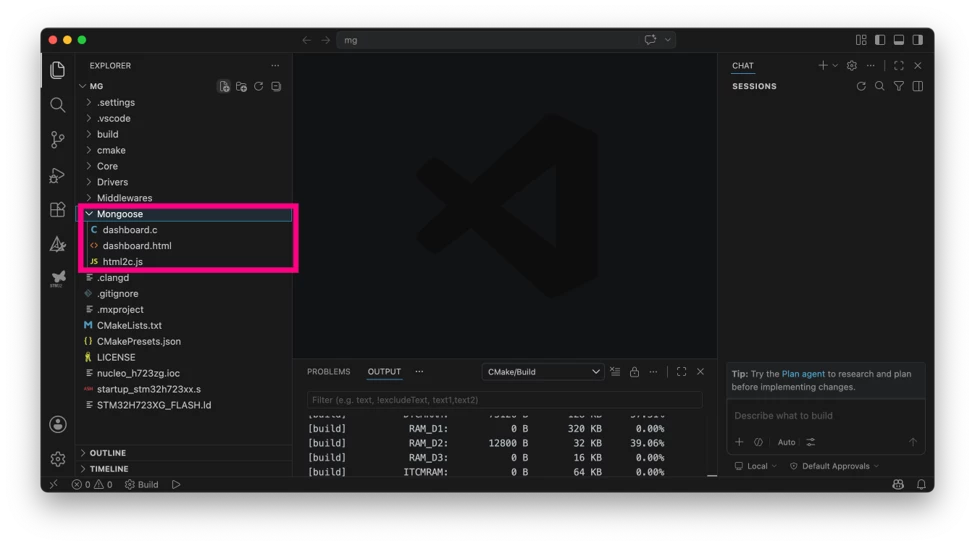
“html2c.js” is a Node.js script that generates “file_data.c” with the following command: “node html2c.js dashboard.html -o file_data.c”. This script first inlines all external resources into an amalgamated HTML file so that it does not depend on external content. It then compresses the file and packs it into a Mongoose-embedded file system. This approach minimizes flash usage.
For this step, Node.js must be installed on the system. Install it from https://nodejs.org/en/download. Verify the installation by opening a shell or command prompt and running “node --version”.
In the top level “CMakeLists.txt” file, add two extra source files to the build, and add the rule that generates “file_data.c” from “dashboard.html”. This step requires that Node.js is installed:
# Generate file_data.c from dashboard.html
add_custom_command(
    OUTPUT ${CMAKE_SOURCE_DIR}/Mongoose/file_data.c
    COMMAND node ${CMAKE_SOURCE_DIR}/Mongoose/html2c.js ${CMAKE_SOURCE_DIR}/Mongoose/dashboard.html -o ${CMAKE_SOURCE_DIR}/Mongoose/file_data.c
    DEPENDS ${CMAKE_SOURCE_DIR}/Mongoose/dashboard.html
    VERBATIM
)

# Add sources to executable
target_sources(${CMAKE_PROJECT_NAME} PRIVATE
    # Add user sources here
    Mongoose/dashboard.c
    Mongoose/file_data.c
)
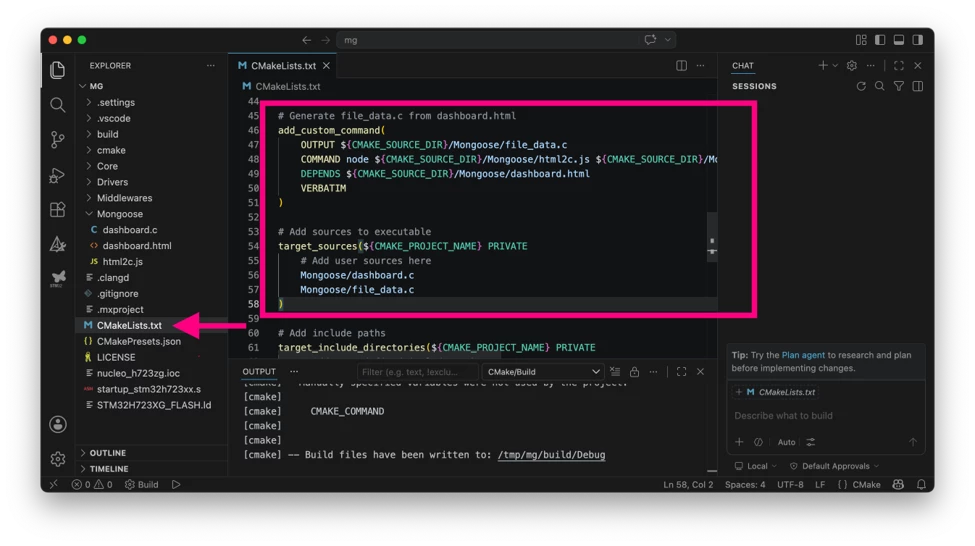
In Core/Src/main.c, modify the while loop to look like this:
/* USER CODE BEGIN WHILE */
struct mg_mgr mgr;
mg_mgr_init(&mgr);
mg_dash_init(&mgr);

while (1)
{
  mg_mgr_poll(&mgr, 1);
  mg_dash_poll(&mgr);
/* USER CODE END WHILE */
Run the serial console. Rebuild and reflash the board. On the serial console, you should see something like this:
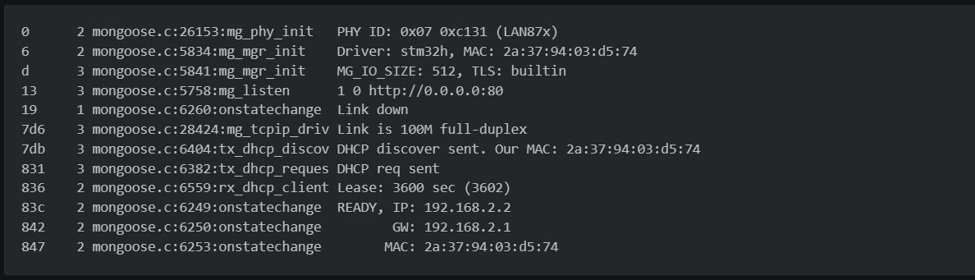
Open the device's IP address in your browser. The dashboard should look like the following:
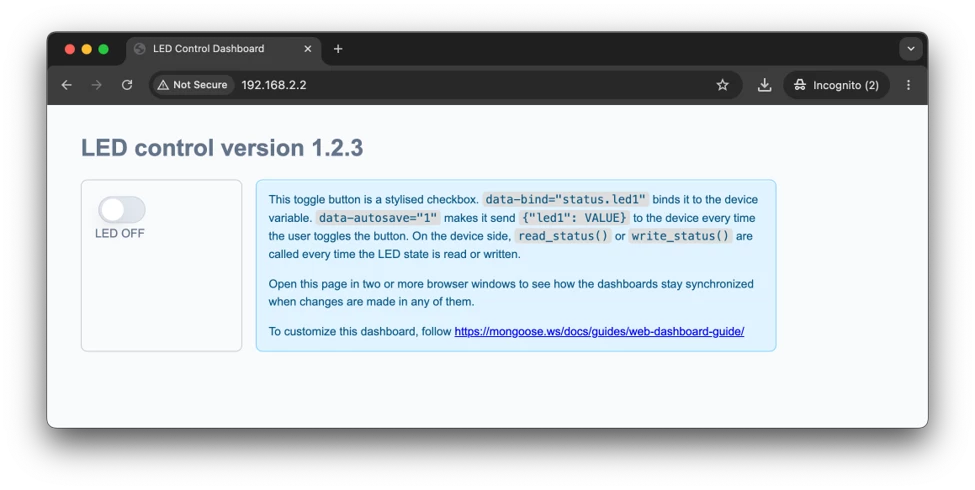
Clicking the toggle button on the dashboard has no effect because the toggle button is not yet connected to the hardware LED. The next chapter addresses how to do that.
3. Customize the dashboard
Our board has 3 built-in LEDs. Let's add two extra toggle buttons and wire them to the hardware.
Open Mongoose/dashboard.html and modify the Dashboard.init() call to include led2 and led3:
Dashboard.init({
  debug: true,
  data: { status: { led1: false, led2: false, led3: false, version: '1.0.0' } },
});
Add two more toggle buttons and bind them to led2 and led3:
<section aria-label="LED status" style="width: 12rem; border: 1px solid #ccc; border-radius: .5rem; padding: 1rem; ">
  <div>
    <input type="checkbox" class="toggle" data-bind="status.led1" data-autosave="1" aria-label="Toggle LED" />
    <div>LED ${status.led1 ? 'ON' : 'OFF'}</div>
  </div>
  <div>
    <input type="checkbox" class="toggle" data-bind="status.led2" data-autosave="1" aria-label="Toggle LED" />
    <div>LED ${status.led2 ? 'ON' : 'OFF'}</div>
  </div>
  <div>
    <input type="checkbox" class="toggle" data-bind="status.led3" data-autosave="1" aria-label="Toggle LED" />
    <div>LED ${status.led3 ? 'ON' : 'OFF'}</div>
  </div>
</section>
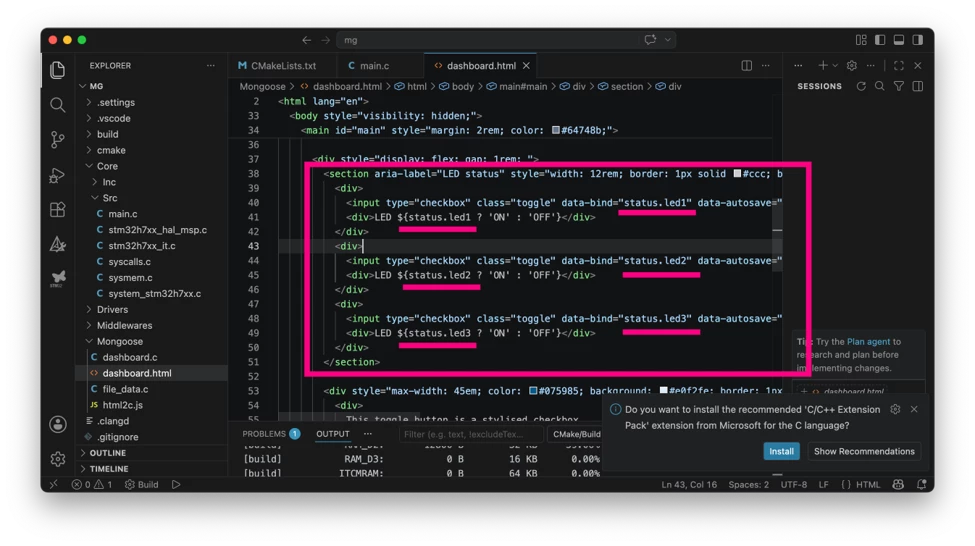
Notice that the HTML uses data-bind attributes that reference values from the Dashboard.init() call. This is how we bind each control to a device variable.
Also notice the ${...} expression in the HTML code. It is replaced with the result of evaluating the expression, which can be any valid JS expression that uses device state variables. ${...} expressions can appear anywhere: in text or in element attributes. This makes it possible to style elements conditionally, for example by adding a red background when device variable values exceed a threshold.
For more details, see the dashboard.js reference. Styling and conditional display will be covered in the next articles. For now, let's move on.
Open Mongoose/dashboard.c and add s_led2 and s_led3 boolean variables that are used to communicate LED state to the dashboard:
static bool s_led1, s_led2, s_led3;
Then modify the read_status() and write_status() functions:
static void read_status(void) {
MG_INFO(("READING STATUS"));
mg_snprintf(s_version, sizeof(s_version), "1.2.3");
// These conditionals make this file work on both microcontroller and desktop
// Useful for developing the UI on desktop, and copying to an MCU project.
#if MG_ARCH == MG_ARCH_CUBE
  s_led1 = HAL_GPIO_ReadPin(GPIOB, GPIO_PIN_0);
  s_led2 = HAL_GPIO_ReadPin(GPIOE, GPIO_PIN_1);
  s_led3 = HAL_GPIO_ReadPin(GPIOB, GPIO_PIN_14);
#endif
}

static void write_status(void) {
  MG_INFO(("WRITING STATUS"));

#if MG_ARCH == MG_ARCH_CUBE
  HAL_GPIO_WritePin(GPIOB, GPIO_PIN_0, s_led1);
  HAL_GPIO_WritePin(GPIOE, GPIO_PIN_1, s_led2);
  HAL_GPIO_WritePin(GPIOB, GPIO_PIN_14, s_led3);
#endif
}
Add "led2" and "led3" to the field-set descriptor:
static struct mg_field fields_status[] = {
    {"led1", MG_VAL_BOOL, &s_led1, sizeof(s_led1)},
    {"led2", MG_VAL_BOOL, &s_led2, sizeof(s_led2)},
    {"led3", MG_VAL_BOOL, &s_led3, sizeof(s_led3)},
    {"version", MG_VAL_STR, &s_version, sizeof(s_version)},
    {NULL, MG_VAL_INT, NULL, 0},
};
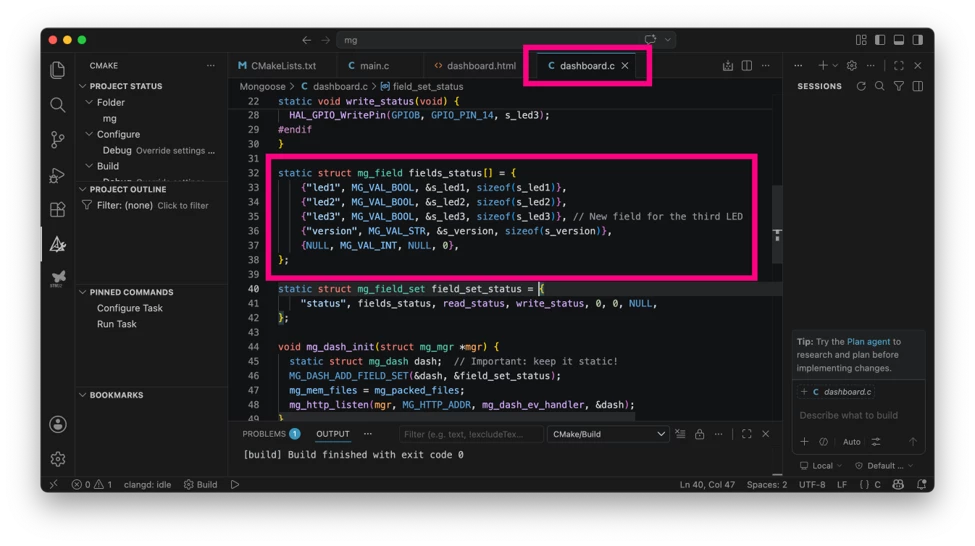
See the Dashboard C API reference for a more detailed explanation of fields and field sets.
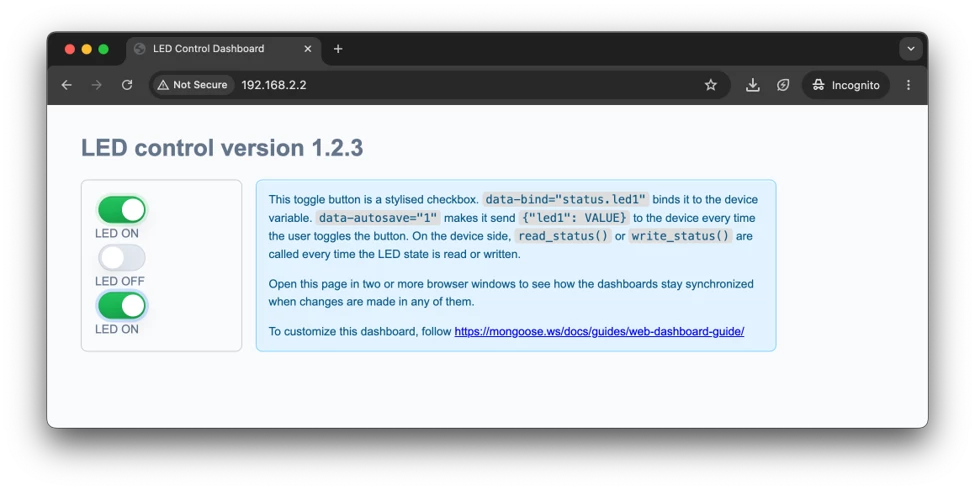
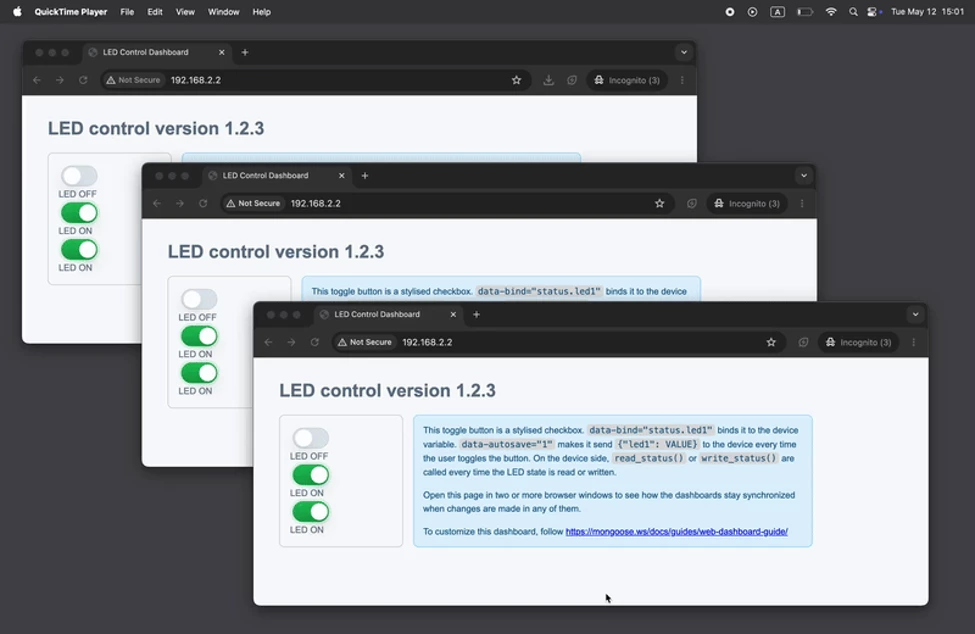
Rebuild and reflash the board. Refresh the dashboard in your browser. If should now show three toggle buttons, and toggling them should toggle the corresponding LED:
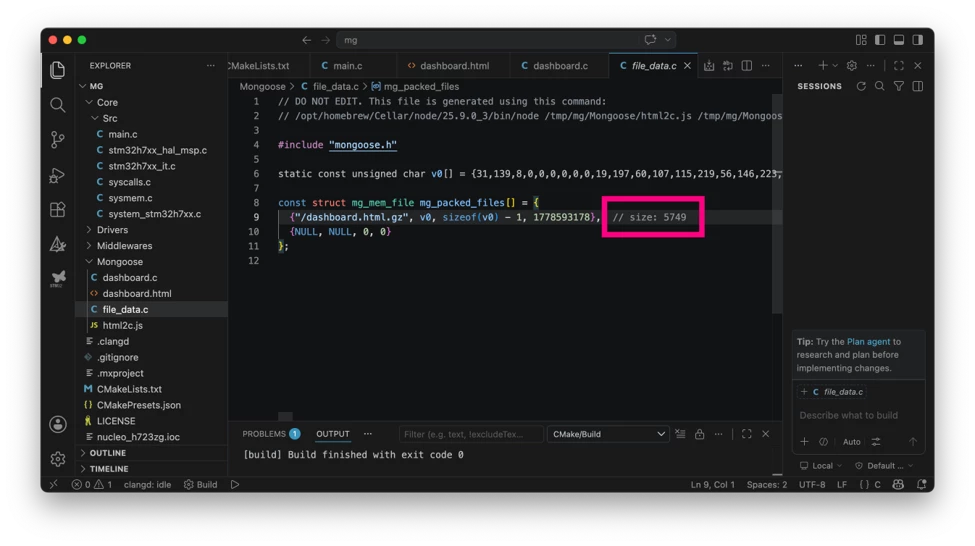
Open Mongoose/file_data.c to check how much space the UI uses, it should be around 5KB:
Open the dashboard in another browser, and toggle LEDs in one browser window. The dashboards remain synchronized because each dashboard keeps a real-time WebSocket connection to the device. As a result, the dashboard does not show stale data:
Conclusion
Congratulations! The STM32 device now runs a web device dashboard that can be customized. Because this implementation provides a solid baseline, it is possible to accelerate development by using AI to modify “dashboard.html” and “dashboard.c” with confidence that the end result is production ready.
“dashboard.c” does not contain low-level embedded networking code. It provides a simple interface for exporting device state through JSON-RPC and REST APIs, which web dashboards and cloud MQTT can use. The implementation is well tested and resides inside the Mongoose library, which makes this approach a robust, low-risk method for implementing network functionality on a microcontroller.
The upcoming articles cover AI usage.