Associate
July 21, 2026
Question

[OpenSTDroid ]STM32MP257F-EV1: Infinite reboot with IAC exception 128 after switching from DFU to eMMC boot – cannot enter fastboot mode

  • July 21, 2026
  • 15 replies
  • 223 views

Hello Experts,

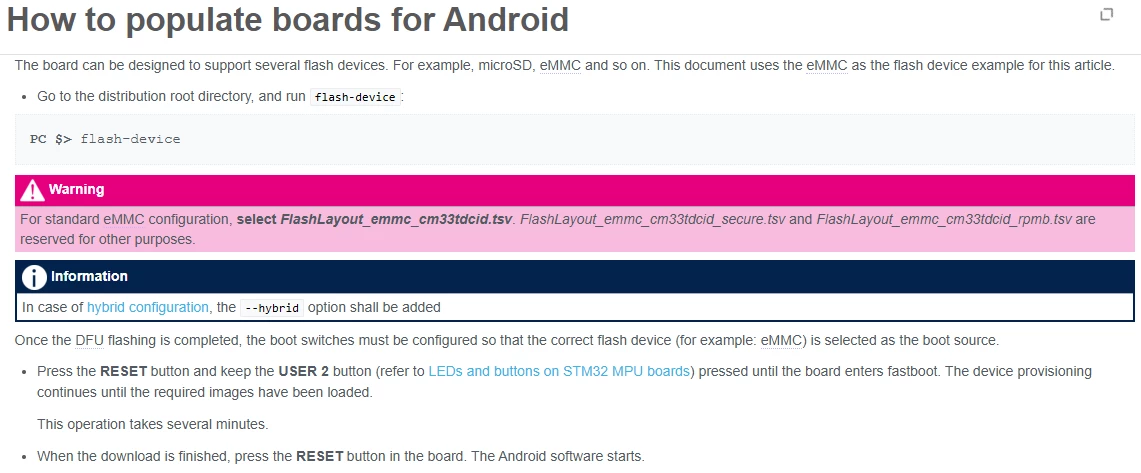
I am working on the STM32MP257F-EV1 board (MB1936 Var1.0 Rev.C-01) and following the official OpenSTDroid provisioning guide. I have successfully used flash-device(STM32CubeProgrammer v2.22.0 ) to flash the full eMMC starter image via DFU mode (FlashLayout_emmc_cm33tdcid.tsv). After that, I switched the boot mode from DFU to eMMC (M33-TD) and pressed USER2 + RESET to enter fastboot mode, as described in the documentation. However, instead of entering fastboot, the board goes into an infinite reboot loop.

Observed behavior:

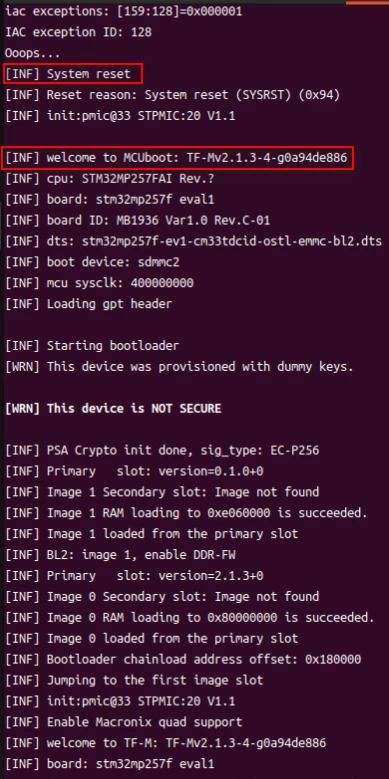
  • Serial console (minicom) shows the following repeated sequence:

    iac exceptions: [159:128]=0x000001
    IAC exception ID: 128
    Ooops...
    [INF] System reset
    [INF] Reset reason: System reset (SYSRST) (0x94)
    [INF] init:pmic@33 STPMIC:20 V1.1

    [INF] welcome to MCUboot: TF-Mv2.1.3-4-g0a94de886
    [INF] cpu: STM32MP257FAI Rev.?
    [INF] board: stm32mp257f eval1
    [INF] board ID: MB1936 Var1.0 Rev.C-01
    [INF] dts: stm32mp257f-ev1-cm33tdcid-ostl-emmc-bl2.dts
    [INF] boot device: sdmmc2
    [INF] mcu sysclk: 400000000
    [INF] Loading gpt header

    [INF] Starting bootloader
    [WRN] This device was provisioned with dummy keys.
    [WRN] This device is NOT SECURE

    [INF] PSA Crypto init done, sig_type: EC-P256
    [INF] Primary slot: version=0.1.0+0
    [INF] Image 1 Secondary slot: Image not found
    [INF] Image 1 RAM loading to 0xe060000 is succeeded.
    [INF] Image 1 loaded from the primary slot
    [INF] BL2: image 1, enable DDR-FW
    [INF] Primary slot: version=2.1.3+0
    [INF] Image 0 Secondary slot: Image not found
    [INF] Image 0 RAM loading to 0x80000000 is succeeded.
    [INF] Image 0 loaded from the primary slot
    [INF] Bootloader chainload address offset: 0x180000
    [INF] Jumping to the first image slot
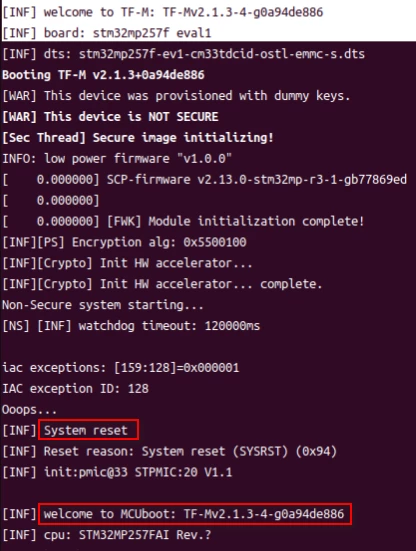
    [INF] init:pmic@33 STPMIC:20 V1.1
    [INF] Enable Macronix quad support
    [INF] welcome to TF-M: TF-Mv2.1.3-4-g0a94de886
    [INF] board: stm32mp257f eval1
    [INF] dts: stm32mp257f-ev1-cm33tdcid-ostl-emmc-s.dts
    Booting TF-M v2.1.3+0a94de886
    [WAR] This device was provisioned with dummy keys.
    [WAR] This device is NOT SECURE
    [Sec Thread] Secure image initializing!
    INFO: low power firmware "v1.0.0"
    [ 0.000000] SCP-firmware v2.13.0-stm32mp-r3-1-gb77869ed
    [ 0.000000]
    [ 0.000000] [FWK] Module initialization complete!
    [INF][PS] Encryption alg: 0x5500100
    [INF][Crypto] Init HW accelerator...
    [INF][Crypto] Init HW accelerator... complete.
    Non-Secure system starting...
    [NS] [INF] watchdog timeout: 120000ms

    iac exceptions: [159:128]=0x000001
    IAC exception ID: 128
    Ooops...
    [INF] System reset
    ... (loop repeats)

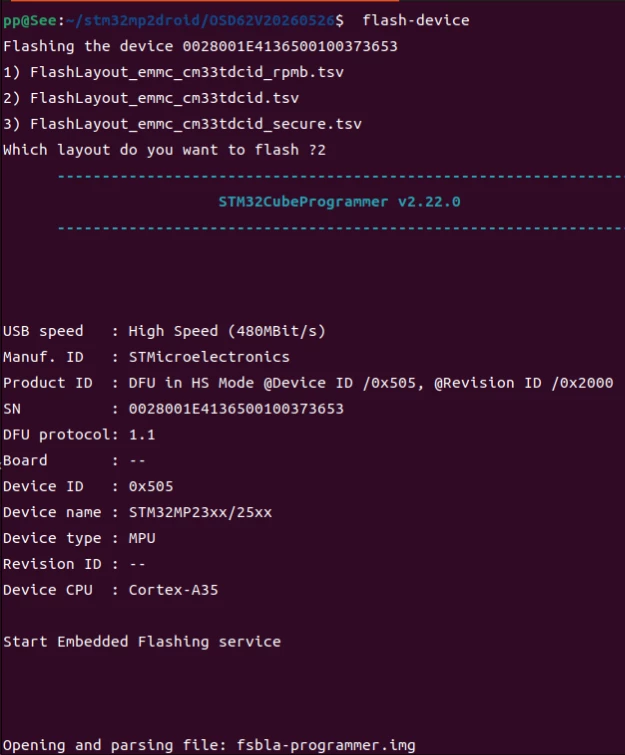
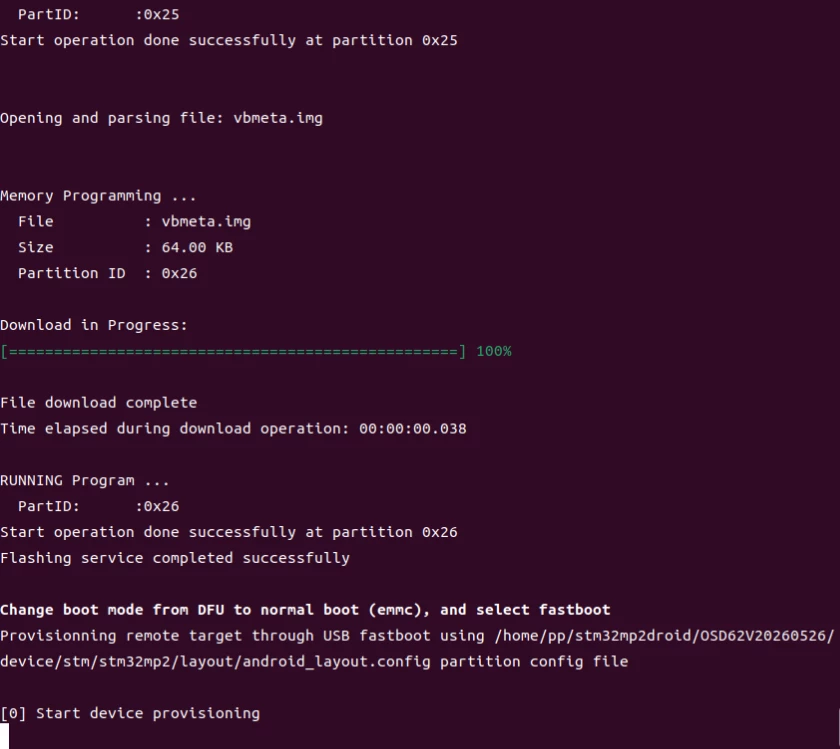
    The flash-device script waits forever for a fastboot device and never proceeds. Its last output before hanging is:

    Flashing service completed successfully

    Change boot mode from DFU to normal boot (emmc), and select fastboot
    Provisionning remote target through USB fastboot using /home/pp/stm32mp2droid/OSD62V20260526/device/stm/stm32mp2/layout/android_layout.config partition config file

    [0] Start device provisioning

    When I press USER2 + RESET, the board does not​ enter fastboot mode (no fastboot devices on host, serial still shows the reboot loop). 
     

    My environment:

  • Host PC: Ubuntu 22.04 inside VMware Workstation

  • STM32CubeProgrammer v2.22.0 

  • Android distribution built from ST's source code: OSD62V20260526 (compiled locally)

  • Board: STM32MP257F-EV1 (MB1936)

  • USB cable: same Type‑C port used for DFU and fastboot 

    What I have tried so far:

  • Re‑flashed the entire eMMC multiple times using STM32_Programmer_CLI -c port=usb1  -w FlashLayout_emmc_cm33tdcid.tsv – always completes successfully.

  • Also tried the _clear.tsv version followed by the _starter version.

  • Manually erased the first 1 GB of eMMC from U‑Boot (mmc erase 0 0x200000) and verified it is zeroed, then re‑flashed via DFU.

  • Checked udev rules for 0483:0afb – they are present and fastboot devices works when the board is actually in fastboot mode (which rarely happens).
     

    Additional context:

  • Before this issue, I had experimented with some fastboot commands likefastboot stage rpmb/rpmbk.bin and fastboot oem run:'mmc rpmb key 0x84000000'. I also attempted fastboot mm dev 1, but it returned unknown command and was skipped. I suspect the RPMB region might now be in an inconsistent state.

  • The board reports This device was provisioned with dummy keys and NOT SECURE – this is the default for the starter package, but perhaps my manual RPMB attempts broke the alignment between eMMC RPMB, TF‑M keys, and OTP.

    My questions:

  • What exactly causes the IAC exception 128 in this context? Is it a mismatch between the TF‑M secure firmware and the non‑secure side (U‑Boot/Linux), specifically related to RPMB authentication? I want to note that I previously flashed the official ST Yocto Linux image to the same eMMC and it booted successfully without any issues. This confirms the eMMC hardware itself is fine, so the problem is likely related to the Android provisioning or RPMB state.

  • Could the RPMB area be corrupted from my previous manual mmc rpmb key attempts? If so, how can I completely reset the RPMB region? Does FlashLayout_emmc_clear.tsv cover the RPMB partition, or do I need additional steps?

  • Is there a reliable way to force the board into fastboot mode despite the crash loop? For example, a specific combination of hardware straps or a different key press timing?

  • Should I try a different boot source (e.g., SD card) to rule out eMMC corruption, or should I attempt to fully reprovision the device using the flash-device script from a clean state?

  • Any guidance would be greatly appreciated. I have attached the full serial log and the exact steps I followed.

    Thank you!


15 replies

Nicolas L
ST Employee
July 21, 2026

Hi John


The last OpenSTDroid distribution is compatible only with STM32MP257F rev Y (which mean MB1936 Rev.D-01). You need to use the previous delivery v5.1.1 (Android 13) which is compatible with your board : https://wiki.st.com/stm32mpu-ecosystem-v5/wiki/STM32_MPU_OpenSTDroid_release_note.


Regards

Nicolas

John LeeAuthor
Associate
July 22, 2026

Hi Nicolas,

Thank you again for your previous help. I have now moved to a custom board based on STM32MP257FAI3, which already runs Yocto Linux successfully. I aim to port Android 16 (OpenSTDroid v6.2.0) onto it. However, my board lacks USER2 and RESET buttons (I will add them in the next PCB revision).

I would like to seek your expert advice on two points:

1. Hardware & Software Prerequisites

What specific hardware configurations or software adaptations are mandatory to boot Android 16 on a custom STM32MP257 board? Specifically:

  • How can I confirm whether my current STM32MP257FAI3 supports Android 16?

  • Regarding RPMB key provisioning: the starter package uses the RPMB test key (rpmb/rpmbk.bin). What I really want to ask is: can Android 16 boot without using RPMB at all?

2. Flashing without USER2/RESET and PCB re-spin recommendations

I also have no DIP switch. STM32CubeProgrammer flashes part of the image, then USER2+RESET is needed to enter fastboot mode to flash the remaining partitions. Without these buttons, is there any way to complete the flashing process?

Also, for the next board revision, what minimal hardware features do you recommend (e.g., BOOT pin headers, RESET button, USER2-equivalent button)?

I would greatly appreciate your guidance.

Best regards,

John Lee

Nicolas L
ST Employee
July 22, 2026

Hi


First concerning the RPMB, by principle you can use Android without, but it’s more complex to manage (missing features as anti-rollback with the write-counter and the authentication mechanism). The solution OpenSTDroid provided is working only with eMMC and its RPMB.

It also depends on the security level you expected. If it’s only a prototype, you can disconnect the security features (several actions are expected here) which means that you don’t need anymore the RPMB.


After concerning your customization, you have certainly to adapt the device-tree in consequence (available in device/stm/stm32mp2-system/external-dt). Then to flash the device, you can use only STM32CubeProgrammer which avoid the need to start fastboot (need to adapt the programmer layout and to unsparse the super, metadata and userdata partition images).

Now if you are capable to open a console and break on U-Boot. You can then execute manually the fastboot command “fastboot 0”. You can still use the flash-device script, but when you have to enable fastboot, you can start it manually.


To give you more details, I need to understand what you can do.


Regards

Nicolas


John LeeAuthor
Associate
July 24, 2026

Hi Nicolas,

Thank you for your previous reply. My primary goal right now is to get Android 16 running on my custom board as quickly as possible, using the simplest and fastest method.

Regarding RPMB, I'm still not clear: for the Android images I compiled myself, do I need to additionally provide the rpmbk.bin key file? Or can I just flash the compiled images directly and boot Android without any extra RPMB steps? Of course, my current custom board is not using RPMB at all, and I don't know if this is correct. If RPMB is actually mandatory, can I simply use the rpmb/rpmbk.bin from the Starter package to fuse the key into the eMMC?

Also, I haven't yet ported my Yocto Linux device tree to the Android side. I'm not sure if this will affect my primary goal of flashing the Android images and getting them to boot.

You asked what I can do. Here is my current situation:

Hardware: My custom board has both the A35 and M33 debug UARTs connected. I have also added a USER2 button and M33-eMMC boot mode.

Flashing behavior: Yesterday I followed the ST tutorial. After flash-device script finished flashing the first part, I switched to M33-eMMC boot mode, held USER2, and reset. The result was the same as what I saw on the MB1936C development board – the board kept rebooting repeatedly, and the remaining images were not flashed.

M33-debug
M33-debug


Trying manual fastboot: I entered U-Boot via the A35 debug UART and manually executed fastboot 0. But then the flash-device script reported an error: ERROR: unknown boot instance value: 5. When I ran flash-device again, it said: ERROR: No device detected, check that it's connected and configured in DFU.

A35-debug​​​​​
PC-flash-device

About modifying the TSV and unsparse: You mentioned that I can use only STM32CubeProgrammer for flashing, which requires modifying the layout and unsparsing the super, metadata, and userdata partition images. Could you please tell me exactly how to do this? What commands or tools should I use?

I look forward to your detailed guidance.

Best regards,

John Lee

Nicolas L
ST Employee
July 24, 2026

Hi


######### RPMB #########

For the RPMB key, you just need to provision it on the device once. If you are in your built distribution, you can execute the script rpmb_provisioning and follow the instructions.


Prerequisite : put your device in DFU (boot mode associated) and ensure that you can see your device, executing the following command : 

$ STM32_Programmer_CLI -l usb

Then execute the rpmb_provisioning command:

$ rpmb_provisioning


You must also have a console open on the device (CA35).


Follow instruction considering the following answers: 

Do you want to fuse the OTP for RPMB-KEY ? N (The OTP fusing is not required).

Do you want to program the eMMC RPMB key slot ? y


######### FLASH #########

If you have “unknown boot instance”, it means that you used a wrong configuration to flash. 

As a reminder, “flash-device” script is using STM32_Programmer_CLI command in a first time, here you need to put the device in DFU (boot mode).

Then when the script ask you to switch to the CM33-eMMC mode, you have to change the boot mode, reset and then start fastboot, using the user2 button or executing the command I mentioned on the U-Boot console (fastboot 0).


Another option is to use the generate_starter script in your distribution. I attach the starter script and configuration file. You can replace the version available in your distribution in device/stm/stm32mp2/scripts/starter/. The execute “source generate_starter” to generate an image of your distribution, you can enter the starter directory then (displayed at the end of the generation) and use STM32_Programmer_CLI to flash all images (it’s longer than with flash-device) at once (no need of fastboot here).

As at this stage, you have a starter image, you can also execute the proposed action (rpmb/README) to provision the rpmb key.


If you can please explain all board customizations you performed, it can be helpful to understand if you need to adapt some configurations.


Regards

Nicolas

John LeeAuthor
Associate
July 28, 2026

Hi Nicolas,

I have already configured the RPMB on my custom board following your method.

However, the later flashing process did not go well.
The test results for my custom STM32MP25 board are as follows:

When the flash-device script reaches the step: "Change boot mode from DFU to normal boot (emmc), and select fastboot", it gets stuck waiting, displaying the message: "[0] Start device provisioning". After that, no further output is shown from the flash-device script.

At this point, if I switch to CM33-emmc boot mode and press the reset button, the A35 serial port immediately becomes unavailable, making it impossible to execute the command: fastboot 0. (If I press Ctrl+C in U-Boot via the A35 serial port before pressing the reset button and run fastboot 0, the flash-device script exits with an error.)

Furthermore, after pressing the reset button — regardless of whether the USER2 button is held down or not — the M33 serial debug port immediately outputs startup information and then hangs at the line: "Creating an empty PS flash layout." After waiting about one minute, a system reset occurs, and the process loops back to the same hang point repeatedly.

Also, on the M33 serial port, it is not possible to enter U-Boot via Ctrl+C to execute the command fastboot 0.

This is another flashing method you provided. When I ran: source generate_starter, I encountered an error message: ERROR: Bad suffix value 3756 for partition 4GiB_MEMORY_MAX_SIZE size, should be K, M or G

chipsee@build:/mnt/work/stm32mp25/OSD62V20260526$ source build/envsetup.sh
including device/stm/stm32mp2/vendorsetup.sh
including device/stm/stm32mp2/scripts/layout/layoutsetup.sh
chipsee@build:/mnt/work/stm32mp25/OSD62V20260526$ lunch aosp_eval-trunk_staging- userdebug

============================================
PLATFORM_VERSION_CODENAME=Baklava
PLATFORM_VERSION=Baklava
TARGET_PRODUCT=aosp_eval
TARGET_BUILD_VARIANT=userdebug
TARGET_ARCH=arm64
TARGET_ARCH_VARIANT=armv8-a
TARGET_CPU_VARIANT=generic
HOST_OS=linux
HOST_OS_EXTRA=Linux-5.4.0-216-generic-x86_64-Ubuntu-20.04.6-LTS
HOST_CROSS_OS=windows
BUILD_ID=BP4A.251205.006
OUT_DIR=out
SOONG_ONLY=false
============================================
chipsee@build:/mnt/work/stm32mp25/OSD62V20260526$
chipsee@build:/mnt/work/stm32mp25/OSD62V20260526$ source generate_starter
ERROR: Bad suffix value 3756 for partition 4GiB_MEMORY_MAX_SIZE size, should be K, M or G
/mnt/work/stm32mp25/OSD62V20260526/out/target/product/eval /mnt/work/stm32mp25/OSD62V20260526 /mnt/work/stm32mp25/OSD62V20260526
/mnt/work/stm32mp25/OSD62V20260526/out-starter/eval/st-android-16.0.0-2026-07-28-stm32mp257f-ev1-emmc-starter /mnt/work/stm32mp25/OSD62V20260526/out/target/ product/eval /mnt/work/stm32mp25/OSD62V20260526 /mnt/work/stm32mp25/OSD62V20260526
cp: cannot stat '/mnt/work/stm32mp25/OSD62V20260526/device/stm/stm32mp2/eval/../security/keys/README-starter.md': No such file or directory
starter kit has been generated:
starter for emmc memory available in out-starter/eval/st-android-16.0.0-2026-07-28-stm32mp257f-ev1-emmc-starter directory
chipsee@build:/mnt/work/stm32mp25/OSD62V20260526$ cd out-starter/
chipsee@build:/mnt/work/stm32mp25/OSD62V20260526/out-starter$ ls
eval
chipsee@build:/mnt/work/stm32mp25/OSD62V20260526/out-starter$ cd eval/
chipsee@build:/mnt/work/stm32mp25/OSD62V20260526/out-starter/eval$ ls
st-android-16.0.0-2026-07-28-stm32mp257f-ev1-emmc-starter st-android-16.0.0-2026-07-28-stm32mp257f-ev1-emmc-starter.tar.gz

Next, I executed the following command in the directory out-starter/eval/st-android-16.0.0-2026-07-28-stm32mp257f-ev1-emmc-starter:

STM32_Programmer_CLI -c port=usb1 -w flashlayout/FlashLayout_emmc_cm33tdcid.tsv


However, the flashing process reported errors:

Error: Partition 0x7 not found in TSV File

Error: TSV flashing service failed

chipsee@build:/mnt/work/stm32mp25/OSD62V20260526/out-starter/eval/st-android-16.0.0-2026-07-28-stm32mp257f-ev1-emmc-starter$ ls
boot.img fip.img flashlayout fsblm.img metadata.img splash.img vbmeta.img
dtbo.img fip-programmer.img fsbla.img m33ddr.img misc.img super.img vendor_boot.img
fip-ddr-programmer.img fip-programmer-rpmb.img fsbla-programmer.img m33fw.img rpmb userdata.img
chipsee@build:/mnt/work/stm32mp25/OSD62V20260526/out-starter/eval/st-android-16.0.0-2026-07-28-stm32mp257f-ev1-emmc-starter$ STM32_Programmer_CLI -l usb
-------------------------------------------------------------------
STM32CubeProgrammer v2.18.0
-------------------------------------------------------------------

===== DFU Interface =====

Total number of available STM32 device in DFU mode: 1

Device Index : USB1
USB Bus Number : 001
USB Address Number : 001
Product ID : DFU in HS Mode @Device ID /0x505, @Revision ID /0x2000
Serial number : 002A002A4236500700333258
Firmware version : 0x0110
Device ID : 0x0505

chipsee@build:/mnt/work/stm32mp25/OSD62V20260526/out-starter/eval/st-android-16.0.0-2026-07-28-stm32mp257f-ev1-emmc-starter$ STM32_Programmer_CLI -c port=usb1 -w flashlayout/FlashLayout_emmc_cm33tdcid.tsv
-------------------------------------------------------------------
STM32CubeProgrammer v2.18.0
-------------------------------------------------------------------


USB speed : High Speed (480MBit/s)
Manuf. ID : STMicroelectronics
Product ID : DFU in HS Mode @Device ID /0x505, @Revision ID /0x2000
SN : 002A002A4236500700333258
DFU protocol: 1.1
Board : --
Device ID : 0x0505
Device name : STM32MP23xx/25xx
Device type : MPU
Revision ID : --
Device CPU : Cortex-A35

Start Embedded Flashing service

Opening and parsing file: fsbla-programmer.img


Memory Programming ...
File : fsbla-programmer.img
Size : 187.98 KB
Partition ID : 0x01

Download in Progress:
[==================================================] 100%

File download complete
Time elapsed during download operation: 00:00:01.286

RUNNING Program ...
PartID: :0x01

Reconnecting the device ...

USB speed : High Speed (480MBit/s)
Manuf. ID : STMicroelectronics
Product ID : DFU @Device ID /0x505, @Revision ID /0x0011, @Name /STM32MP257FAI Rev.Y,
SN : 002A002A4236500700333258
DFU protocol: 1.1
Board : --
Device ID : 0x0505
Device name : STM32MP257FAI Rev.Y
Device type : MPU
Device CPU : Cortex-A35
Start operation done successfully at partition 0x01
Opening and parsing file: fip-ddr-programmer.img


Memory Programming ...
File : fip-ddr-programmer.img
Size : 29.38 KB
Partition ID : 0x02

Download in Progress:
[==================================================] 100%

File download complete
Time elapsed during download operation: 00:00:00.021

RUNNING Program ...
PartID: :0x02

Reconnecting the device ...

USB speed : High Speed (480MBit/s)
Manuf. ID : STMicroelectronics
Product ID : DFU @Device ID /0x505, @Revision ID /0x0011, @Name /STM32MP257FAI Rev.Y,
SN : 002A002A4236500700333258
DFU protocol: 1.1
Board : --
Device ID : 0x0505
Device name : STM32MP257FAI Rev.Y
Device type : MPU
Device CPU : Cortex-A35
Start operation done successfully at partition 0x02
Opening and parsing file: fip-programmer.img


Memory Programming ...
File : fip-programmer.img
Size : 2.93 MB
Partition ID : 0x03

Download in Progress:
[==================================================] 100%

File download complete
Time elapsed during download operation: 00:00:01.808

RUNNING Program ...
PartID: :0x03

Reconnecting the device ...

USB speed : High Speed (480MBit/s)
Manuf. ID : STMicroelectronics
Product ID : USB download gadget@Device ID /0x505, @Revision ID /0x0011, @Name /STM32MP257FAI Rev.Y,
SN : 002A002A4236500700333258
DFU protocol: 1.1
Board : --
Device ID : 0x0505
Device name : STM32MP257FAI Rev.Y
Device type : MPU
Device CPU : Cortex-A35
Start operation done successfully at partition 0x03

Flashlayout Programming ...
[==================================================] 100%
Running Flashlayout Partition ...

Reconnecting the device ...

USB speed : High Speed (480MBit/s)
Manuf. ID : STMicroelectronics
Product ID : USB download gadget@Device ID /0x505, @Revision ID /0x0011, @Name /STM32MP257FAI Rev.Y,
SN : 002A002A4236500700333258
DFU protocol: 1.1
Board : --
Device ID : 0x0505
Device name : STM32MP257FAI Rev.Y
Device type : MPU
Device CPU : Cortex-A35
Flashlayout partition started successfully
Opening and parsing file: fsblm.img


Memory Programming ...
File : fsblm.img
Size : 105.73 KB
Partition ID : 0x04

Download in Progress:
[==================================================] 100%

File download complete
Time elapsed during download operation: 00:00:00.022

RUNNING Program ...
PartID: :0x04
Start operation done successfully at partition 0x04
Opening and parsing file: fsblm.img


Memory Programming ...
File : fsblm.img
Size : 105.73 KB
Partition ID : 0x05

Download in Progress:
[==================================================] 100%

File download complete
Time elapsed during download operation: 00:00:00.022

RUNNING Program ...
PartID: :0x05
Start operation done successfully at partition 0x05
Opening and parsing file: m33ddr.img


Memory Programming ...
File : m33ddr.img
Size : 128.00 KB
Partition ID : 0x06

Download in Progress:
[==================================================] 100%

File download complete
Time elapsed during download operation: 00:00:00.025

RUNNING Program ...
PartID: :0x06
Start operation done successfully at partition 0x06
Partition 0x07 skipped
Error: Parition 0x7 not found in TSV File

Error: TSV flashing service failed

I look forward to your assistance. Many thanks.
 

Best regards,

John Lee

Nicolas L
ST Employee
July 28, 2026

Hi


Sorry I missed your last message. For the problem with the generate_starter script, you have also to apply a correction on the layoutsetup script (see attached the patch in ZIP file). It corrects the error you mentioned.


For the other solution to flash, it seems that there is a misunderstanding on the method. You don’t have to execute CtrlC in any case. I remind the procedure :

Prerequisite : open console on CA35 (as your performed) and connect the USB cable also on USB DRD connector.

Step1: start in DFU (boot switch to 0000)

Step2 : execute flash-device script

Step3 : when message “Change boot mode from DFU to normal boot (emmc), and select fastboot” appears, switch in CM33-emmc (boot switch to 0001), then reset

Step4: Press immediately after the reset to USER2 button (see on the console, you should have u-boot started then fastboot started). If USER2 is not detected, you can then break in U-Boot console and execute the 


I also think that it’s better if you update the STM32CubeProgrammer installed in your environment to the last version (2.22) (I remind an issue with older than 2.19).


Regards

Nicolas

John LeeAuthor
Associate
August 4, 2026

Dear Nicolas,
 

I have successfully generated the starter package using source generate_starter. The output is located at:

out-starter/eval/st-android-16.0.0-2026-xx-xx-stm32mp257f-ev1-emmc-starter/

When I tried to flash the images with the original TSV file using:

STM32_Programmer_CLI -c port=usb1 -w flashlayout/FlashLayout_emmc_cm33tdcid.tsv

I encountered an error (please see log below for details).

Opening and parsing file: m33ddr.img


Memory Programming ...
File : m33ddr.img
Size : 128.00 KB
Partition ID : 0x06

Download in Progress:
[==================================================] 100%

File download complete
Time elapsed during download operation: 00:00:00.025

RUNNING Program ...
PartID: :0x06
Start operation done successfully at partition 0x06
Partition 0x07 skipped
Error: Parition 0x7 not found in TSV File

Error: TSV flashing service failed
Opening and parsing file: m33fw.img


Memory Programming ...
File : m33fw.img
Size : 2.50 MB
Partition ID : 0x08

Download in Progress:
[==================================================] 100%

File download complete
Time elapsed during download operation: 00:00:00.419

RUNNING Program ...
PartID: :0x08
Start operation done successfully at partition 0x08
Partition 0x09 skipped
Error: Parition 0x9 not found in TSV File

Error: TSV flashing service failed

To work around this, I modified the TSV file: for partition 0x07 (m33ddr-b) I changed the Opt column from P to PE, and did the same for partition 0x09 (m33fw-b). After saving the modified file as FlashLayout_emmc_cm33tdcid_pp.tsv, the flashing completed successfully:

STM32_Programmer_CLI -c port=usb1 -w flashlayout/FlashLayout_emmc_cm33tdcid_pp.tsv


However, after switching to CM33‑eMMC boot mode, the board still fails to boot properly. The serial console output shows errors:

�INF] Reset reason: Pin reset from NRST (0x14)
[INF] init:pmic@33 STPMIC:21 V1.1

[INF] welcome to MCUboot: TF-Mv2.1.3-4-g0a94de886
[INF] cpu: STM32MP257FAI Rev.Y
[INF] board: stm32mp257f eval1
[INF] dts: stm32mp257f-ev1-cm33tdcid-ostl-emmc-bl2.dts
[INF] boot device: sdmmc2
[INF] mcu sysclk: 400000000
[INF] Loading gpt header

[INF] Starting bootloader
[WRN] This device was provisioned with dummy keys.

[WRN] This device is NOT SECURE

[INF] NV_MM_COUNTER_INIT: counters are initialized.

[INF] PSA Crypto init done, sig_type: EC-P256
[INF] Primary slot: version=0.1.0+0
[INF] Image 1 Secondary slot: Image not found
[INF] Image 1 RAM loading to 0xe060000 is succeeded.
[INF] Image 1 loaded from the primary slot
[INF] BL2: image 1, enable DDR-FW
[INF] Primary slot: version=2.1.3+0
[INF] Image 0 Secondary slot: Image not found
[INF] Image 0 RAM loading to 0x80000000 is succeeded.
[INF] Image 0 loaded from the primary slot
[INF] Bootloader chainload address offset: 0x180000
[INF] Jumping to the first image slot
[INF] init:pmic@33 STPMIC:21 V1.1
[INF] welcome to TF-M: TF-Mv2.1.3-4-g0a94de886
[INF] board: stm32mp257f eval1
[INF] dts: stm32mp257f-ev1-cm33tdcid-ostl-emmc-s.dts
Booting TF-M v2.1.3+0a94de886
[WAR] This device was provisioned with dummy keys.
[WAR] This device is NOT SECURE
[Sec Thread] Secure image initializing!
INFO: low power firmware "v1.0.0"
[ 0.000000] SCP-firmware v2.13.0-stm32mp-r3-1-gb77869ed
[ 0.000000]
[ 0.000000] [FWK] Module initialization complete!
Creating an empty ITS flash layout.
Creating an empty PS flash layout.
Partition initialization FAILED in 0x8000240d
FATAL ERROR: UsageFault
Here is some context for the exception:
EXC_RETURN (LR): 0xFFFFFFFD
Exception came from secure FW in thread mode.
xPSR: 0x00000006
MSP: 0x80281800
PSP: 0x802A4F50
MSP_NS: 0x80387900
PSP_NS: 0xFFFFFFFC
Exception frame at: 0x802A4F50
(Note that the exception frame may be corrupted for this type of error.)
R0: 0x00000008
R1: 0x802A4F70
R2: 0x802A4FC8
R3: 0x8000993C
R12: 0x802A4F64
LR: 0x80035A8F
PC: 0x8000993C
xPSR: 0x00000000
Callee saved register state: R4: 0x00000008
R5: 0x802A5220
R6: 0x800268F9
R7: 0x802A5210
R8: 0x800345B5
R9: 0x802A52D0
R10: 0x00000002
R11: 0x00000000
CFSR: 0x00020000
BFSR: 0x00000000
BFAR: Not Valid
MMFSR: 0x00000000
MMFAR: Not Valid
UFSR: 0x00000002
HFSR: 0x00000000
SFSR: 0x00000000
SFAR: Not Valid
[ERR] BACKTRACE: START: tfm_core_panic
[ERR] 0: 0x8003461c
[ERR] 1: 0x80011152
[ERR] 2: 0x800262ee
[ERR] BACKTRACE: END: tfm_core_panic
[INF] System reset
�INF] Reset reason: System reset (SYSRST) (0x94)
[INF] init:pmic@33 STPMIC:21 V1.1

[INF] welcome to MCUboot: TF-Mv2.1.3-4-g0a94de886
[INF] cpu: STM32MP257FAI Rev.Y
[INF] board: stm32mp257f eval1
[INF] dts: stm32mp257f-ev1-cm33tdcid-ostl-emmc-bl2.dts
[INF] boot device: sdmmc2
[INF] mcu sysclk: 400000000
[INF] Loading gpt header

[INF] Starting bootloader
[WRN] This device was provisioned with dummy keys.

[WRN] This device is NOT SECURE

[INF] PSA Crypto init done, sig_type: EC-P256
[INF] Primary slot: version=0.1.0+0
[INF] Image 1 Secondary slot: Image not found
[INF] Image 1 RAM loading to 0xe060000 is succeeded.
[INF] Image 1 loaded from the primary slot
[INF] BL2: image 1, enable DDR-FW
[INF] Primary slot: version=2.1.3+0
[INF] Image 0 Secondary slot: Image not found
[INF] Image 0 RAM loading to 0x80000000 is succeeded.
[INF] Image 0 loaded from the primary slot
[INF] Bootloader chainload address offset: 0x180000
[INF] Jumping to the first image slot
[INF] init:pmic@33 STPMIC:21 V1.1
[INF] welcome to TF-M: TF-Mv2.1.3-4-g0a94de886
[INF] board: stm32mp257f eval1
[INF] dts: stm32mp257f-ev1-cm33tdcid-ostl-emmc-s.dts
Booting TF-M v2.1.3+0a94de886
[WAR] This device was provisioned with dummy keys.
[WAR] This device is NOT SECURE
[Sec Thread] Secure image initializing!
INFO: low power firmware "v1.0.0"
[ 0.000000] SCP-firmware v2.13.0-stm32mp-r3-1-gb77869ed
[ 0.000000]
[ 0.000000] [FWK] Module initialization complete!
Creating an empty PS flash layout.
Partition initialization FAILED in 0x8000240d
FATAL ERROR: UsageFault
Here is some context for the exception:
EXC_RETURN (LR): 0xFFFFFFFD
Exception came from secure FW in thread mode.
xPSR: 0x00000006
MSP: 0x80281800
PSP: 0x802A4F50
MSP_NS: 0x80387900
PSP_NS: 0xFFFFFFFC
Exception frame at: 0x802A4F50
(Note that the exception frame may be corrupted for this type of error.)
R0: 0x00000008
R1: 0x802A4F70
R2: 0x802A4FC8
R3: 0x8000993C
R12: 0x802A4F64
LR: 0x80035A8F
PC: 0x8000993C
xPSR: 0x00000000
Callee saved register state: R4: 0x00000008
R5: 0x802A5220
R6: 0x800268F9
R7: 0x802A5210
R8: 0x800345B5
R9: 0x802A52D0
R10: 0x00000002
R11: 0x00000000
CFSR: 0x00020000
BFSR: 0x00000000
BFAR: Not Valid
MMFSR: 0x00000000
MMFAR: Not Valid
UFSR: 0x00000002
HFSR: 0x00000000
SFSR: 0x00000000
SFAR: Not Valid
[ERR] BACKTRACE: START: tfm_core_panic
[ERR] 0: 0x8003461c
[ERR] 1: 0x80011152
[ERR] 2: 0x800262ee
[ERR] BACKTRACE: END: tfm_core_panic
[INF] System reset
�INF] Reset reason: System reset (SYSRST) (0x94)
[INF] init:pmic@33 STPMIC:21 V1.1

Could you please advise what might be causing this boot failure and how to resolve it?
Thank you for your support.

Best regards,
John 

Nicolas L
ST Employee
August 4, 2026

Hi


Did you upgrade your STM32CubeProgrammer as I suggested. I think that you have to use a more recent version.

I recommend to use the last version of STM32CubeProgrammer (2.22). I remind an issue with older than 2.19.


Regards

Nicolas

John LeeAuthor
Associate
August 4, 2026

Hi Nicolas,

Yes, I have already upgraded to STM32CubeProgrammer version 2.22​ before performing the operations I described in my previous email.

Regards,
John

Nicolas L
ST Employee
August 4, 2026

Hi
 

I have some doubt on your board customization. As far as I understood the TF-M is booting from eMMC but SPI-NOR remains used as Protected Storage (PS). It seems that you have a problem initializing this Protected Storage. The Internal Trusted Storage (ITS) is in the BKPSRAM (dedicated to TF-M).


Regards

Nicolas

John LeeAuthor
Associate
August 5, 2026

Hi Nicolas,

Thank you for the insight. You are correct - my custom board 
situation is:

1. Is there a SPI-NOR Flash on my board? 
    No, there is no SPI-NOR Flash on my current board. It might be added in a future revision.
   
2. If NO SPI-NOR, how should I configure TF-M to use BKPSRAM 
   for PS (like ITS does)? Which files need to be modified?
   
3. Alternatively, can I simply disable PS service for this 
   prototype bring-up? What changes are needed in device-tree 
   or TF-M config?

Could you guide me on the minimal changes needed to get my 
board booting? I'm open to either:
a) Redirecting PS to BKPSRAM, or
b) Disabling PS service temporarily for bring-up.

Best regards,
John

Nicolas L
ST Employee
August 5, 2026

Hi


I suggest you to try disabling the PS in TF-M. For that you have :

  1. Switch to the latest git version in device/stm/stm32mp2-system directory (an errata has been published for that purpose, ensure executing “git fetch”)
  2. Execute the script : load_system
  3. Change the build script device/stm/stm32mp2-system/source/build_tfm.sh adding the following line in the function extract_buildconfig tfm_cmake+="-DTFM_PARTITION_PROTECTED_STORAGE=OFF "
  4. Rebuild TF-M : build_system -i
  5. Rebuild your distribution and reflash

I’m not completely aware of the potential impacts on security features but I expect that you can boot with this configuration. Normally the Android Trusty OS used is based on RPMB for its secure storage and may be not required the SPI-NOR Protected Storage within TF-M.


Regards

Nicolas