NAmam.2
Associate II
August 23, 2024
Solved

UART Booatloader for STM32F469I-DISCO

  • August 23, 2024
  • 8 replies
  • 1963 views

Hi,


I would like to test out the UART bootloader functionality for the demo board STM32F469I-DISCO.


I am using reference documents AN2606 and Demo board schematic. I am assuming  I need to follow below steps to achieve this.

Please let me know if I am missing any.


Step1: Load a regular software (some LED Blink) , then have the software to set the bit BFB2 when the user ready for bootload.


Step2: try to achieve pattern3 first line item of Table2 from the App note AN2606 .


  1.     a) Remove SB15 on the demo board, Stuff R150 with 1K to achive High condition of Boot0.


  1.     b) Set PB2 (Boot1) to high by adding pullup resistor


Step3: use STM32 Cube programmer to load ne bin file over the Virtual COM Port U3 (STLINK_V2) . It uses PB10 and PB11 (  MICRO UART3 connections PB10 TX,PB11 RX).


      Note: The micro PB10 is disconnected on the board to STLK_RX , make sure the connection is restored.


I look forward to your reply.

Best Regards,

Naga Amam.

 

This topic has been closed for replies.
Best answer by mƎALLEm

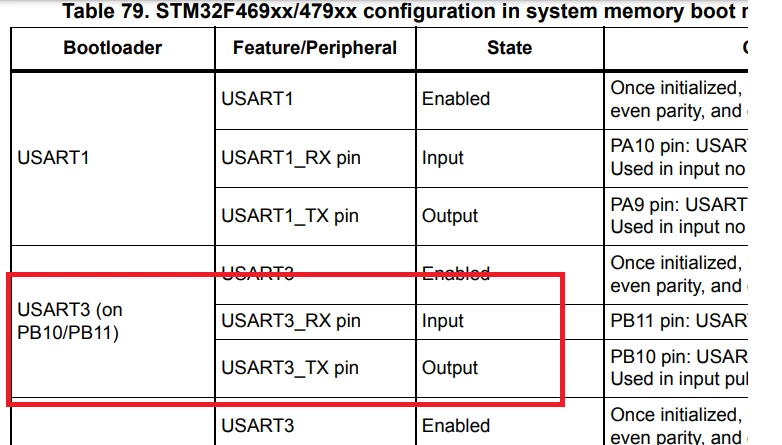
In your case you are using UART3/PB10/PB11 which is correct according to the AN2606:

SofLit_0-1724425597059.png

You need simply to check the board's schematics: the UART3 connections + BOOT pin.

Programming step: Boot0 pin needs to be tied to VDD and reset the MCU then connect to the MCU with STM32CubeProgrammer.

Running user program step: Boot0 pin needs to be tied again to GND and reset the MCU. So your program will be running.

This is basically what you need to do.

Hope it helps.

8 replies

mƎALLEm
ST Technical Moderator
August 23, 2024

Hello, 

Did you already test the bootloader over UART on that board and you faced an issue or what?

You need to take care about Boot0 pin level (need to be connected to VDD):

SofLit_0-1724424964094.png

Then reset the board, to let the MCU jumps to the system bootloader.


To give better visibility on the answered topics, please click "Best answer" on the reply which solved your issue or answered your question.
NAmam.2
NAmam.2Author
Associate II
August 23, 2024

Hi,

I am new to this; I just want to make sure I am on right track before I make all these changes on board .

Also I would like to know if there any easy ways to test out UART bootloader with/without any changes.

Thank you,

Naga.

mƎALLEm
mƎALLEmBest answer
ST Technical Moderator
August 23, 2024

In your case you are using UART3/PB10/PB11 which is correct according to the AN2606:

SofLit_0-1724425597059.png

You need simply to check the board's schematics: the UART3 connections + BOOT pin.

Programming step: Boot0 pin needs to be tied to VDD and reset the MCU then connect to the MCU with STM32CubeProgrammer.

Running user program step: Boot0 pin needs to be tied again to GND and reset the MCU. So your program will be running.

This is basically what you need to do.

Hope it helps.

To give better visibility on the answered topics, please click "Best answer" on the reply which solved your issue or answered your question.
TDK
August 23, 2024

Do either Step 1 or Step 2, you do not need both.


Alternatively, program a simple program which always jumps to the bootloader on startup. See here for how to do so:

How to jump to system bootloader from application ... - STMicroelectronics Community

After that, your step 3 will work. No hardware modification needed.

"If you feel a post has answered your question, please click ""Accept as Solution""."
NAmam.2
NAmam.2Author
Associate II
August 23, 2024

That is interesting, you said just do Step 1 and Step2 is not required, Could you please tell me which pattern on Table2 satisfies this condition? I look forward to your reply.

MM..1
Super User
August 23, 2024

You make more miss here

MM1_0-1724429475618.png

Only Pattern 5 is valid for 469, and pattern is for boot jumps. Other way is jump to bootloader code from your app, but this work only from your code. If you for example erase flash = next boot require pattern...