Takayoshi Ishii
Associate III
June 8, 2017
Solved

System Workbench Installing Error

  • June 8, 2017
  • 3 replies
  • 904 views
Posted on June 08, 2017 at 10:19

I installed JAVA8_131 and downloaded System Work Bench v2.0, but I couldn't install it.

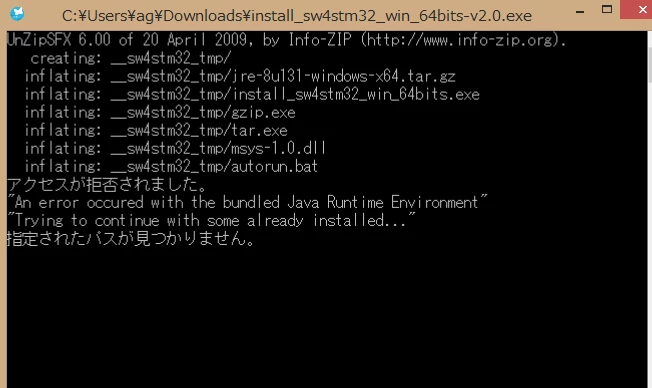
After i run the install exe, a window showed but it said,

...

''The access denied''

''An error occured with the bundled Japa Runtime Enviroment''

''Trying to continue with some already installed...''

 ''The specified path can not be found.''

as like following screen shot.

I tried it as x86 and x64 both. My PC is Win8.1. I have made Android phone program on the PC, so I think Java is OK.

I have no idea where folder the installer looks to, and no idea what file I need.

Let me know what should I do.

Thank you.

0690X00000607FgQAI.png
    This topic has been closed for replies.
    Best answer by Takayoshi Ishii
    Posted on June 16, 2017 at 05:58

    Julien,

    Thank you for your reply. It works!

    First, I copied the exe file just under the C:, and run it. But the folder __sw4stm32_tmp disappears after it appears for a moment. Then I copied all the files in the folder at the moment, and paste it. This time it doesn't disappear and I could run the installer.

    I spent 3 days just install the environment, finally I can develop STM32.

    Thank you very much!

    3 replies

    Julien D
    ST Employee
    June 9, 2017
    Posted on June 09, 2017 at 10:05

    The pre-processing embedded within the

    System Workbench

     installer is probably failing because of Japanese (?) characters. The self-extracting archive does its job, e.g extract all stuff (JRE + installer) into a temporary folder, and successfully delegate the next step to the autorun.bat which fails with paths resolution.

    Considering that Java is already available on your system, there are 2 different ways to solve this installation issue :

    1. While the attached prompt is opened you should have the possibility to access to the temporary folder.

      Here it should be

      C:\Users\ag\Downloads\__sw4stm32_tmp\

      .

      Then, just try to execute

      install_sw4stm32_win_64bits.exe

      .
    2. Download Neon.3 from Eclipse.org (

      https://www.eclipse.org/downloads/packages/eclipse-ide-cc-developers/neon3

      ) and follow the Installation section of 

      http://www.openstm32.org/Installing+System+Workbench+for+STM32+from+Eclipse?structure=Documentation

    Hope this help.

    To give better visibility on the answered topics, please click on Accept as Solution on the reply which solved your issue or answered your question.
    Takayoshi Ishii
    Takayoshi IshiiAuthorBest answer
    Associate III
    June 16, 2017
    Posted on June 16, 2017 at 05:58

    Julien,

    Thank you for your reply. It works!

    First, I copied the exe file just under the C:, and run it. But the folder __sw4stm32_tmp disappears after it appears for a moment. Then I copied all the files in the folder at the moment, and paste it. This time it doesn't disappear and I could run the installer.

    I spent 3 days just install the environment, finally I can develop STM32.

    Thank you very much!

    Julien D
    ST Employee
    June 16, 2017
    Posted on June 16, 2017 at 09:16

    Apologize for that waste of time.

    The 2nd solution would probably be more efficient in term of SW installation time. But just note that in this case you have to install the ST-Link drivers (from

    http://www.st.com/en/development-tools/st-link-v2.html

    ) manually if they are not already installed. 

    Best regards.

    To give better visibility on the answered topics, please click on Accept as Solution on the reply which solved your issue or answered your question.