


How to port a STM32CubeMX application to SBSFU
Summary
This article provides a step-by-step guide for porting STM32CubeMX generated project to SBSFU covering project configuration, memory mapping, hardware adaptation, and advanced debugging techniques.
We are using the SBSFU 2_images example available in the applications directory for NUCLEO-L476RG. However, the guide should work on any SBSFU example and STM32 target.
This article is not a getting-started guide for SBSFU. The user is expected to be familiar with SBSFU. For more information, refer to the related links section for additional SBSFU resources.
Introduction
X-CUBE-SBSFU is a security framework that provides these features
- Secure bootloader module
- Secure firmware update module
- Secure engine module. It manages secure services.
- Key management service module (L4, WL).
Before we start porting the user application to SBSFU, we should create a user application.
For ease of development, we created a simple STM32CubeMX project that toggles the internal Green LED (PA5) every 1 second. It prints "Hello World" using the USART 2 connected to STLINK.
Important note: when generating the project using STM32CubeMX, make sure that “Generate under root” is enabled in the project configuration. This setting is important because it affects the generated project structure and changes the relative paths used by the project and its build scripts.
At the time of writing this article, the following system configuration was used:
- Python: v3.12.3
- STM32CubeIDE v2.2.0
- X-CUBE-SBSFU v2.8.0
- STM32CubeMX v6.18.1
- STM32CubeCTL v1.1.18
For the hardware requirements, we used the NUCLEO-L476.
1. User application configuration
We are using the 2_images example and the NUCLEO-L476 board:
x-cube-sbsfu-v2-8-0/STM32CubeExpansion_SBSFU_V2.8.0/Projects/NUCLEO-L476RG/Applications/2_Images
- Copy the user application SBSFU_user_application to the 2_images folder.
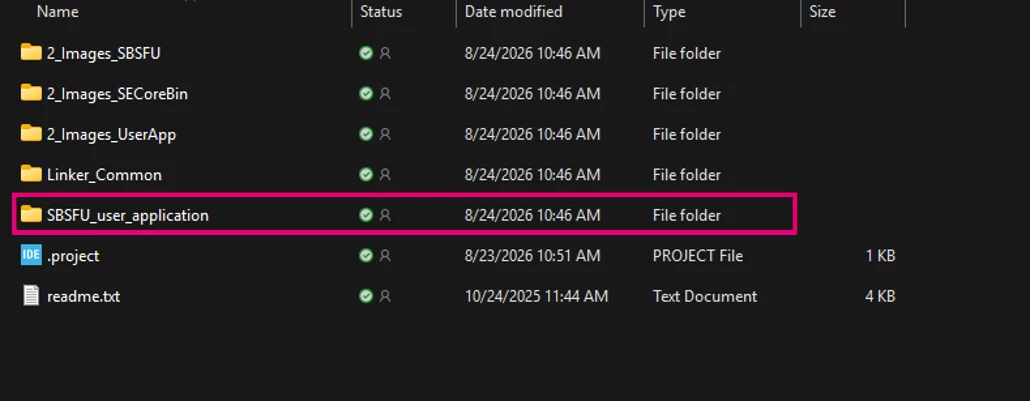
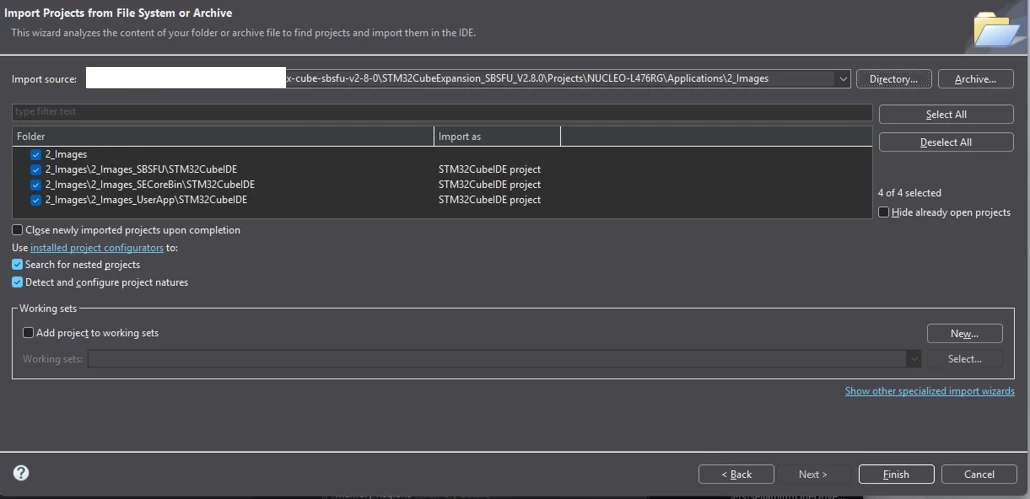
- Import the project to STM3232CubeIDE: Go to
File -> STM32 Project Create/Import -> STM32CubeMX/STM32CubeIDE Project -> Next - Copy the project path: x-cube-sbsfu-v2-8-0/STM32CubeExpansion_SBSFU_V2.8.0/Projects/NUCLEO-L476RG/Applications/2_Images
2. SBSFU general overview
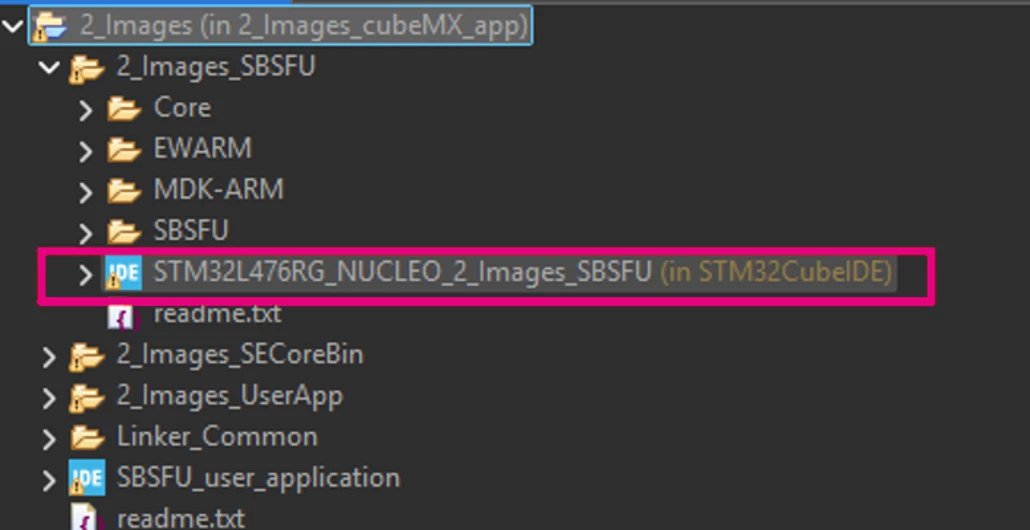
To build or flash the project, there is a specific process to follow.
Right-click on the STM32CubeIDE icon as highlighted in the image above, then select Build project:
- First, build the 2_images_SECoreBin project.
- Then, build the 2_images_SBSFU project.
- Flash the SBSFU.elf file using STM32CubeIDE.
- Build the user application. This generates a UserApp.sfb file under 2_images_UserApp/Binary.
- Then, using Tera Term, upload the user application to the device.
To build or flash the project, click on the STM32CubeIDE project highlighted by the red rectangle in the image before performing the corresponding step.
For ease of development, configure SBSFU to disable all security features initially, and enable them later once the basic functionality has been validated. To do so, go to 2_images_SBSFU/APP/app_sfu.h and uncomment the following line:
#define SECBOOT_DISABLE_SECURITYSBSFU requires installing Python packages on the system, go to:
x-cube-sbsfu-v2-8-0/STM32CubeExpansion_SBSFU_V2.8.0/Middlewares/ST/STM32_Secure_Engine/Utilities/KeysAndImages
In PowerShell, run:
pip3 install -r requirements.txt.3. User application compiler configuration
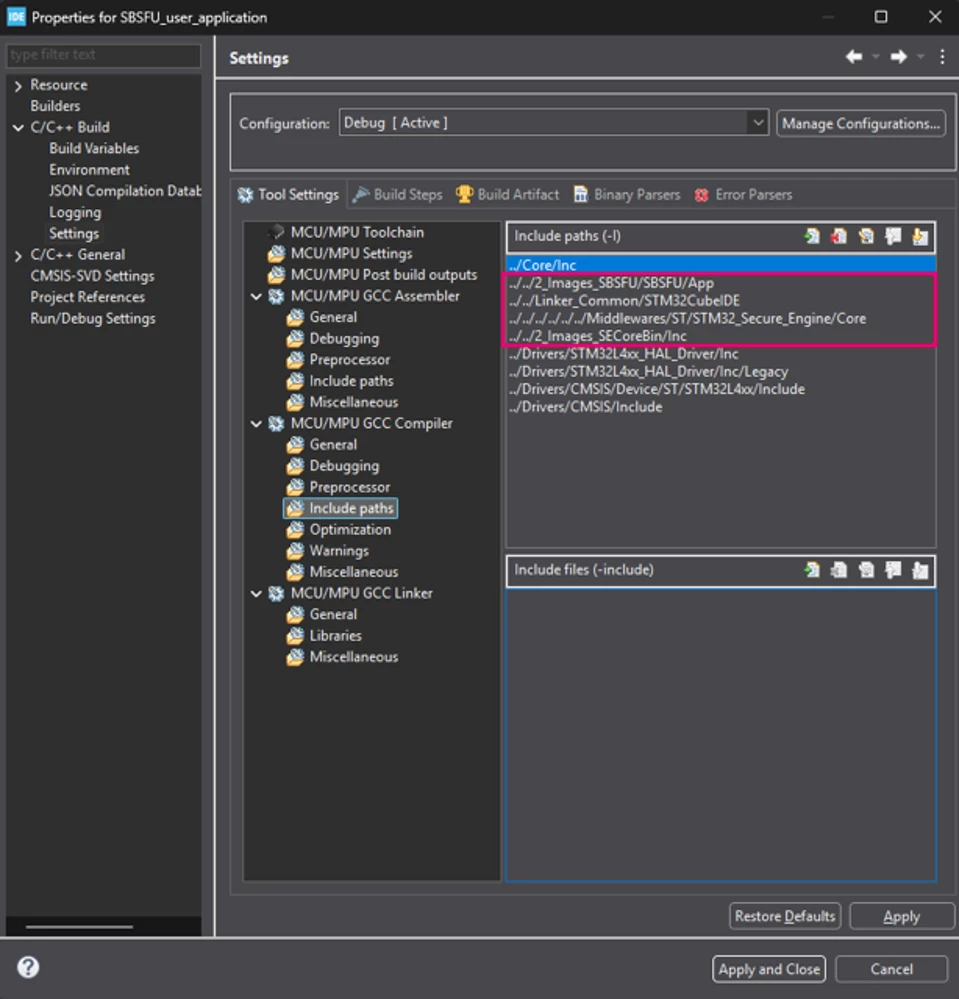
- We need to configure the include-paths for the SBSFU_user_application, go to properties ->C/C++ build -> settings -> MCU GCC compiler -> include paths and add these paths:
- ../../../2_Images_SBSFU/SBSFU/App
- ../../../Linker_Common/STM32CubeIDE
- ../../../2_Images_SECoreBin/Inc
- ../../../../../../../Middlewares/ST/STM32_Secure_Engine/Core
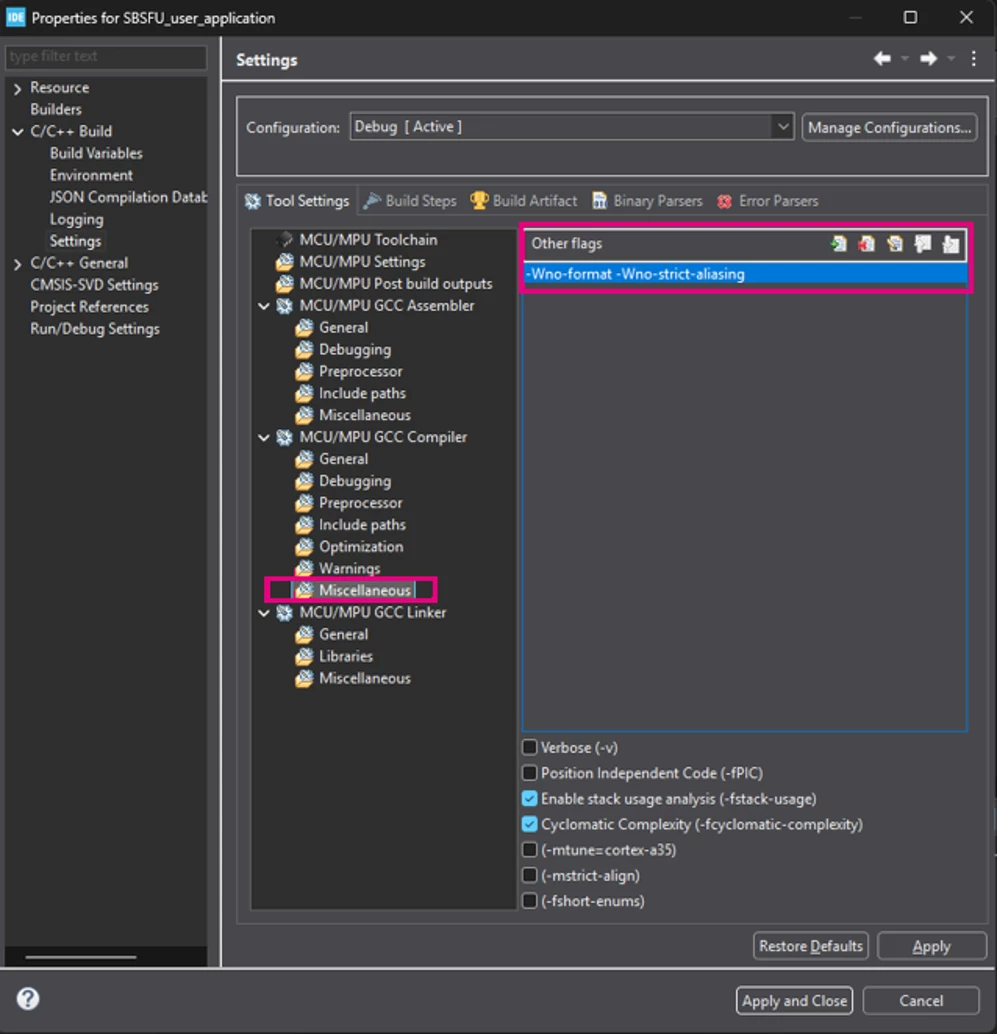
- In MCU GCC compiler -> Miscellaneous -> Other flags, add: -Wno-format -Wno-strict-aliasing
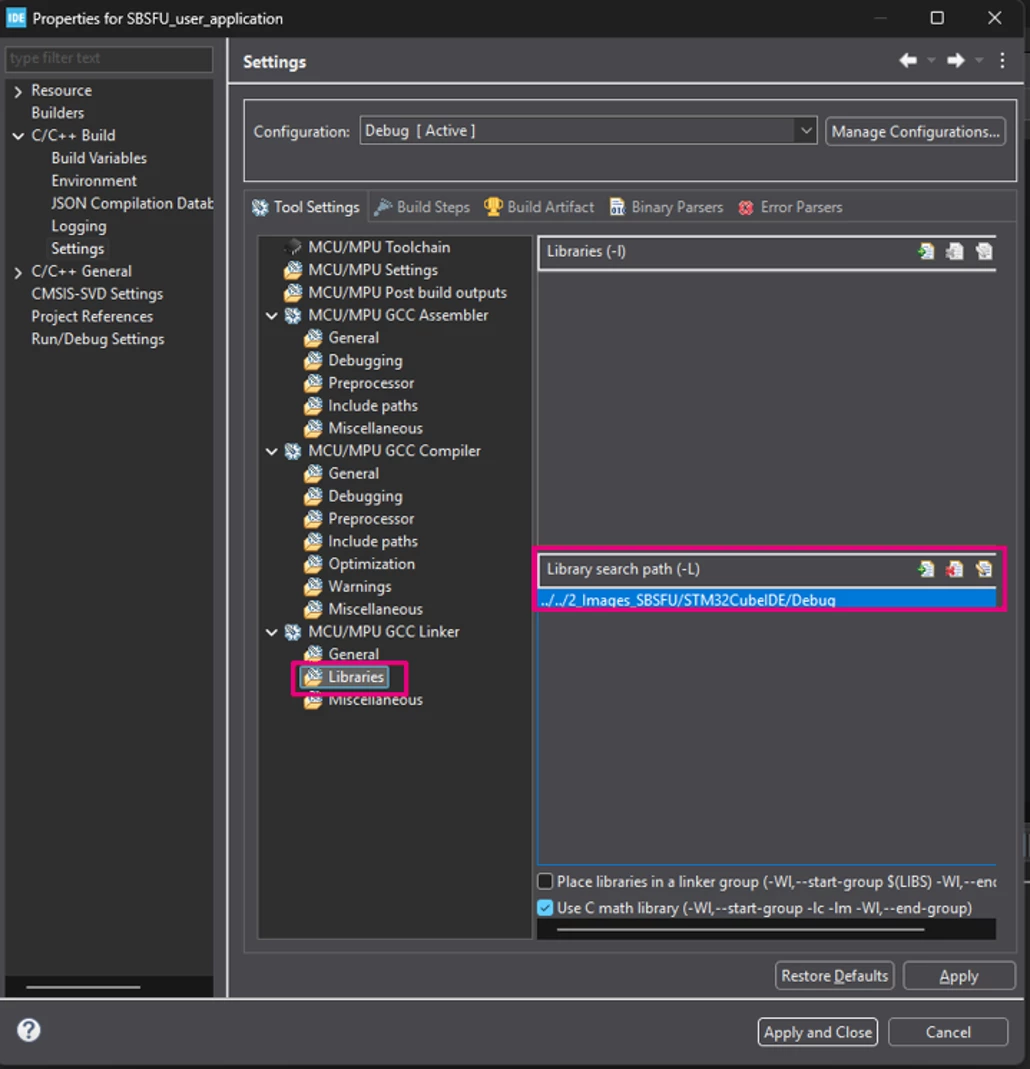
- Go to MCU GCC Linker -> library -> Library search path and add this path:
../../../2_Images_SBSFU/STM32CubeIDE/Debug
This is needed for the SBSFU to detect the secure interface linker file se_interface_app.ld generated by the postbuild.sh script.
Finally, we add a post build command to generate the .sfb file used for firmware update. In the same window while it is still open go to the Build steps tab. In the Post-Build steps area, add the following command:
arm-none-eabi-objcopy -O binary "${BuildArtifactFileBaseName}.elf" "../${BuildArtifactFileBaseName}.bin" && arm-none-eabi-size "${BuildArtifactFileName}" && "../../2_Images_SECoreBin/STM32CubeIDE/postbuild.sh" "./" "${BuildArtifactFileBaseName}.elf" "../${BuildArtifactFileBaseName}.bin" "1" "1"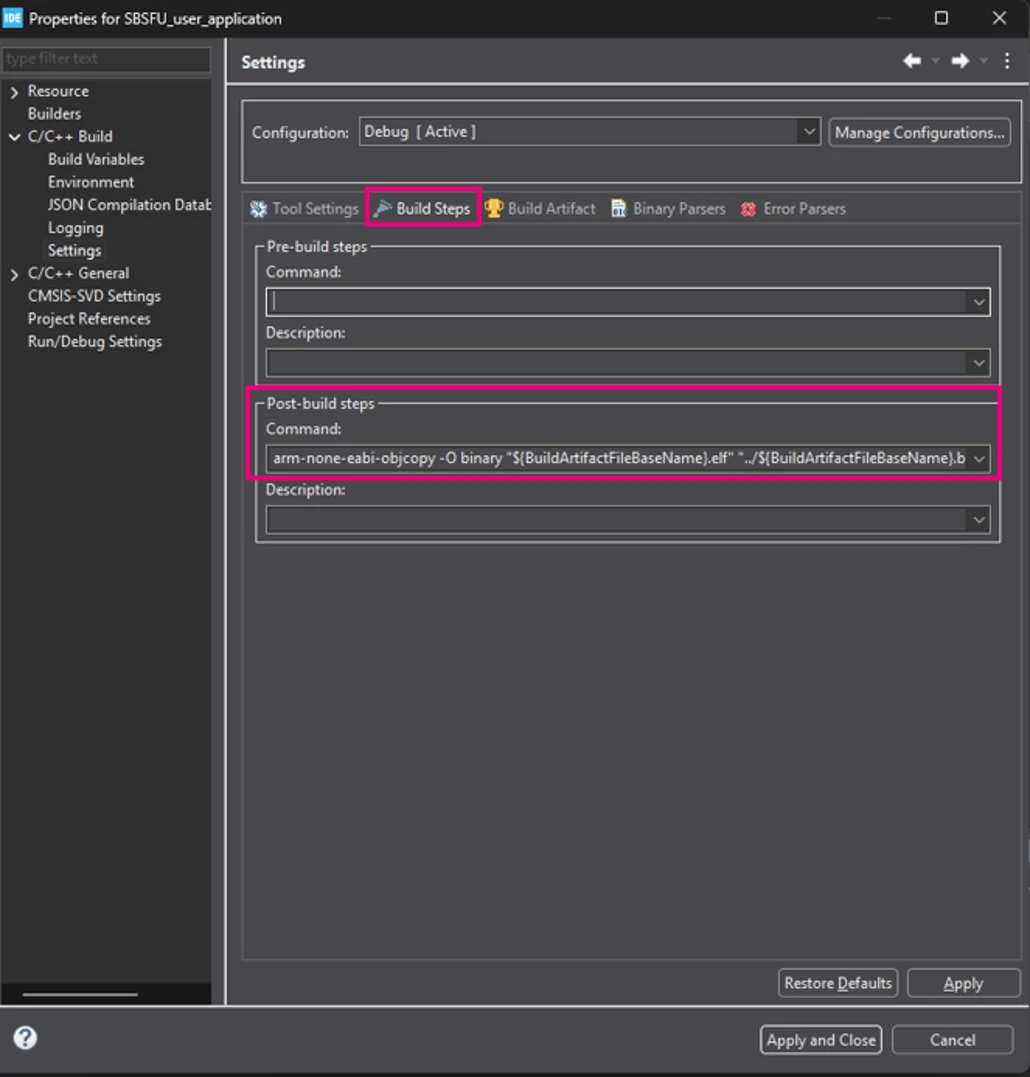
- Click apply and close.
4. Flash memory adaptation
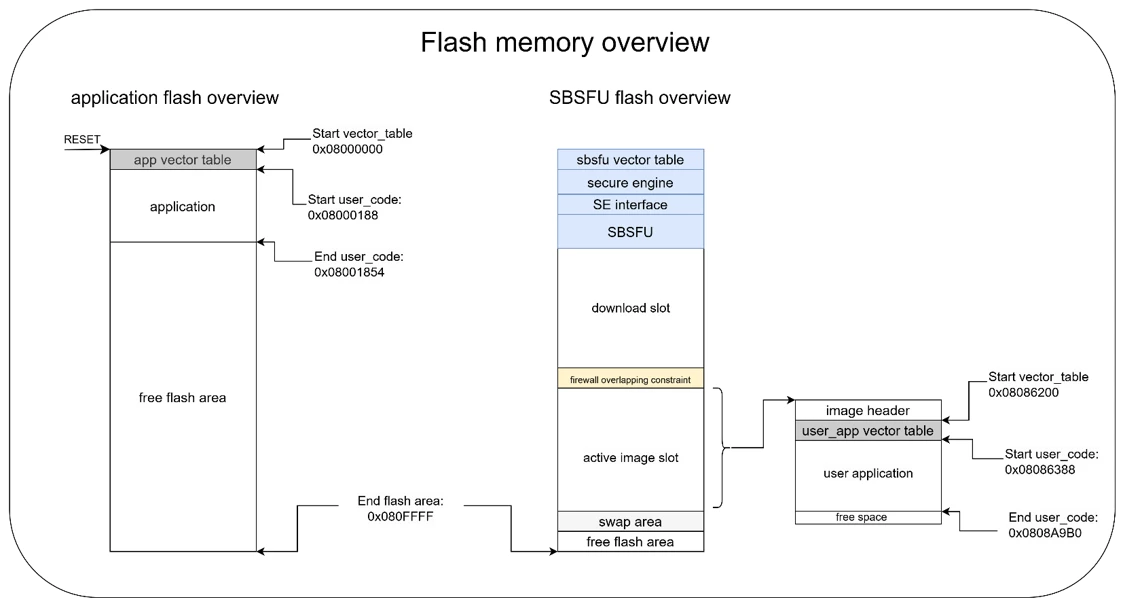
The user application must be linked to and executed from the SBSFU application slot rather than from the default 0x08000000 address. In this article, the SBSFU example application is used as a reference (2_images/UserApp).
Its linker script is used as a template. The relevant memory regions, vector table location, application sections, and RAM/stack configuration are adapted to the STM32CubeMX generated application.
We copy the content of 2_images/UserApp/STM32CubeIDE/STM32L476RGTx.ld into the linker script of the STM32CubeMX generated application.
5. User application software configuration
When generating the application using STM32CubeMX, it is recommended to enable IWDG, because the SBSFU bootloader configures it. It must then be refreshed periodically in the main loop, or it may be possible to disable it depending on the user setup.
1. Reset the RCC/clock state at the very top of main(), before HAL_Init()
SBSFU leaves its own oscillator/PLL configuration active. Do not assume a clean slate, either run the RCC reset sequence or call HAL_RCC_DeInit() before the user application configures its own clock.
2. Set SCB->VTOR to the application’s actual vector table address
The application is no longer linked at 0x08000000; SBSFU relocates it to its active slot address. VTOR must point there, using the real symbol defined by the GCC linker script.
3. Deinitialize peripherals already used by SBSFU, especially UART
Call HAL_UART_DeInit() on the UART instance used by the bootloader before the application’s MX_USART2_UART_Init() runs. This avoids leftover NVIC, DMA, or register settings by the SBSFU bootloader affecting the user application.
4. Feed the IWDG
If the SBSFU bootloader enabled IWDG with a short timeout, the application must refresh it regularly using HAL_IWDG_Refresh() or the equivalent low-level reload sequence. Reinitializing the watchdog is not recommended once it is already running.
Remember to disable the IWDG initialization function generated by STM32CubeMX.
extern void *g_pfnVectors;
#define INTVECT_START ((uint32_t)&g_pfnVectors)

int main(void)
{
  /* Configure the vector table location */
  SCB->VTOR = INTVECT_START;

  HAL_Init();

  /* User initialization */
  HAL_RCC_DeInit();
  HAL_UART_DeInit(&huart2);

  // User code here
while(1){
/* refreshing the watchdog */
WRITE_REG(IWDG->KR, IWDG_KEY_RELOAD);
}
6. Testing the user application
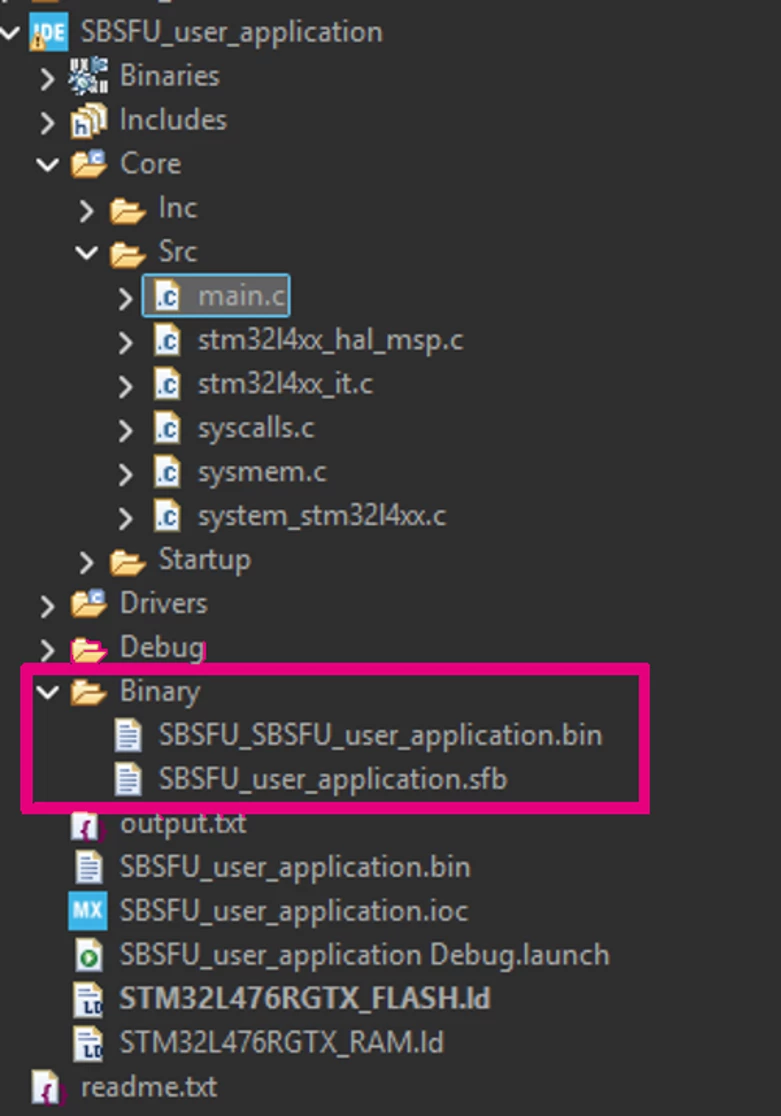
- Build the SBSFU_user_application
The build process generates SBSFU_user_application.sfb under SBSFU_user_application/Binary directory.
- Flash the Nucleo-L476 with SBSFU project
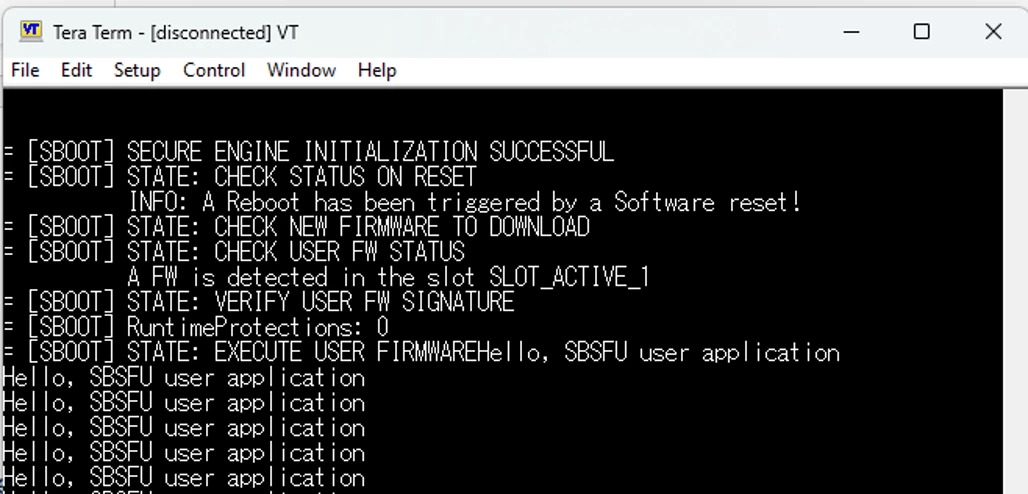
- Using Tera Term, perform the firmware update via Ymodem.
Note: when pressing the blue button on the STM32 during boot the secure bootloader will enter firmware update mode.
For more information about firmware update using TeraTerm, refer to SBSFU getting started user manual section 8.4.2 Send the first firmware.
7. Debugging the application
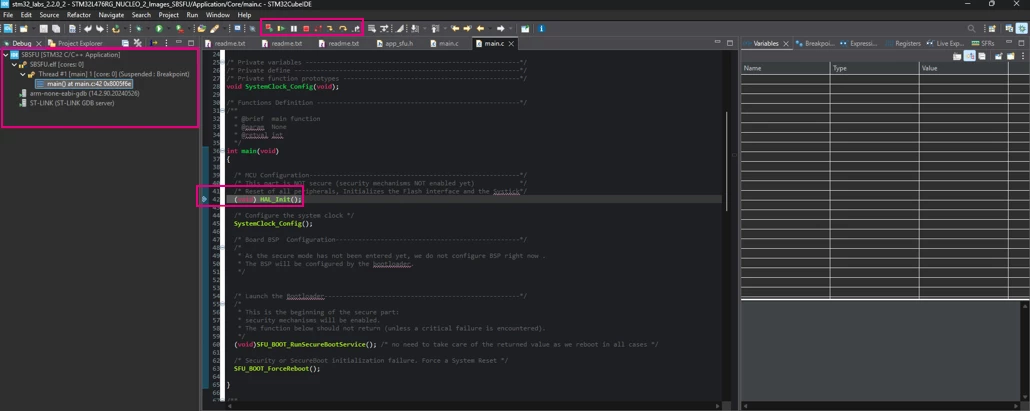
Go to 2_images_SBSFU and open the debug configuration.
- Run > Debug configurations...
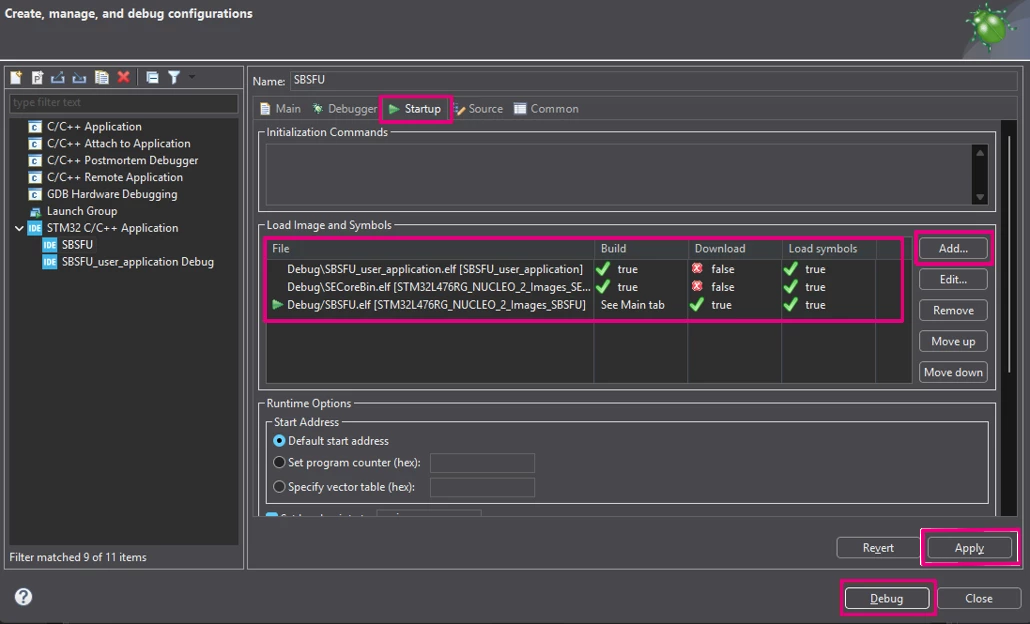
- Open the Startup tab
- Add the project, then enable Load symbols.
We load the symbols for the SBSFU_user_application and the SECoreBin. Click add and configure it as shown below:
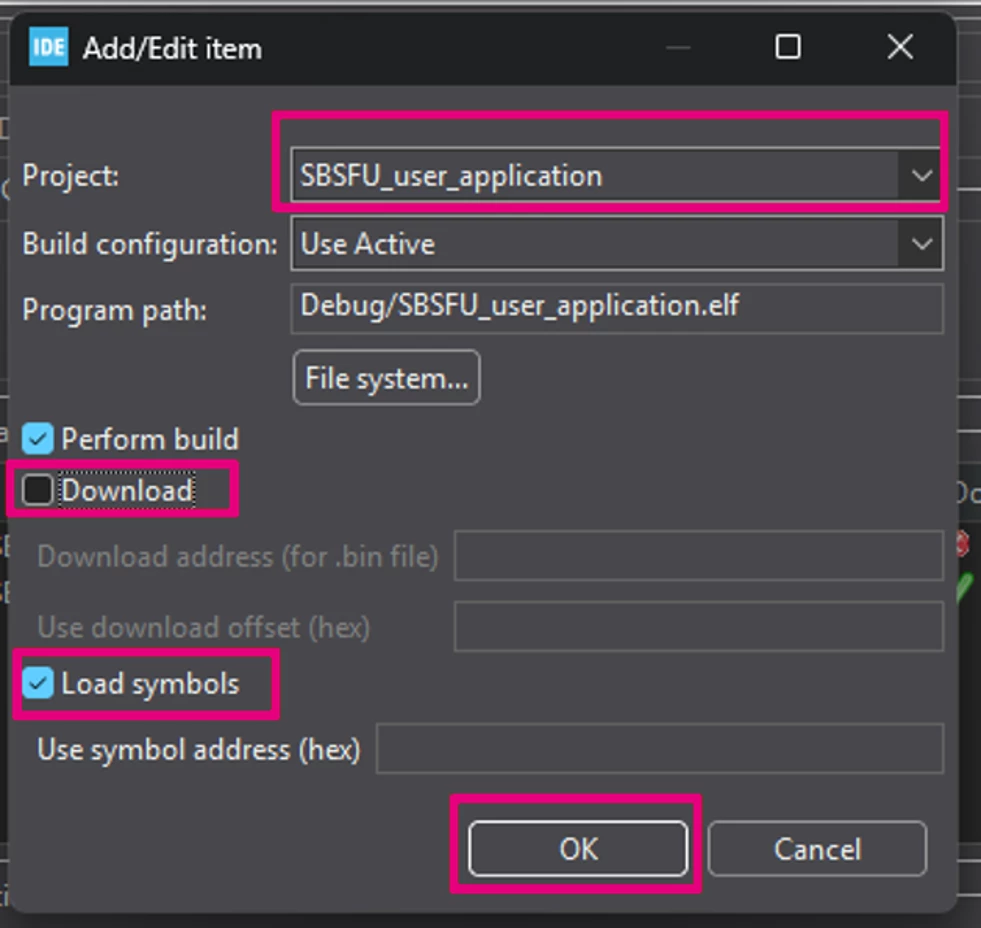
Then the configuration should look like this. We do not need to download the user image or the SECoreBin. We only need to load the symbols.
Also, it is important to configure the SBSFU project (app_sfu.h) to be in development mode.
- Deactivate all security protections: enable this config SECBOOT_DISABLE_SECURITY_IPS.
- Make sure that SFU_FINAL_SECURE_LOCK_ENABLE is disabled.
- Activate SFU_FWIMG_BLOCK_ON_ABNORMAL_ERRORS_MODE.
- Activate the SFU_VERBOSE_DEBUG_MODE and SFU_DEBUG_MODE.
- We can debug the SBSFU project.
8. Limitations
In this section we present some of the issues encountered during the development of this article and the workaround to fix them.
8.1 White space in paths
When building SBSFU projects, do not place the project, toolchain, or workspace in a path that contains spaces. The SBSFU build scripts do not support paths containing spaces.
For example:
C:\Users\name\Desktop\SBSFU project\x-cube-sbsfu-v2-8-0\
To fix this problem, remove the white space:
C:\Users\name\Desktop\SBSFU-project\x-cube-sbsfu-v2-8-0\
8.2 Update Python scripts
Depending on the Python command, system alias updates the script accordingly.

Update all the .sh scripts by changing all the python commands to py.
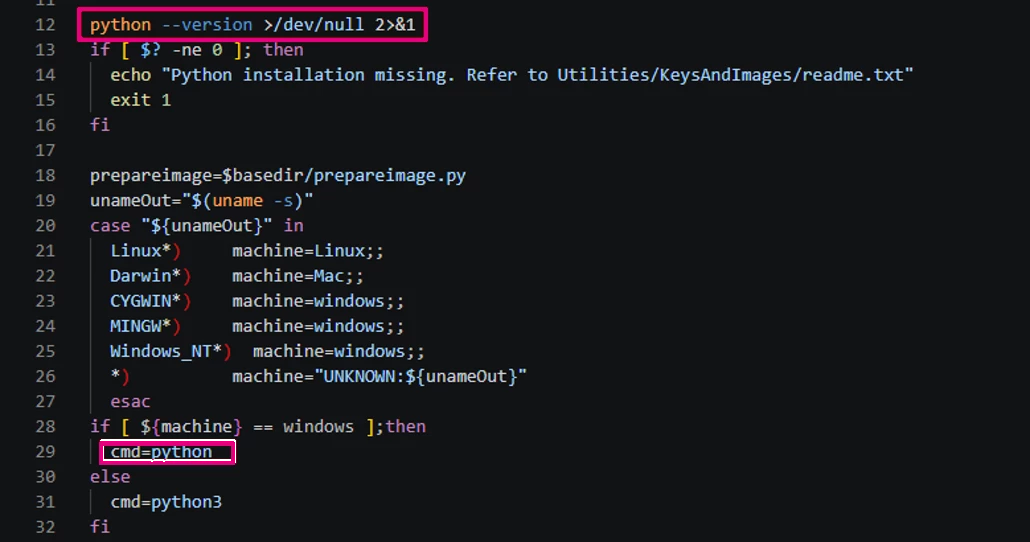
This is how it is aliased in our system. Verify the Python command used by the system.
The .sh scripts are located under 2_Images_SECoreBin/STM32CubeIDE and 2_Images_SBSFU/STM32CubeIDE.
8.3 Compilation process
A separate issue can occur when building the SECoreBin project with Arm GCC 14. In the tested environment, GCC 14.3.1 produced linker errors in the Secure Engine components, as shown in the image below.
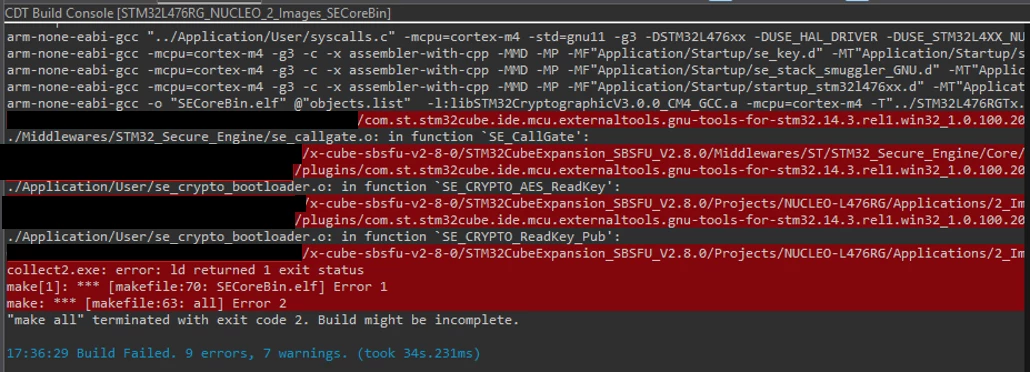
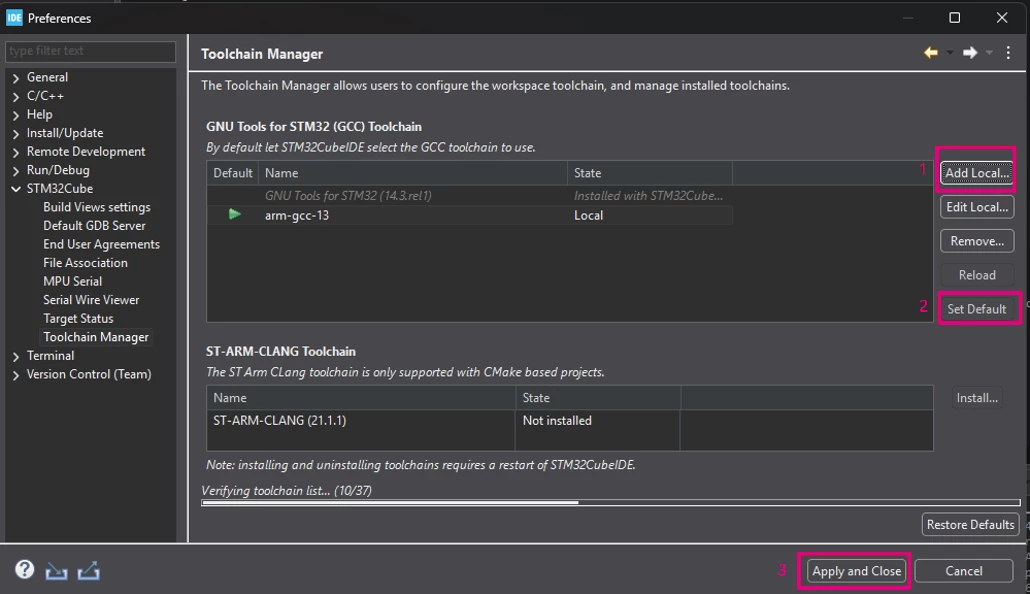
The tested workaround is to build the SBSFU project with an Arm GNU toolchain version earlier than GCC 14. We use STM32CubeCLT version 1.1.18. It provides a compatible Arm GCC 13 toolchain.
We updated the STM32CubeIDE toolchain to point to the new arm-gcc toolchain. Go to window -> preferences -> STM32Cube -> Toolcain Manager.
9. Using the attached project
To be able to use the attached project, follow these steps:
- Unzip the project.
- Copy the project directory into:
x-cube-sbsfu-v2-8-0/STM32CubeExpansion_SBSFU_V2.8.0/Projects/NUCLEO-L476RG/Applications/
- Import the project using STM32CubeIDE.
Note: When extracting the ZIP file, it creates a directory. Do not copy that directory. Copy only the root folder containing the SBSFU projects and the SBSFU_user_application.
Conclusion
In this article, we successfully ported a STM32CubeMX generated application in the SBSFU project, and we presented debugging tips when debugging the SBSFU project.
Related links
For more information about SBSFU, refer to these resources:
- User manual UM2262: Getting started with the X-CUBE-SBSFU STM32Cube Expansion Package:
- Application note AN5056: How to integrate the X-CUBE-SBSFU STM32Cube Expansion Package:
- Read the readme attached with each example.
- Follow the STM32 MOOC: Security Part 6, STM32 security ecosystem.