


How to implement a dual-instance USB host application on STM32: USB1 + USB2
Introduction
This article describes the implementation of a dual-instance host USB application on an STM32 microcontroller. The goal is to demonstrate that each USB instance operates independently and manages its own class.
This article provides a step-by-step workflow to set up, generate, and adapt the USB application. STM32CubeMX is used to generate the code with CMake and STM32CubeIDE is used to develop the application. It covers USB host core, class assignment to each instance, project generation, and integration in a STM32CubeIDE environment.
For this article, the STM32H7S78-DK board is used to implement this application. This board features an STM32H7S7L8 microcontroller, which integrates a dual-instance USB core (USB High-Speed and USB Full-Speed). For further details about the board, refer to the user manual.
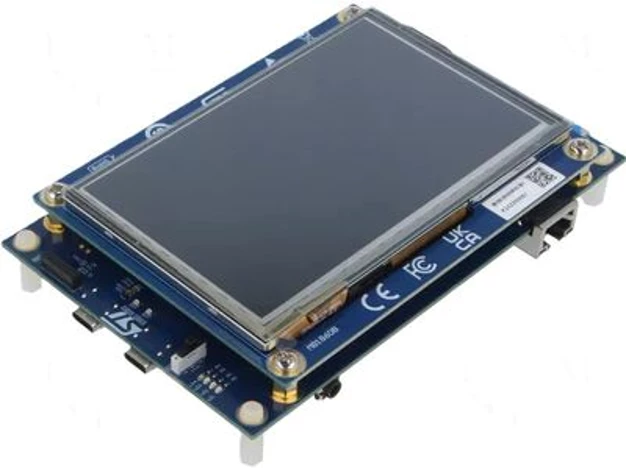
1. Project setup
Clone the project from STM32_Hotspot_GitHub or follow the steps below to set up the project.
1.1 STM32H7S78-DK overview
The STM32H7S78-DK board used in this application includes 64 KB of boot flash memory. This memory allows the system to boot from and run applications stored in external memory. In this configuration, the application is typically divided into at least two subprojects: [Boot], which manages the initial startup and external memory initialization, and [Appli], which contains the main application code executed from external memory.
1.2 STM32CubeMX configuration
Start a new project in STM32CubeMX by selecting [File] → [New Project]. Navigate to the [Board Selector] tab and choose [STM32H7S78-DK].
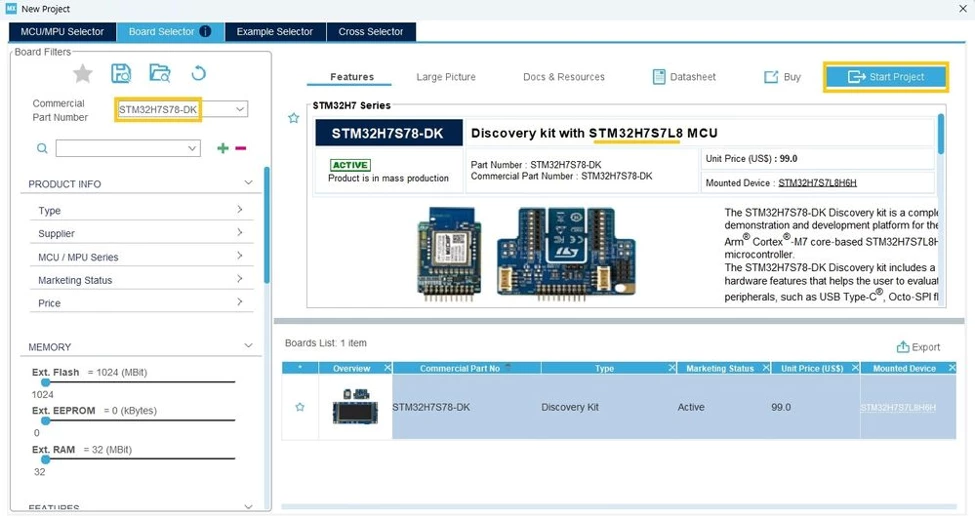
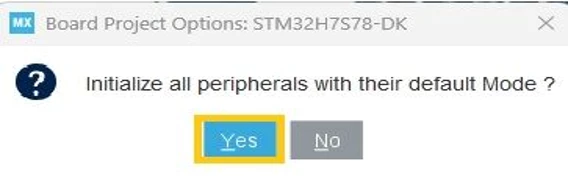
After clicking the [Start Project] button, click [Yes] in the Board Project Options dialog box.
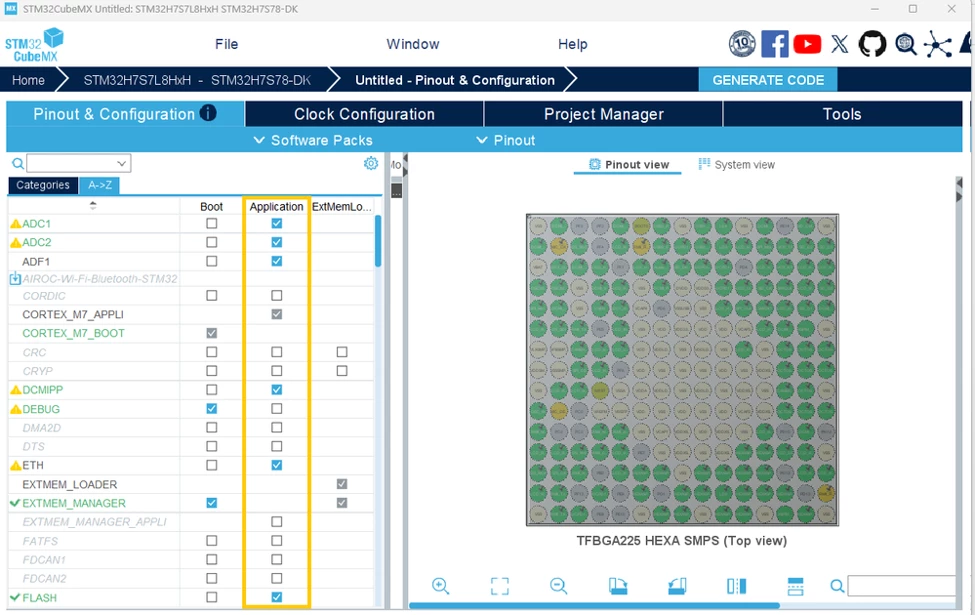
After the project is created, open the Categories view A->Z in CubeMX.
In this table, separate columns for Boot, Application, and ExternalMemoryLoader are shown.
For this tutorial, keep the Boot and ExternalMemoryLoader configuration as provided by the default CubeMX board settings. Focus on the Application configuration to set up a custom application.
First, in the Application column, manually uncheck all enabled IPs.
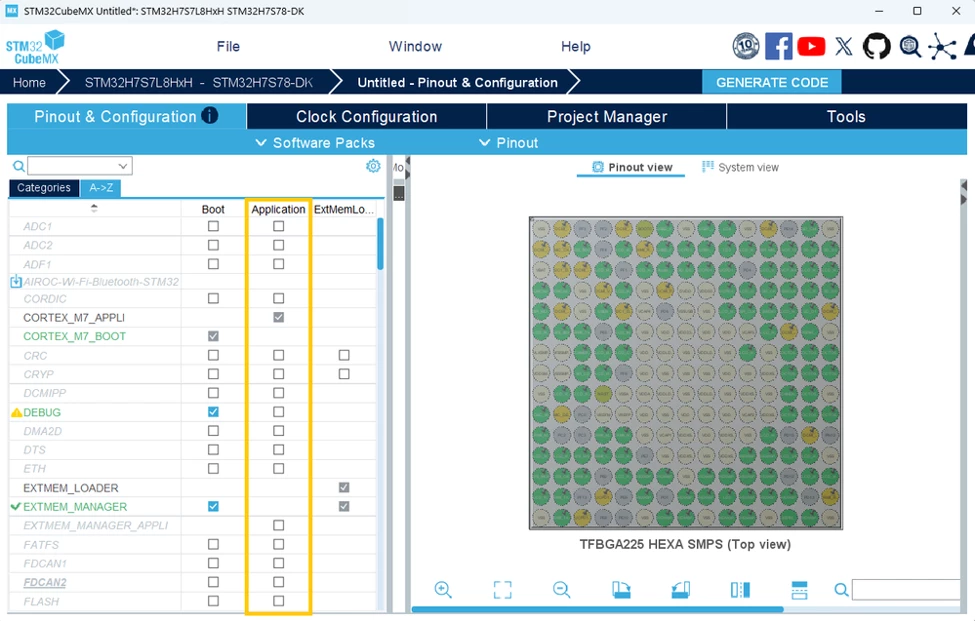
At this stage, we are ready to start enabling and configuring the IPs related to the application.
- Enable dual-instance USB
On the STM32H7S78-DK board, Two USB instance-capable interfaces are available: one USB Full-Speed (FS) instance and one USB High-Speed (HS) instance. The board layout provides separate connectors and power-routing support for each USB path, allowing the application to use both instances independently.
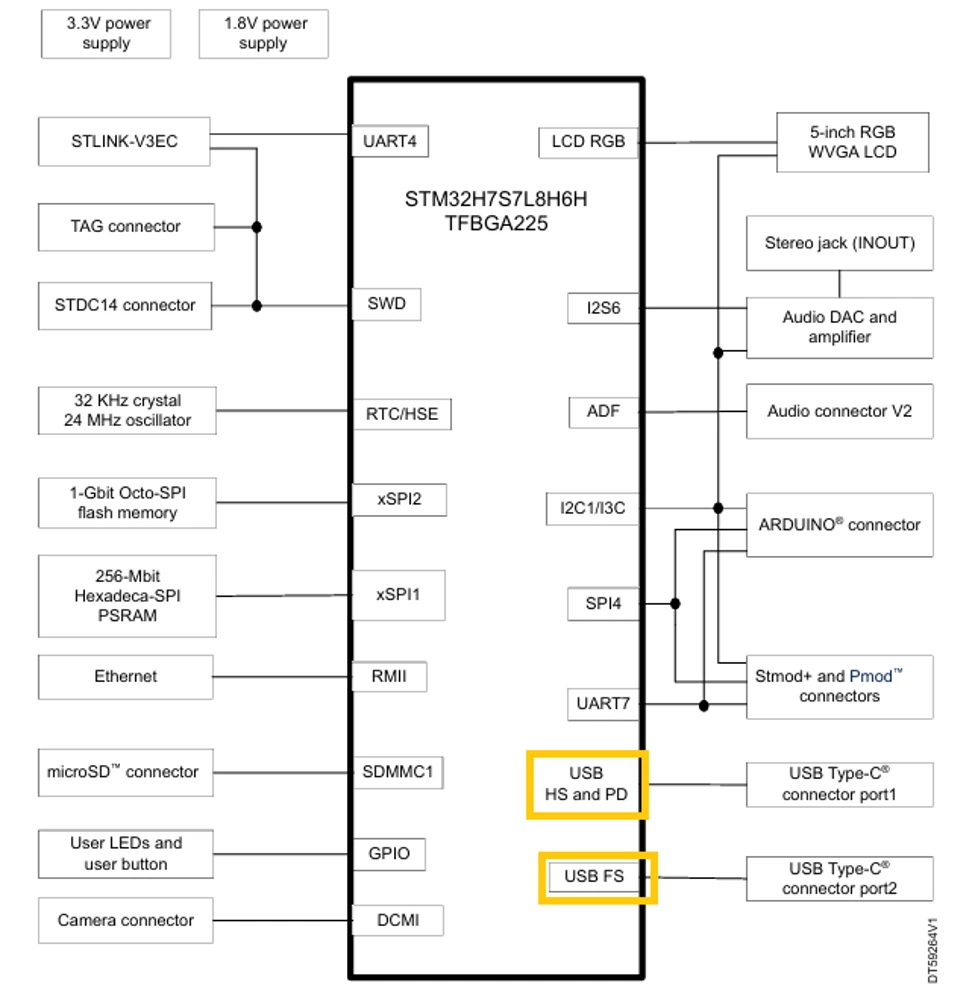
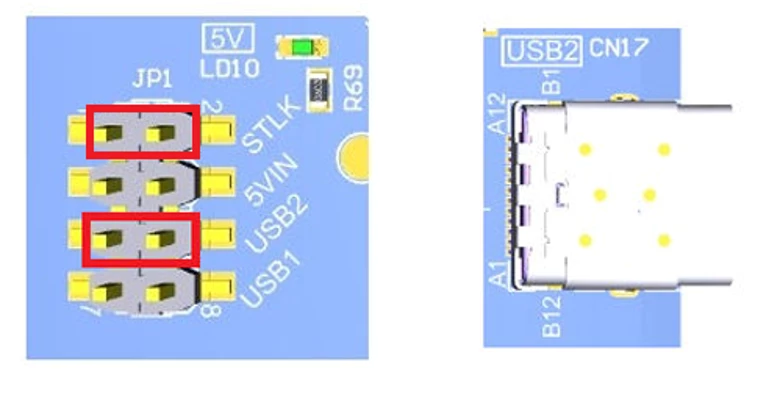
To supply VBUS power to the device connected to the first USB2 (FS) instance, the board is configured as follows: the JP1 jumpers are set so that the 5 V rail is routed to the USB_FS VBUS line on the USB2 (Type-C) connector. This configuration allows the board to power the attached USB FS device when operating in host mode.
For USB1 (USB Type-C® high-speed, dual-role port), the USB PD controller is typically used in source mode to supply VBUS power to the connected USB device.
- USB_OTG_FS
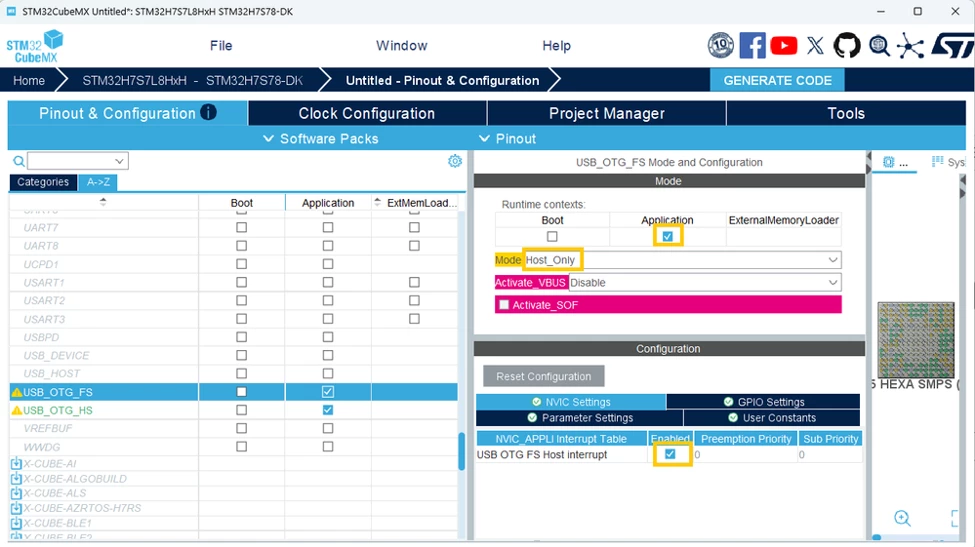
- USB_OTG_HS
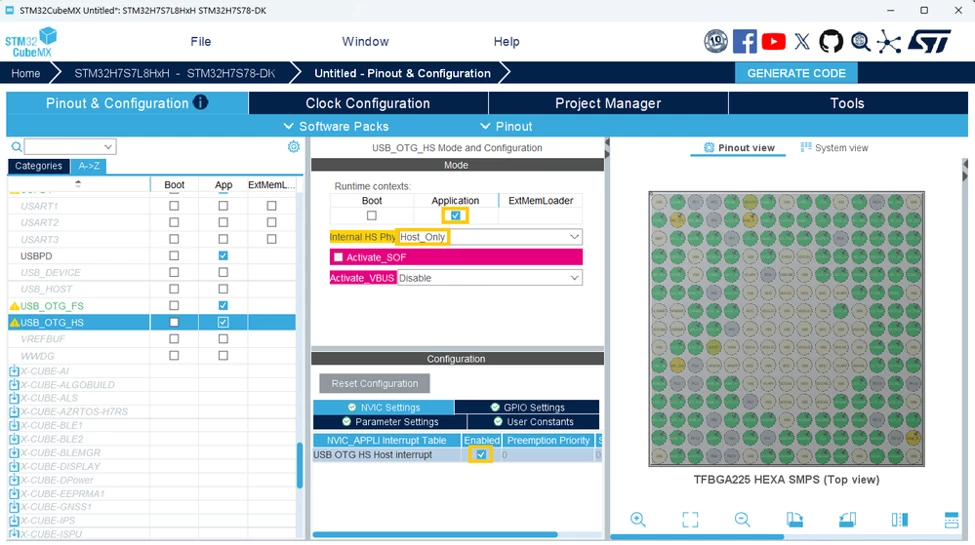
- USB_HOST
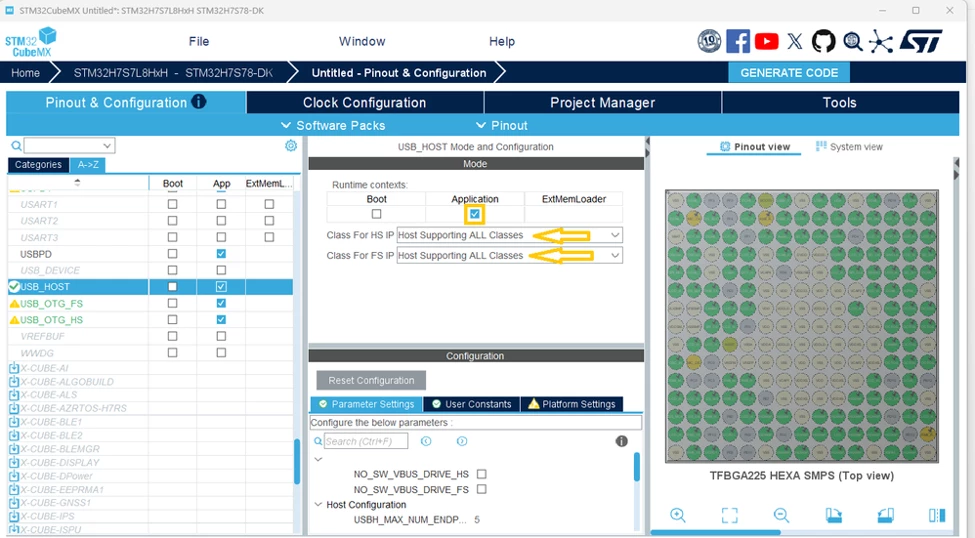
In this step, we configure the USB FS and USB HS instances as host supporting all classes, such as HID, MSC, audio, and CDC.
- USB-PD configuration
- UCPD1
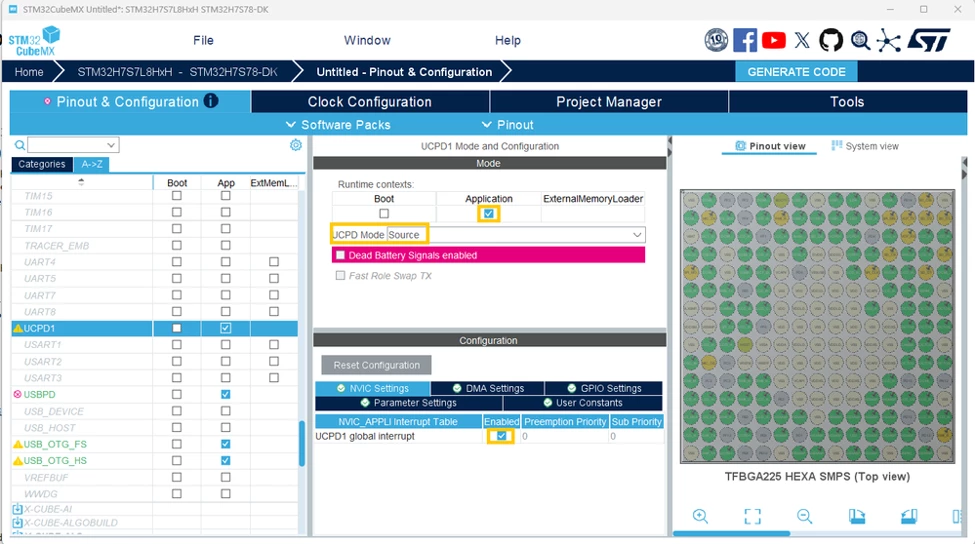
- GPDMA1
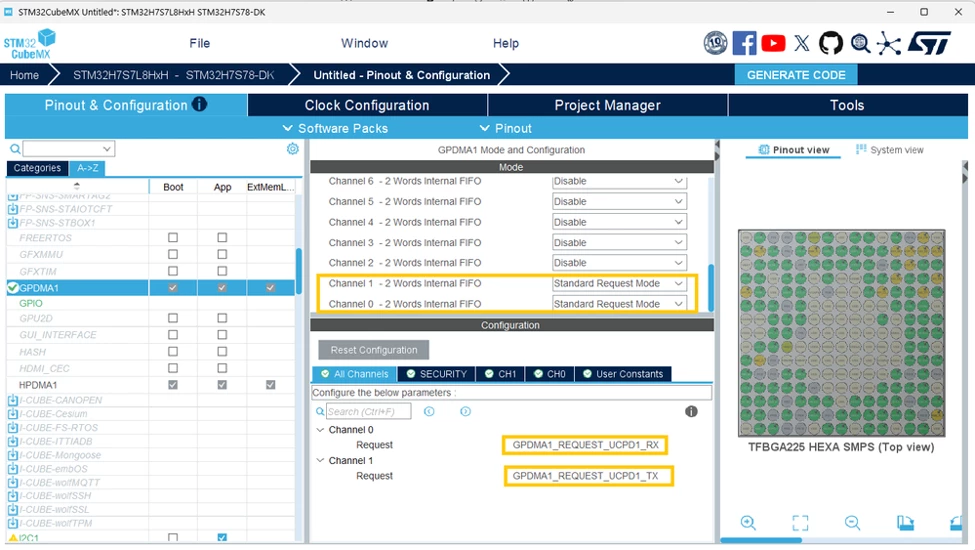
- USBPD
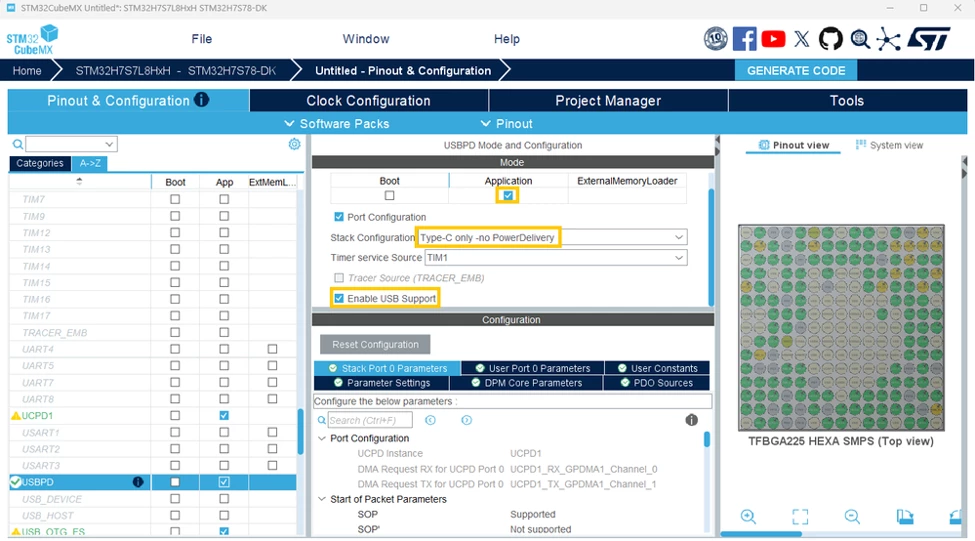
- PWR
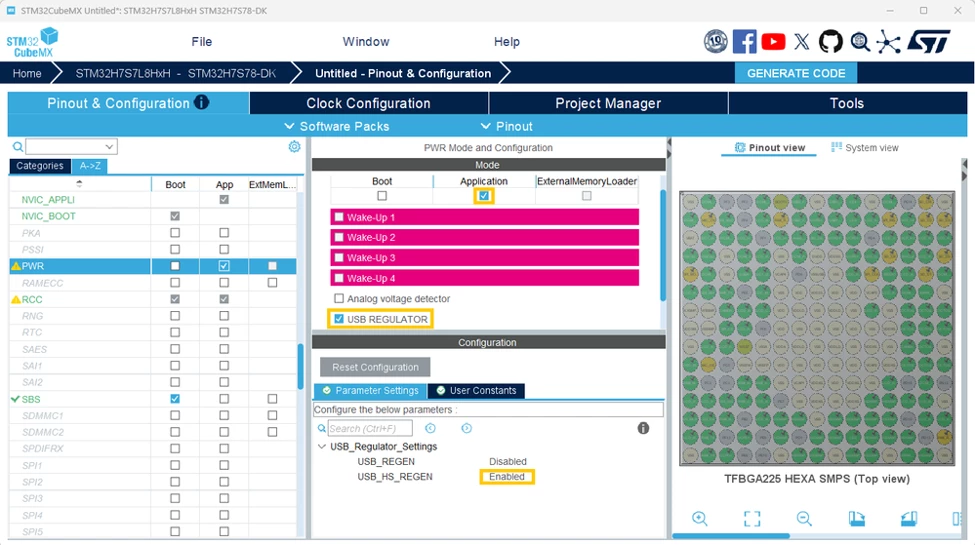
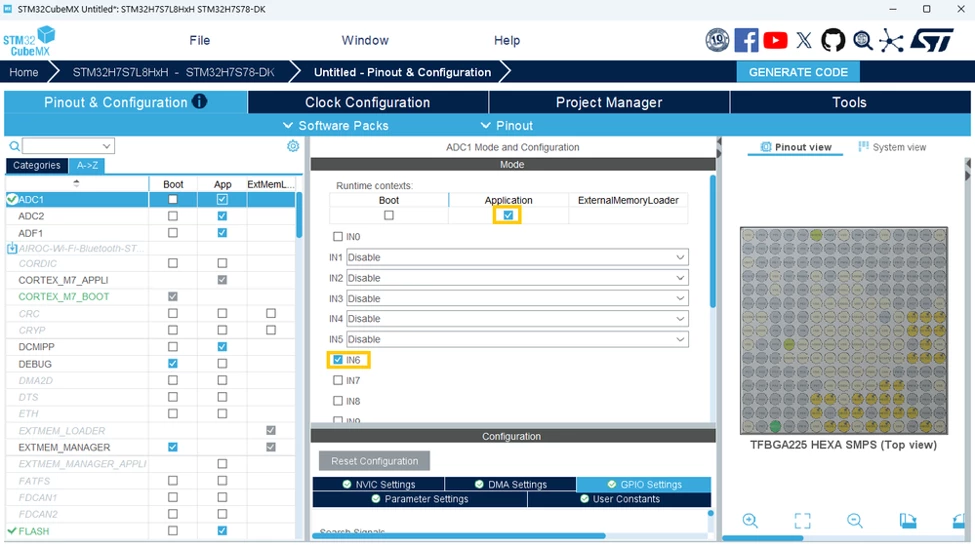
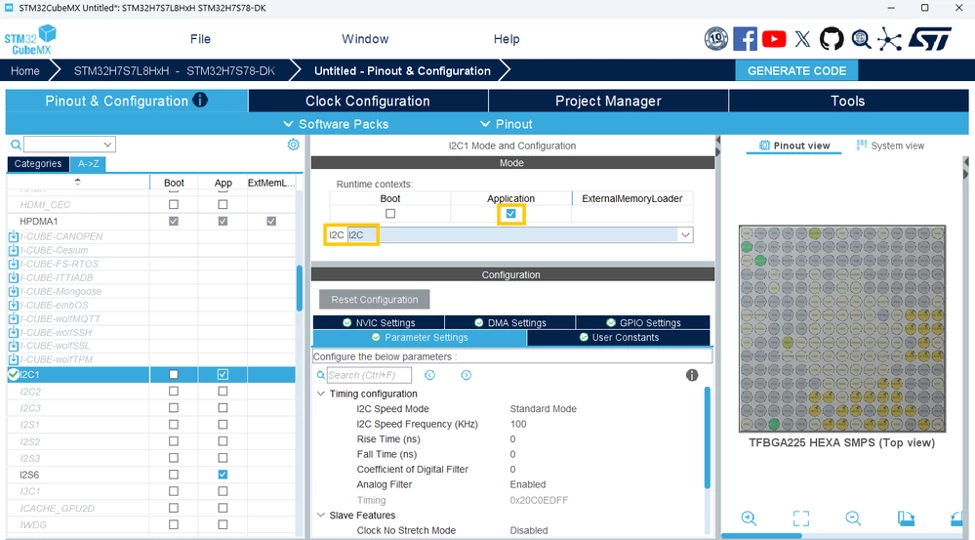
Add the activation of I2C1 and ADC1, which are required to enable VBUS and to detect devices connected to the USB1 port.
- ADC1
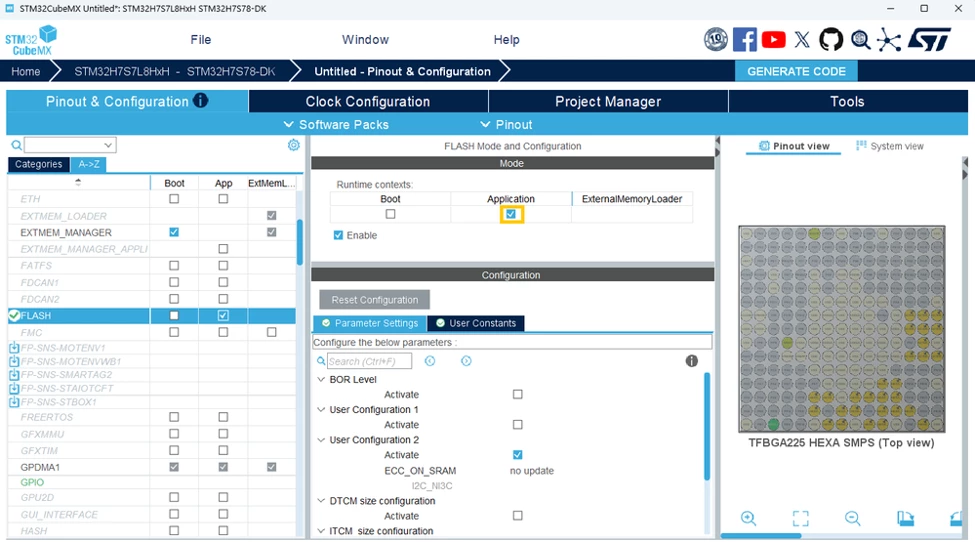
- FLASH
- I2C1
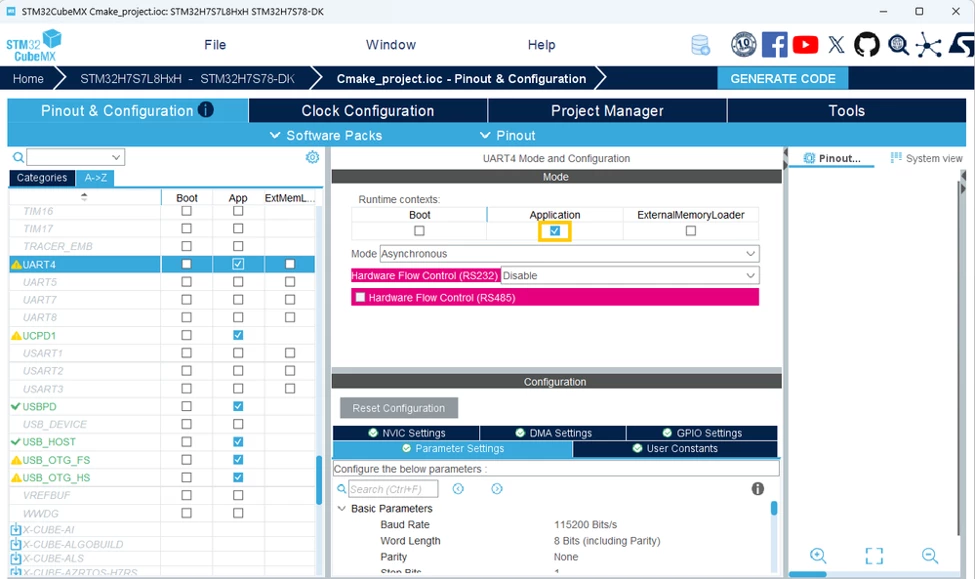
Add the UART4 configuration related to the VCOM of the board to enable viewing messages from the USB enumeration using any HyperTerminal.
- UART4
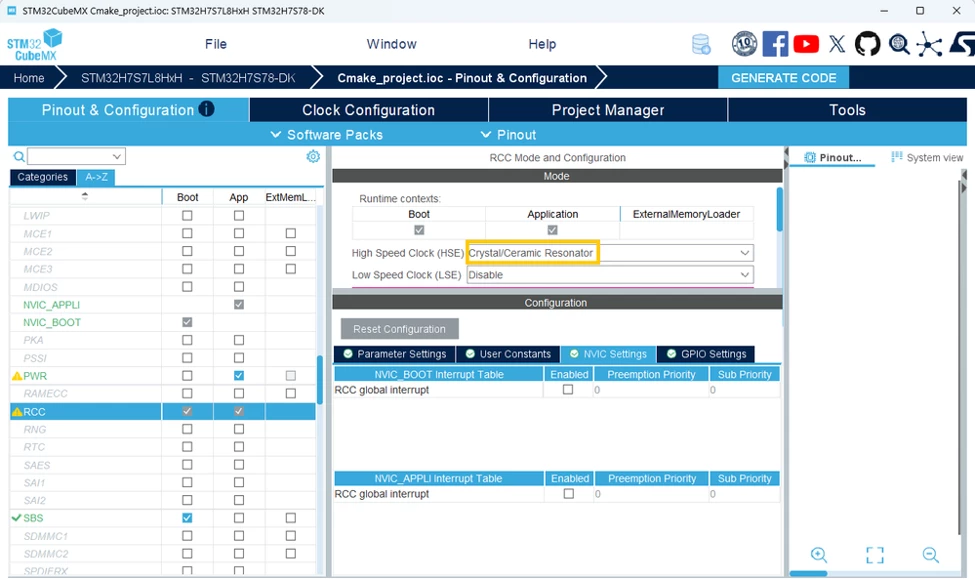
- RCC
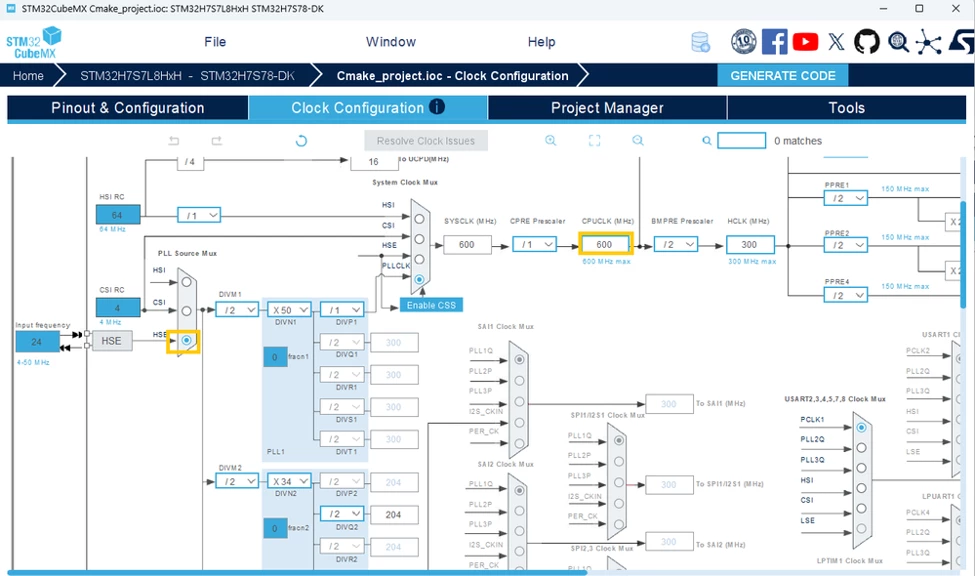
- Clock configuration
3.Select CMake as the Toolchain
Now that all configuration is completed for the application, open [Project Manager] and select [CMake] as the toolchain, then click [GENERATE CODE].
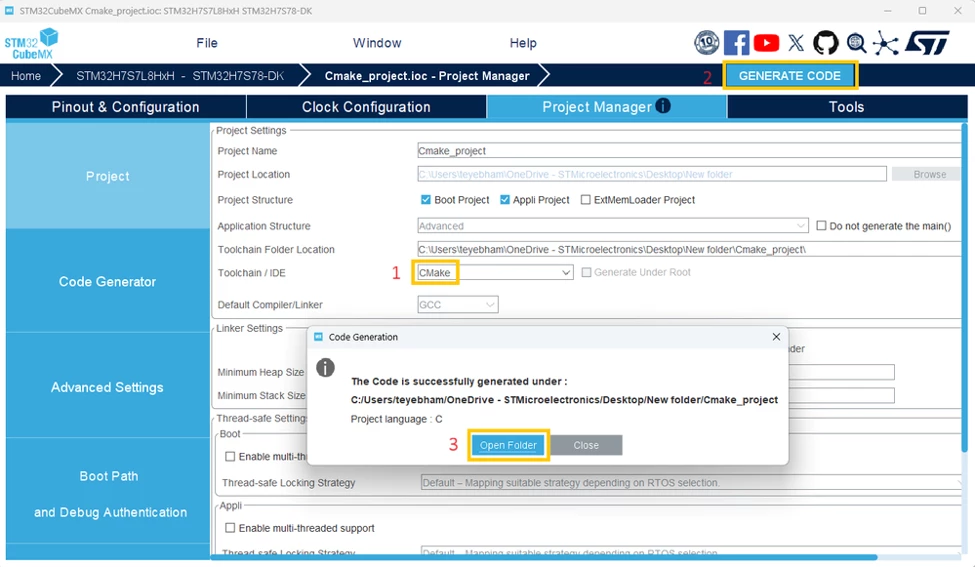
After all steps are completed, use STM32CubeIDE to finalize the configuration, build, and run the application. To import the project, refer to the application note “How to use CMake in STM32CubeIDE.” The application note lists all the steps, but you can follow the steps below if needed.
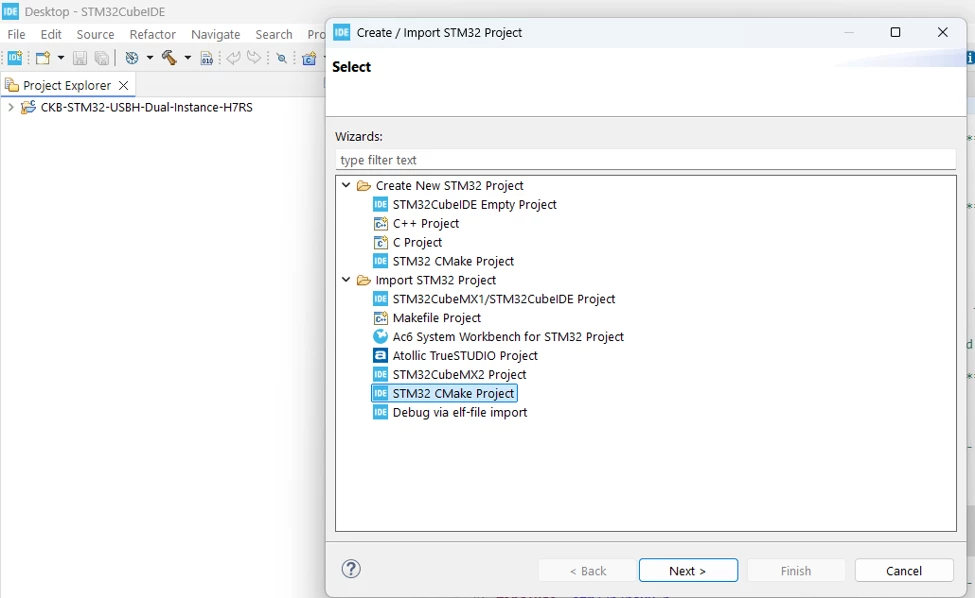
4.Import the STM32 CMake Project into STM32CubeIDE
Open STM32CubeIDE, click [File] → [Create/Import STM32 Project], and select [Import STM32 CMake Project].
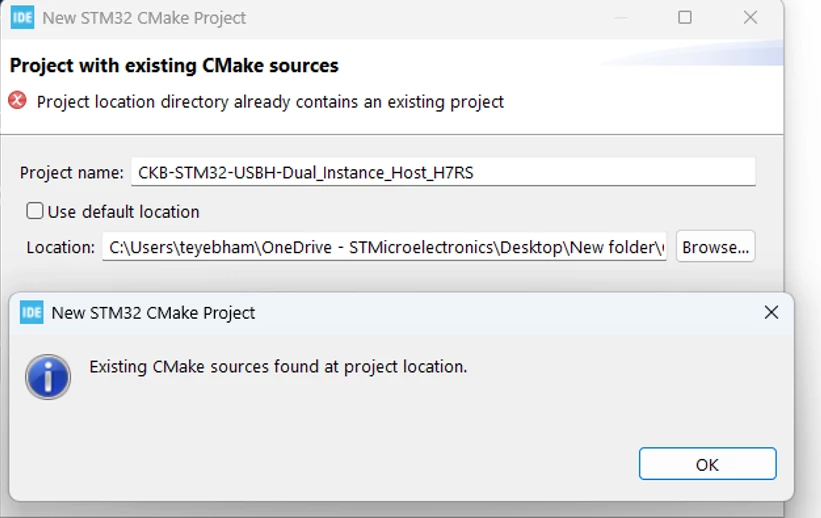
The “New STM32 CMake Project” prompt appears. Enter the project name and browse to the project location, as shown below.
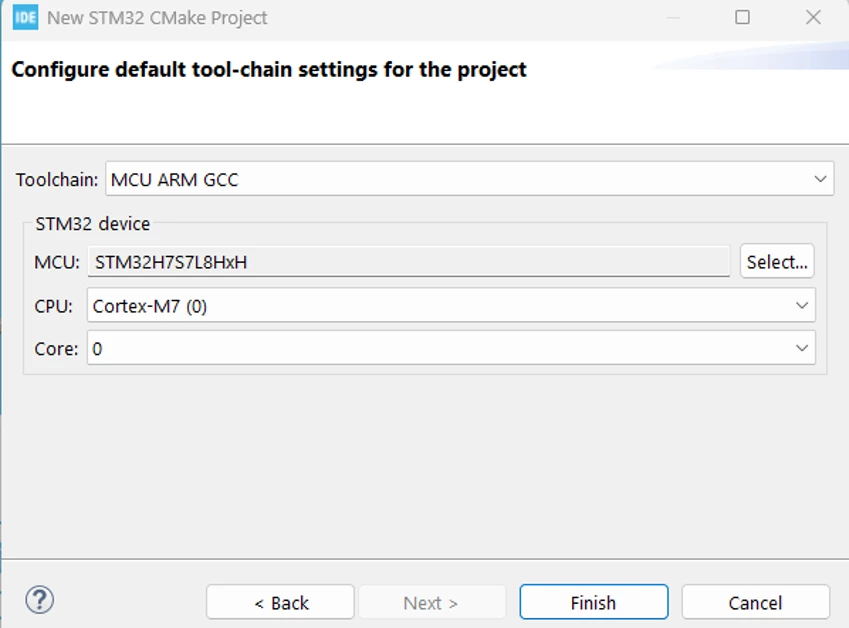
Set the toolchain to [MCU ARM GCC] and select the [STM32H7S7L8HxH] MCU.
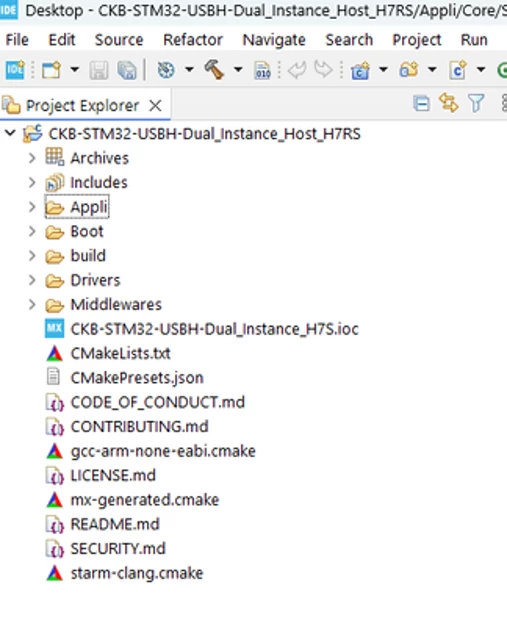
After opening the project with STM32CubeIDE, the project architecture should appear as shown below
2. Develop your own project
Now, focusing on the [Appli] part to complete the development of the application. We start with the USB HOST configuration.
2.1 USB HOST configuration
- USBPD
Below is the list of files that are modified to activate VBUS for USB HS instance.
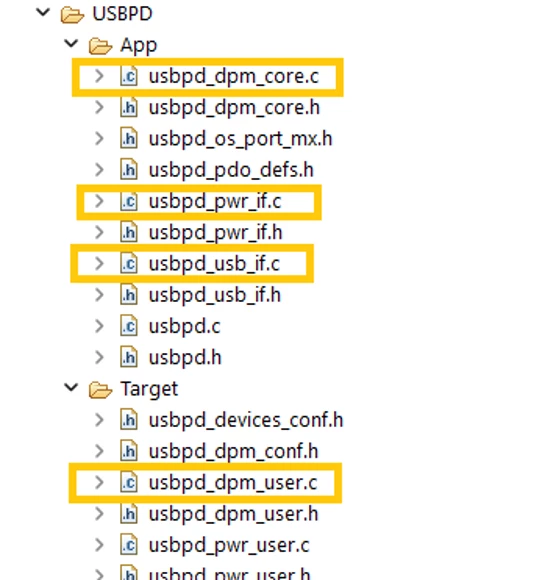
- usbpd_dpm_core.c
In this file, we modify the USBPD_DPM_Run function.
//do{
    if ((HAL_GetTick() - DPM_Sleep_start[USBPD_PORT_COUNT]) >= DPM_Sleep_time[USBPD_PORT_COUNT])
    {
      DPM_Sleep_time[USBPD_PORT_COUNT] = USBPD_CAD_Process();
      DPM_Sleep_start[USBPD_PORT_COUNT] = HAL_GetTick();
    }
    USBPD_DPM_UserExecute(NULL);
  //} while (1u == 1u);
Comment out the do ... while loop since it’s not needed to stop in this function.
- usbpd_dpm_user.c
In the USBPD_DPM_UserCableDetection function, uncomment these lines to enable cable detection.
void USBPD_DPM_UserCableDetection(uint8_t PortNum, USBPD_CAD_EVENT State)
{
/* USER CODE BEGIN USBPD_DPM_UserCableDetection */
   switch(State)
   {
   case USBPD_CAD_EVENT_ATTACHED:
   case USBPD_CAD_EVENT_ATTEMC:
     {
       if (USBPD_OK != USBPD_PWR_IF_VBUSEnable(PortNum))
       {
         /* Should not occur */
         HAL_Delay(6000);
         NVIC_SystemReset();
       }
       break;
     }
   case USBPD_CAD_EVENT_DETACHED :
   case USBPD_CAD_EVENT_EMC :
   default :
     {
       if (USBPD_OK != USBPD_PWR_IF_VBUSDisable(PortNum))
       {
         /* Should not occur */
         while(1);
       }
       break;
     }
   }
/* USER CODE END USBPD_DPM_UserCableDetection */
}
Uncomment the commented switch cases in this function to process the USB PD notification events.
void USBPD_DPM_Notification(uint8_t PortNum, USBPD_NotifyEventValue_TypeDef EventVal)
{
/* USER CODE BEGIN USBPD_DPM_Notification */
  /* Manage event notified by the stack? */
  switch(EventVal)
  {
    case USBPD_NOTIFY_POWER_EXPLICIT_CONTRACT :
      break;
    case USBPD_NOTIFY_REQUEST_ACCEPTED:
      break;
    case USBPD_NOTIFY_REQUEST_REJECTED:
    case USBPD_NOTIFY_REQUEST_WAIT:
      break;
    case USBPD_NOTIFY_POWER_SWAP_TO_SNK_DONE:
      break;
    case USBPD_NOTIFY_STATE_SNK_READY:
      break;
    case USBPD_NOTIFY_HARDRESET_RX:
    case USBPD_NOTIFY_HARDRESET_TX:
      break;
    case USBPD_NOTIFY_STATE_SRC_DISABLED:
      break;
    case USBPD_NOTIFY_ALERT_RECEIVED :
      break;
    case USBPD_NOTIFY_CABLERESET_REQUESTED :
      break;
    case USBPD_NOTIFY_MSG_NOT_SUPPORTED :
      break;
    case USBPD_NOTIFY_PE_DISABLED :
      break;
    case USBPD_NOTIFY_USBSTACK_START:
      USBPD_USBIF_HostStart(PortNum);
      break;
    case USBPD_NOTIFY_USBSTACK_STOP:
      USBPD_USBIF_HostStop(PortNum);
      break;
    case USBPD_NOTIFY_DATAROLESWAP_DFP :
      break;
    case USBPD_NOTIFY_DATAROLESWAP_UFP :
      break;
    default:
      DPM_USER_DEBUG_TRACE(PortNum, "ADVICE: USBPD_DPM_Notification:%d", EventVal);
      break;
  }
/* USER CODE END USBPD_DPM_Notification */
}
- usbpd_usb_if.c
Add the USB HS start sequence in the USBPD_USBIF_HostStart function.
void USBPD_USBIF_HostStart(uint32_t PortNum)
{
/* USER CODE BEGIN USBPD_USBIF_HostStart */
  if (USBH_Start(&hUsbHostHS) != USBH_OK)
  {
    Error_Handler();
  }
  USBPD_TRACE_Add(USBPD_TRACE_DEBUG, PortNum, 0, (uint8_t *) "USBIF host start", 16);
/* USER CODE END USBPD_USBIF_HostStart */
}
Add the USB HS stop sequence in the USBPD_USBIF_HostStop function.
void USBPD_USBIF_HostStop(uint32_t PortNum)
{
/* USER CODE BEGIN USBPD_USBIF_HostStop */
  if (USBH_Stop(&hUsbHostHS) != USBH_OK)
  {
    Error_Handler();
  }
  USBPD_TRACE_Add(USBPD_TRACE_DEBUG, PortNum, 0, (uint8_t *) "USBIF host stop", 15);
/* USER CODE END USBPD_USBIF_HostStop */
}
Furthermore, add the BSP for the STM32H7S78-DK and the BSP for the TCPP0203 component to facilitate and manage VBUS power activation. The files are listed in the table below, along with their placement in the project.
| File source | File name | Destination |
| BSP/Components/tcpp0203 | tcpp0203.c | |
| tcpp0203.h | ||
| tcpp0203_reg.c | ||
| tcpp0203_reg.h | ||
| BSP/STM32H7S78-DK | stm32h7s78_discovery.c | |
| stm32h7s78_discovery.h | ||
| stm32h7s78_discovery_bus.c | ||
| stm32h7s78_discovery_bus.h | ||
| stm32h7s78_discovery_errno.h | ||
| stm32h7s78_discovery_usbpd_pwr.c | ||
| stm32h7s78_discovery_usbpd_pwr.h | ||
| stm32h7s78_discovery_conf.h |
After adding them to the project directory, we update the following file to proceed with the CMake compilation process: open Appli/mx-generated.cmake and go to the following sections.
# STM32CubeMX generated application sources
Add the following lines.
  ${CMAKE_CURRENT_SOURCE_DIR}/Core/Src/stm32h7s78_discovery.c

  ${CMAKE_CURRENT_SOURCE_DIR}/Core/Src/stm32h7s78_discovery_bus.c

  ${CMAKE_CURRENT_SOURCE_DIR}/Core/Src/stm32h7s78_discovery_usbpd_pwr.c

  ${CMAKE_CURRENT_SOURCE_DIR}/Core/Src/tcpp0203_reg.c

  ${CMAKE_CURRENT_SOURCE_DIR}/Core/Src/tcpp0203.c
# STM32CubeMX generated symbols (macros)
Add the macros related to USB PD
TCPP0203_SUPPORTAt this step, the USB PD configuration is completed. Proceed to the USB protocol configuration to add the necessary implementation for host enumeration.
- Host enumeration
We start by implementing the missing configuration with the function MX_USB_HOST_Init, which is implemented in the file usb_host.c
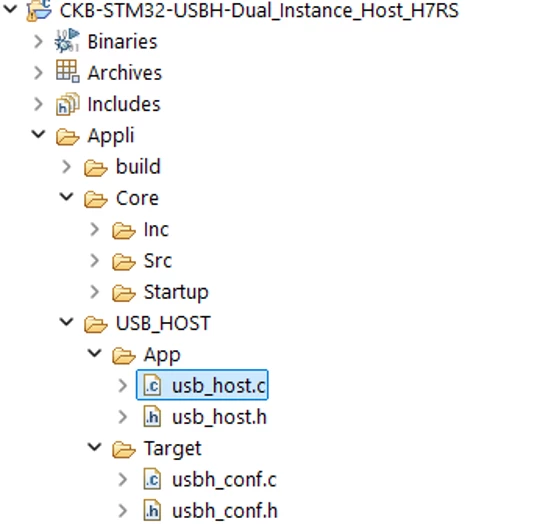
- MX_USB_HOST_Init
Modify the MX_USB_HOST_Init function to customize it for our application. In our application, we assign the AUDIO and CDC classes to the USB1 instance, and the HID and MSC classes to USB2.
void MX_USB_HOST_Init(void)
{
/* USER CODE BEGIN USB_HOST_Init_PreTreatment */

/* USER CODE END USB_HOST_Init_PreTreatment */

/* Init host Library, add supported class and start the library. */
if (USBH_Init(&hUsbHostHS, USBH_UserProcess1, HOST_HS) != USBH_OK)
{
Error_Handler();
}
if (USBH_RegisterClass(&hUsbHostHS,USBH_AUDIO_CLASS) != USBH_OK)
{
Error_Handler();
}
if (USBH_RegisterClass(&hUsbHostHS,USBH_CDC_CLASS) != USBH_OK)
{
Error_Handler();
}
/* USER CODE BEGIN USB_HOST_Init_PreTreatment */

/* USER CODE END USB_HOST_Init_PreTreatment */

/* Init host Library, add supported class and start the library. */
if (USBH_Init(&hUsbHostFS, USBH_UserProcess2, HOST_FS) != USBH_OK)
{
Error_Handler();
}
if (USBH_RegisterClass(&hUsbHostFS,USBH_MSC_CLASS) != USBH_OK)
{
Error_Handler();
}
if (USBH_RegisterClass(&hUsbHostFS,USBH_HID_CLASS) != USBH_OK)
{
Error_Handler();
}
/* USER CODE BEGIN USB_HOST_Init_PostTreatment */

/* Start the Full Speed USB Host USB2*/
if (USBH_Start(&hUsbHostFS) != USBH_OK)
{
Error_Handler();
}

USBH_UsrLog("*******Starting Dual Instance USB Host Application*******\n");
USBH_UsrLog("Connect Your Device to either USB1 or USB2 port");
/* USER CODE END USB_HOST_Init_PostTreatment */
}
Modify the debug level value in the file usbh_conf.h, to view the messages from USBH_UsrLog.
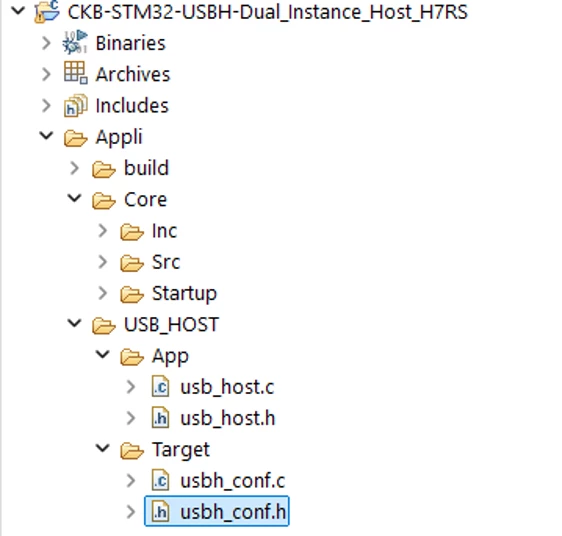
#define USBH_DEBUG_LEVEL 2UAlso in the same file, modify the USBH_MAX_SIZE_CONFIGURATION definition to 512U to support audio enumeration.
#define USBH_MAX_SIZE_CONFIGURATION 512UGo to main.c in the [Appli] section to add the configuration related to redefining USBH_UsrLog for VCOM connected to UART4.
3.UART configuration
defined(__GNUC__)
#define PUTCHAR_PROTOTYPE int __io_putchar(int ch)
Then, add the following function inside /* USER CODE BEGIN 4 */
PUTCHAR_PROTOTYPE
{
  /* Place your implementation of putchar here */
  /* e.g. write a character to the UART4 and Loop until the end of transmission */
  HAL_UART_Transmit(&huart4, (uint8_t *)&ch, 1, 0xFFFF);
  return ch;
}
The configuration of the USB FS and HS Host is completed. All supported device classes can be detected, and the state of any connected USB device can be viewed through the HyperTerminal connected to the VCOM port via ST-LINK.
- Data Length = 8 Bits
- One Stop Bit
- No parity
- BaudRate = 115200 baud
- Flow control: None
Now that we have completed the implementation phase, we move on to the process of building the project and downloading it to the board. With STM32H7RS, the download is split into two parts: the Boot is programmed in internal flash, and the App is programmed in external memory.
3. Build process
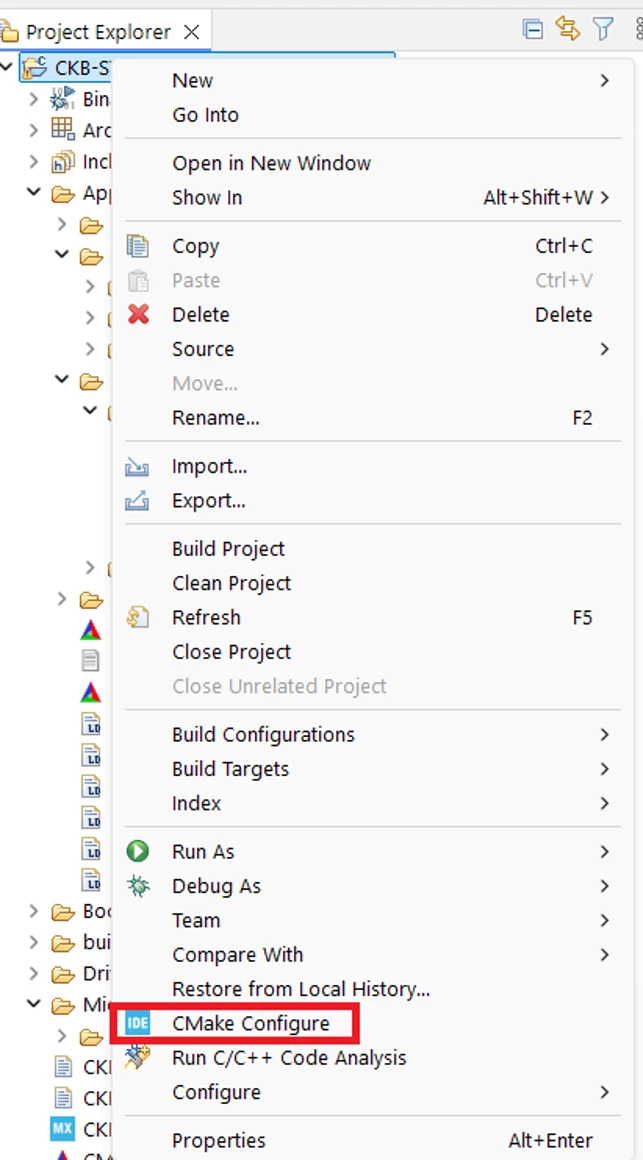
3.1 CMake configuration
The first step is to update the CMake configuration after adding the paths of the new files.
3.2 Build Boot and Appli
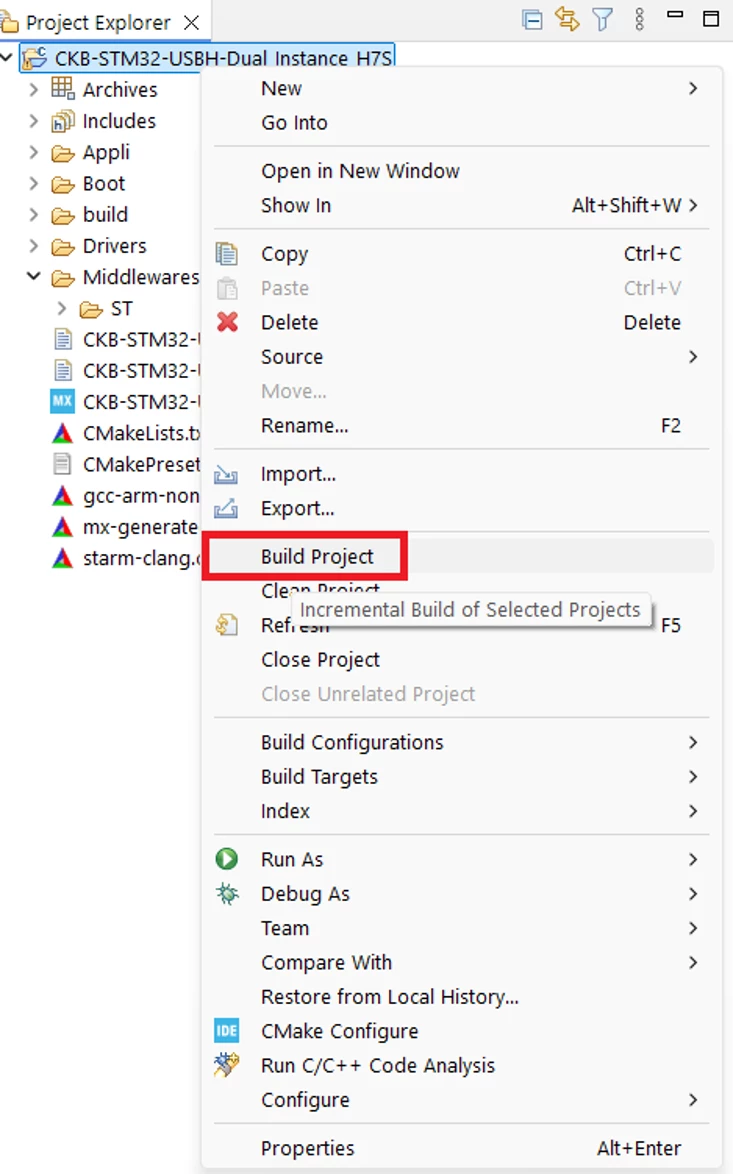
- Build
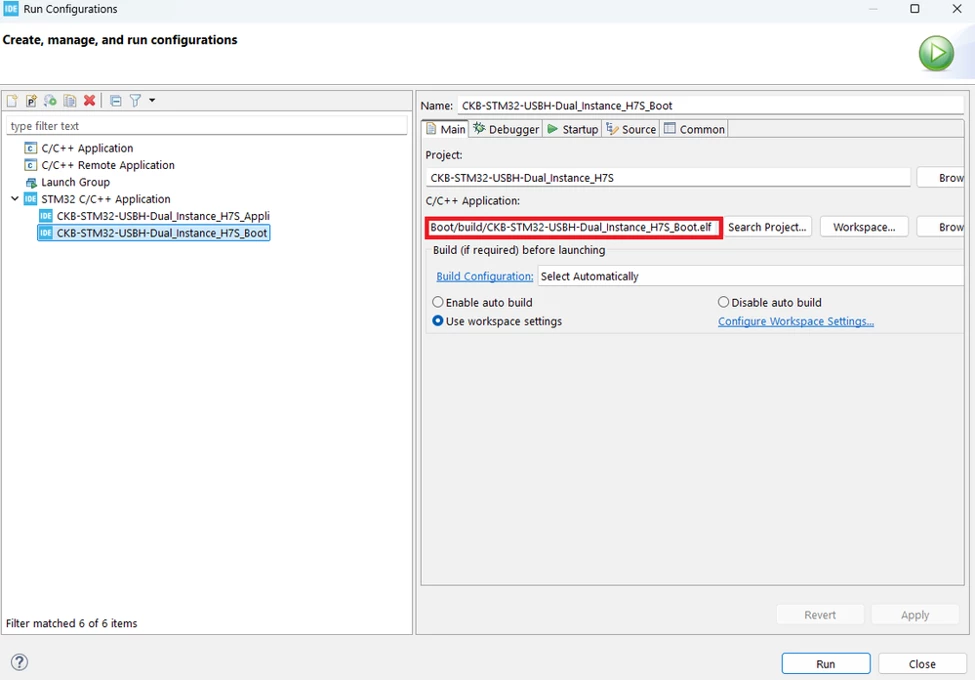
- Run Boot and Appli
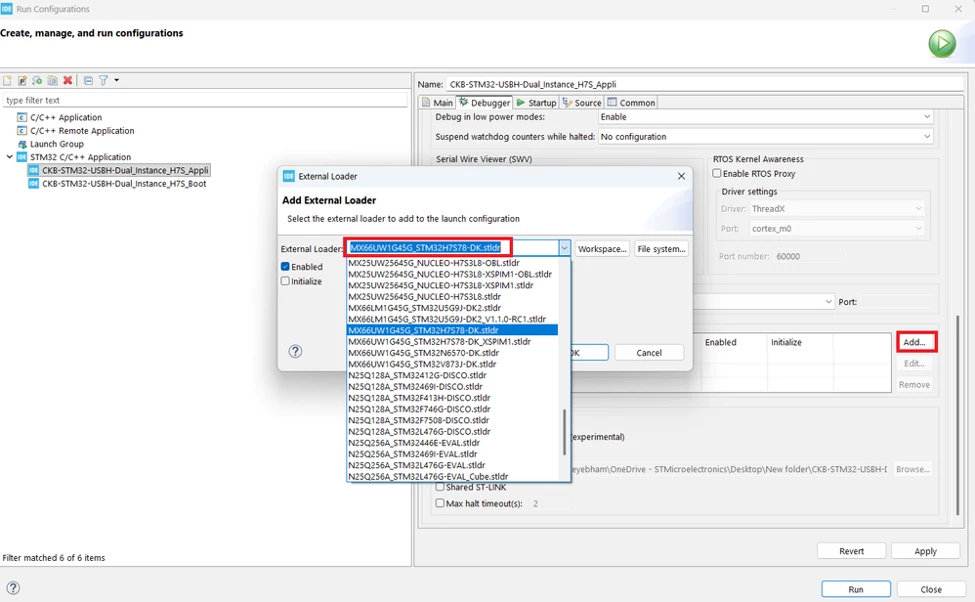
In the debugger configuration, select CKB-STM32-USBH-Dual_Instance_H7S_Appli, then open the Debugger section.
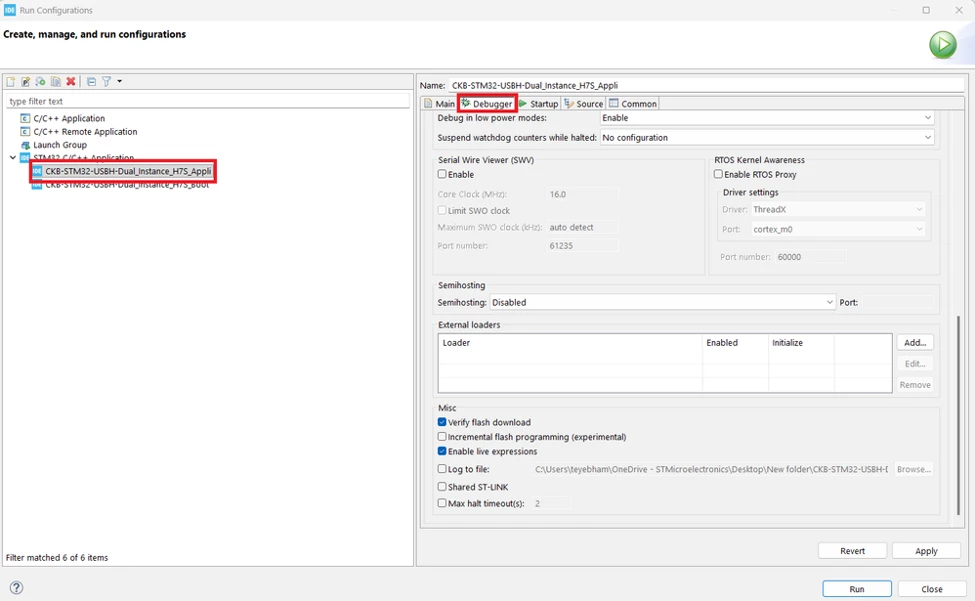
Add the external loader related to the external memory by going to the External loaders section, click [Add…] and select ”MX66UW1G45G_STM32H7S78-DK.stldr”.
Go to the “Startup” section and click [Add…] to include the CKB-STM32-USBH-Dual_Instance_H7S_Boot.elf file in the flashing process.
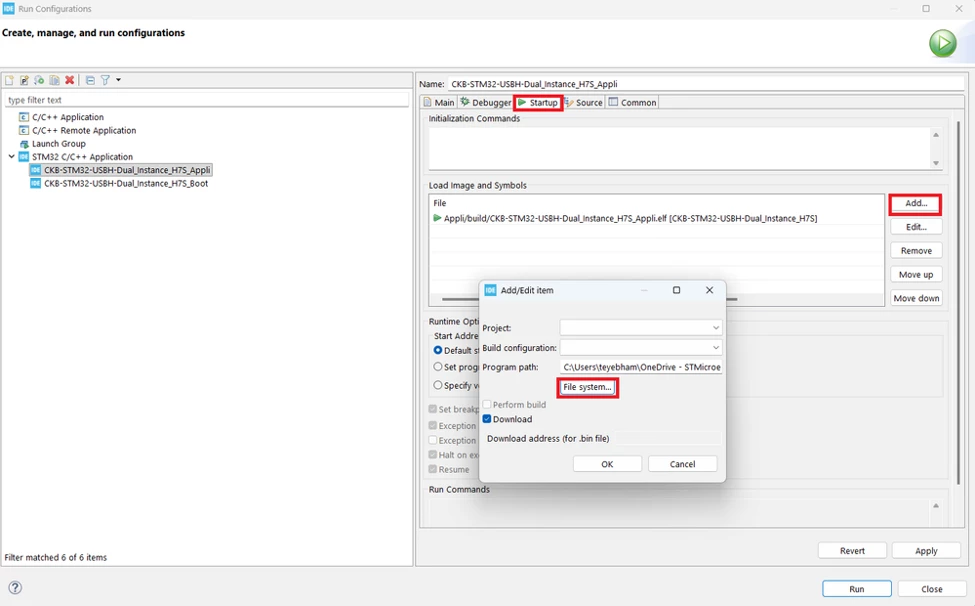
After completing all the steps and clicking Run, both the Boot and Appli projects will be flashed to the target.
4. Results
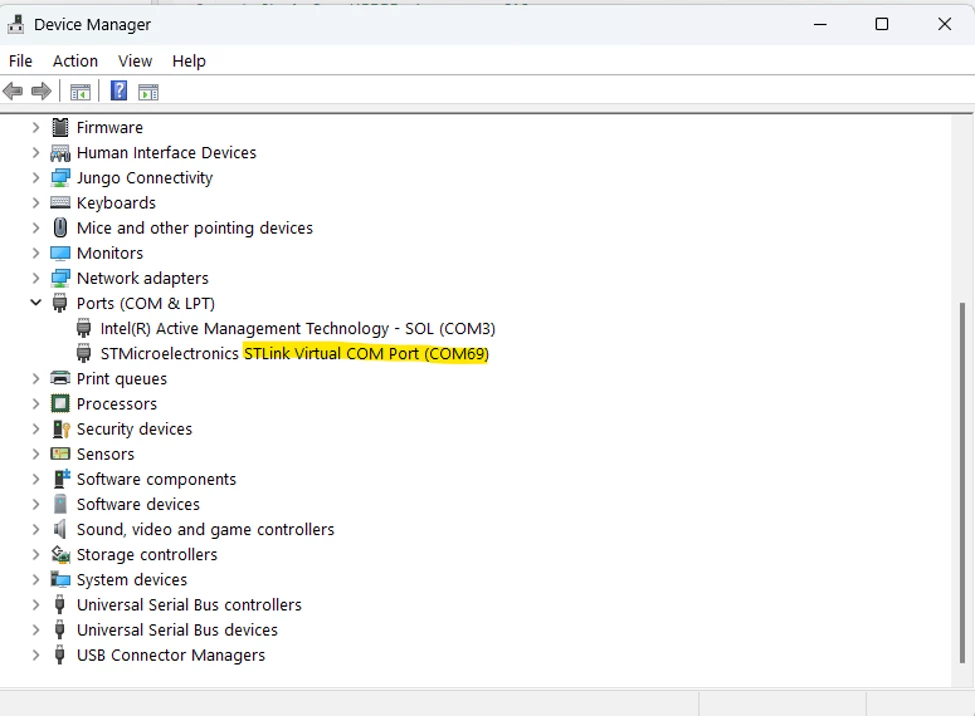
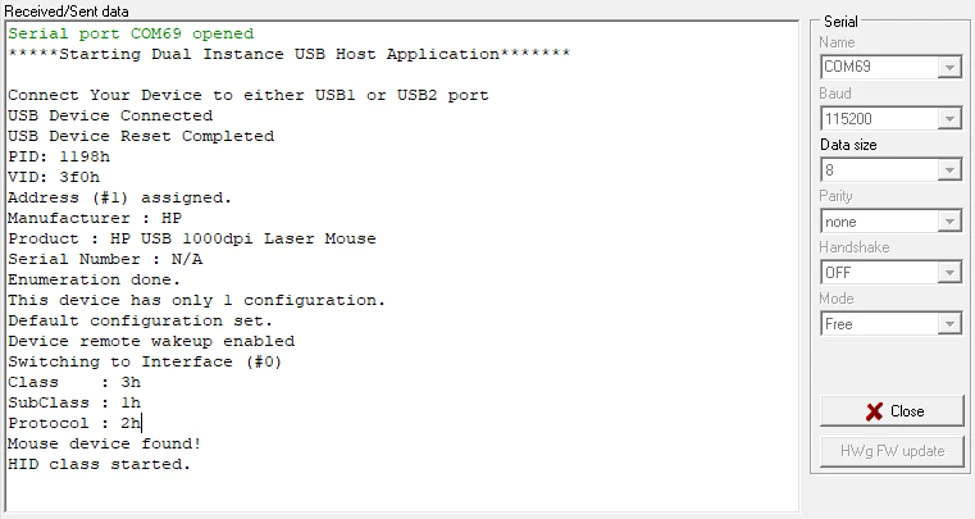
After successfully flashing the application onto the STM32H7S78-DK board, open any HyperTerminal and select the ST-LINK virtual COM port. In my case, it is COM69.
When the board is reset, a message appears in the serial monitor that prompts to pair the device.
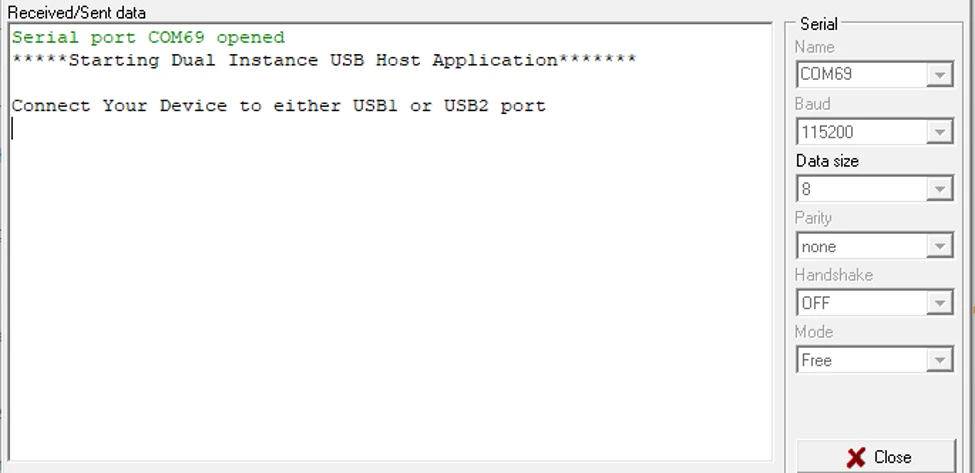
I chose the HID device (mouse) to be plugged into the first instance, USB2.
I plugged an audio device into the second instance, USB1.
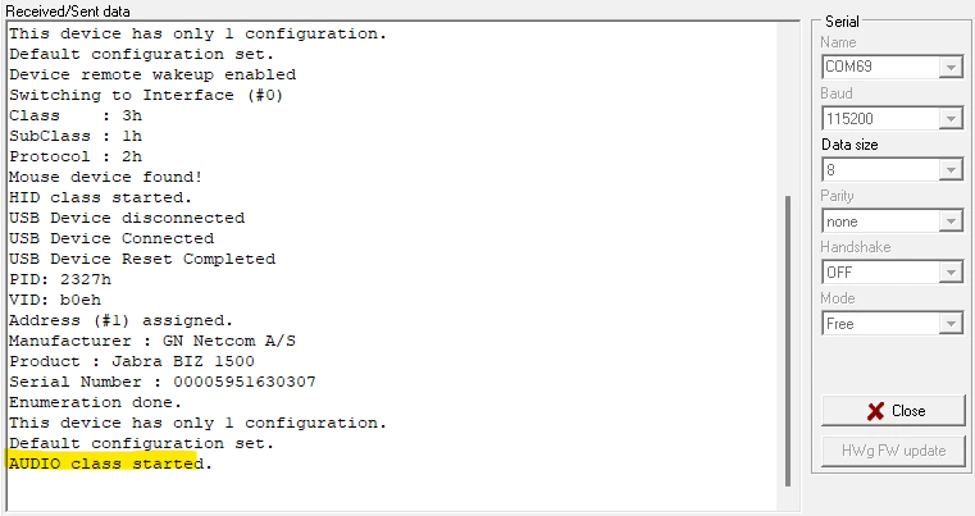
Both USB instances run correctly, demonstrating the successful implementation of the application. We can also try other devices, such as MSC and CDC devices.
Conclusion
This guide provides a detailed approach to developing an STM32 USB Host application that integrates dual USB instances, USB1 and USB2. By following these steps, you can create a USB Host application that enables both instances, with each instance handling a specific class, while taking your hardware into consideration. In our case, it is the STM32H7S78-DK.