


How to configure STM32 as USB dual role using USBX in standalone mode
Summary
This article provides a step-by-step guide to configure the NUCLEO-U545RE-Q board as a dual role device using USBX middleware in standalone mode (no threadX or FreeRTOS™). It details the entire setup process, starting with the basic hardware connections and progressing to the firmware implementation. By following this guide, users can successfully configure the NUCLEO-U545RE-Q board to function effectively in both roles: HID host and CDC device.
Technical terms
Dual role device (DRD): USB function that can operate either as a host or a device on the same port, depending on the current connection and role logic.
Device mode: the STM32 acts as a USB peripheral and connects to a host like a PC.
Host mode: the STM32 acts as the USB host and controls a connected USB device.
Introduction
STM32CubeMX does not natively support dual role functionalities.
There is no full code generation for USBX middleware files or dual role functionalities when you select the dual role device option if available. This knowledge article helps you enable the USB dual role using USBX in standalone mode with a step-by-step method. The project is attached at the end of this article.
This guide is based on STM32CubeIDE 2.1.0, STM32CubeMX 6.17.0, and STM32CubeU5 1.8.0. It was validated with a NUCLEO-U545RE-Q board, which embeds an STM32U545RE device.
It can be easily tailored in other boards that support USBX middleware.
Make the following adjustments if needed:
- Regarding reference boards
Check that the reference board supports both device and host mode. In some cases, hardware modifications may need to be applied like in the (B-IoT-STM32U585/NUCLEO-H563ZI etc.)
Check the VBUS pin and Power VBUS used.
- Regarding USB controllers
Check the USB controller used in your products. Some STM32 products embed a USB OTG controller. Others embed a USB DRD controller, which leads to different naming in the firmware for the used variables and instances. In this case, the STM32U545 embeds the USB DRD controller.
In this article, a simple switch between modes is achieved by pressing the USER button. This guide outlines the process from configuring the basic hardware connections to implementing the firmware.
1. Hardware and software prerequisites
- NUCLEO-U545RE-Q
- STM32CubeIDE V2.1.0
- STM32CubeMX V6.17.0
- STM32Cube firmware U5 v1.8.0
- Two USB 2.0 Type C male to Type A male cables
- One Type A female to type C male adapter
2. Development
With the NUCLEO-U545RE-Q, dual role option mode is not available in STM32CubeMX by default. Therefore, we need to create 2 projects.
The first project as a host, and the second project as a device to access the necessary files and functions for both modes.
3. Configuring the device project
Start by creating a new project using the STM32CubeIDE by clicking [File → New → STM32 project].
Use the [Board selector] tab and select the [NUCLEO-U545RE-Q].
In the board project options that pop up, unselect all BSP options, and press [OK].
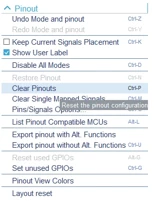
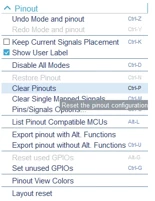
When the .ioc file opens, click [Pinout → Clear pinouts].
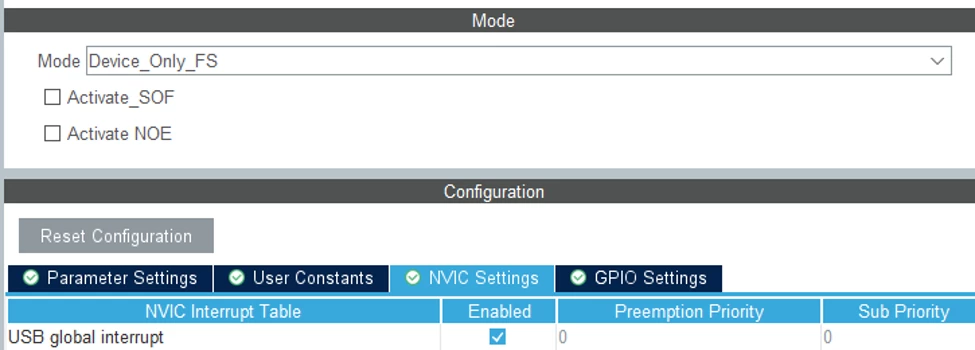
In connectivity, under USB-DRD-FS, select device_Only_FS in mode and activate USB global interrupt in the NVIC settings.
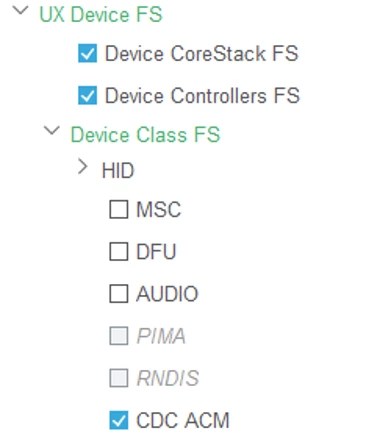
In USBX, under middleware and software packages,
enable Core system. Under UX device FS, enable Device CoreStack FS and DeviceControllers FS. Enable CDC ACM in device class FS.
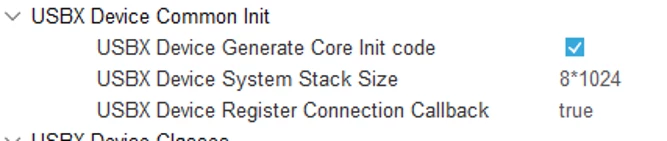
In the USBX settings window, allocate 10 KB for the UX device memory pool size and 8 KB for the USBX device system stack size.

In platform settings, select USB_DRD-FS in found solutions.

In the clock configuration settings, ensure that USB receives a 48 MHz frequency. The easiest way to do this is to select HSI48 as the clock source.
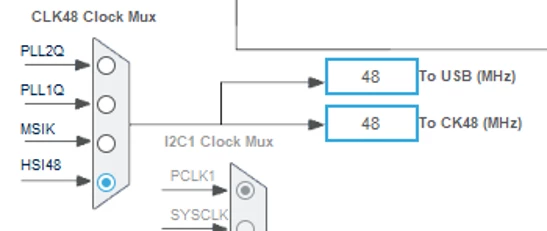
Select a project name and generate the code.

4. Configuring the DRD project
The idea here is to create a host-based project then overwrite all necessary files and code in it from the device project
Start by creating a new project using the STM32CubeIDE by clicking [File → New → STM32 project].
Use the [Board selector] tab and select the [NUCLEO-U545RE-Q].
In the board project options that pop up, unselect all BSP options, and press [OK].
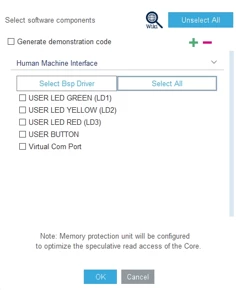
When the .ioc file opens, press [Pinout → Clear pinouts].
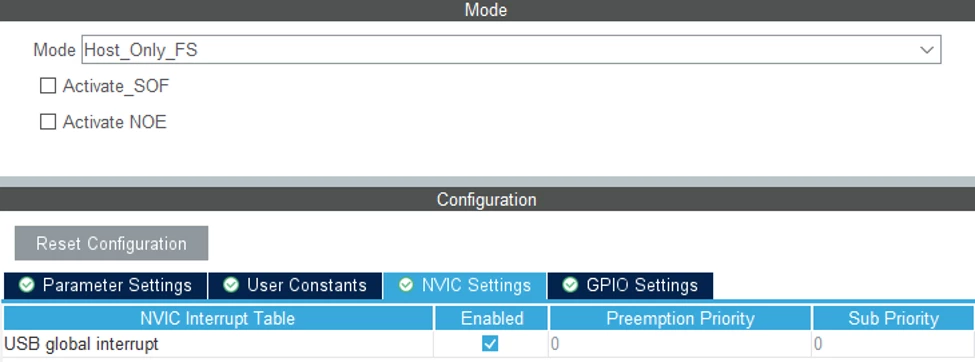
In connectivity, under USB-DRD-FS, select Host_Only_FS as mode and activate the USB global interrupt in NVIC settings.
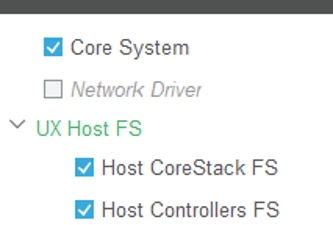
In USBX under middleware and software packages, enable Core system, host CoreStack FS, and host controllers FS.
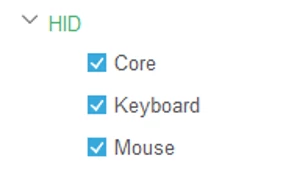
Under Host class FS, enable core, keyboard, and mouse, which is found under the HID class.
Enable PB5 pin as GPIO output. Under platform settings, select it in “Found Solutions” under the Drive_VBUS_FS window.
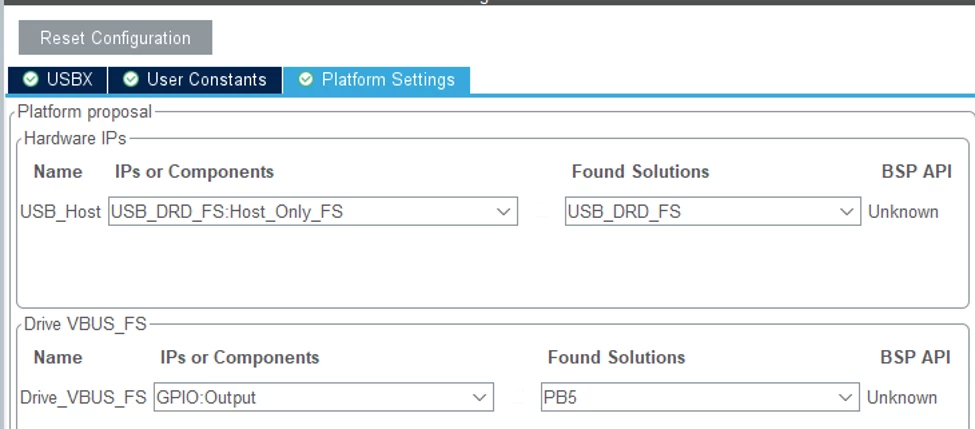
The Drive_VBUS pin may change from product to another. Consult the board schematics to see what the dedicated pin used is.
In the USBX settings window, allocate 28*1024 KB for USBX host system stack size.
Enable PC13 as GPIO EXTI. Enable EXTI Line 13 in NVIC under system core/GPIO.

Enable USART 1 in asynchronous mode.
In RCC, enable CRS SYNC Source USB in CRS sync.

In clock configuration, ensure that the USB receives a clean 48 MHz frequency signal.
Name your project and click [Generate Code].
5. Dual role project tree configuration
We need to add the necessary device files and folders to the DRD project.
Locate the folders where the host project and dual role project are saved on your computer.
In device project, under “Device_project\Drivers\STM32U5xx_HAL_Driver\Src”,
copy the “stm32u5xx_hal_pcd.c” and “stm32u5xx_hal_pcd_ex.c” files.

Paste these files to the same location in the DRD project.
Do the same action for the headers files located under
“Device_project\Drivers\STM32U5xx_HAL_Driver\Inc”.

Below is a table showing the necessary files and folders that need to be transferred.
Note: These paths are general and are created for demonstration purposes. Your paths may be different based on how the project was named and saved.
6. Code implementation
Add the mentioned code parts to the specified areas.
The code parts to add can be found in the project attached at the end of this article.
| Folder | File | Code part |
|
| Main.c | USER CODE BEGIN includes |
| USER CODE BEGIN PV | ||
| User CODE begin PFP | ||
| USER CODE EBGIN 2 | ||
| USER CODE BEGIN 3 | ||
| USER CODE BEGIN 4 | ||
| Main.h | USER CODE BEGIN EFP | |
| Stm32u5xx_hal_msp.c | USER CODE BEGIN 1 | |
| Stm32u5xx_it.c | USER CODE BEGIN PV | |
| USER CODE BEGIN EXTI13_IRQn 1 | ||
| USER CODE BEGIN USB_IRQn 1 | ||
| USBX/App | App_usbx_device.c | Whole file contents |
|
| App_usbx_device.h | USER CODE BEGIN EFP |
| USER CODE BEGIN 1 | ||
| Ux_device_cdc_acm.c | Whole file contents | |
| Ux_device_cdc_acm.h | Whole file contents | |
| Ux_host_keyboard.c | Whole file contents | |
| Ux_host_keyboard.h | Whole file contents | |
| ux_host_mouse.c | Whole file ocntents | |
| ux_host_mouse.h | Whole file contents | |
| Ux_user.h | See below |
Note: To achieve our goal, modifications to the existing middleware needs are needed.
| Middleware/st/usbx /common/core/src | Ux_system-tasks_run.c | _ux_system_tasks_run function |
|
| Ux_host_stack_hnp_polling _thread_entry.c | Delete the file content |
In Ux_user.h, uncomment the following defines:
#define UX_DEVICE_BIDIRECTIONAL_ENDPOINT_SUPPORT
#define UX_DEVICE_CLASS_CDC_ACM_TRANSMISSION_DISABLE
Comment the following defines:
//#define UX_HOST_SIDE_ONLY
// #define UX_DEVICE_SIDE_ONLY
7. Results
Build and flash your project. The application should start in host mode initially.
Connect a mouse or keyboard to the board USB connector (CN3) using the type C male to type A female adapter. Open the serial monitor and set the baud rate to 115200 bit/s.
You should be able to see mouse or keyboard activity registering in the terminal window.
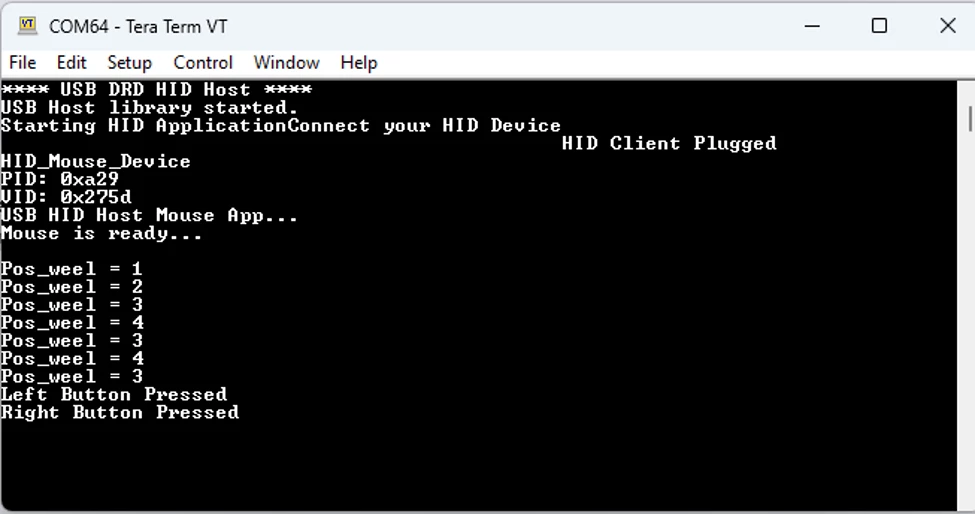
When the USER button is pressed, the board should switch to device mode. When you disconnect the mouse and attach the USB connector (CN3) to PC, a new USB serial device should appear that prints “hello world” repetitively.

Conclusion
Now, you have the necessary information to create a dual role project. Follow the same steps to configure the board with other classes.
This application does not support full USB On-The-Go (OTG) functionality. However, it supports dual role data (DRD) mode, which allows role switching between host and device based on the USB cable connection.
Related links
- NUCLEO-U545RE-Q
- NUCLEO-U545RE-Q schematics
- STM32U535/545
- USBX documentation
- GitHub project (coming soon)