Associate III
August 22, 2026
Solved

Issue after updating STM32CubeAI Studio to v1.2: No longer generates raw files

  • August 22, 2026
  • 3 replies
  • 23 views

Hello,

I have just updated STM32CubeAI Studio to version 1.2.

In the previous version, the AI Studio generated:

  • Middleware
  • Application code
  • Raw files (e.g., network_atonbuf.xSPI2.raw)

My workflow was to add the middleware and application code to my project, then convert the raw file (network_atonbuf.xSPI2.raw) to a hex file. Everything worked fine until I updated the studio.

In version 1.2, instead of generating the raw file, it now generates a C source file: network_atonbuf.xSPI2.c.

I am unsure what to do with this new .c file. I placed it in my project, but nothing works as expected.

Could someone please advise on how to proceed or explain the change in workflow?
 

Best answer by hamitiya

Hello  @pawatJoy  

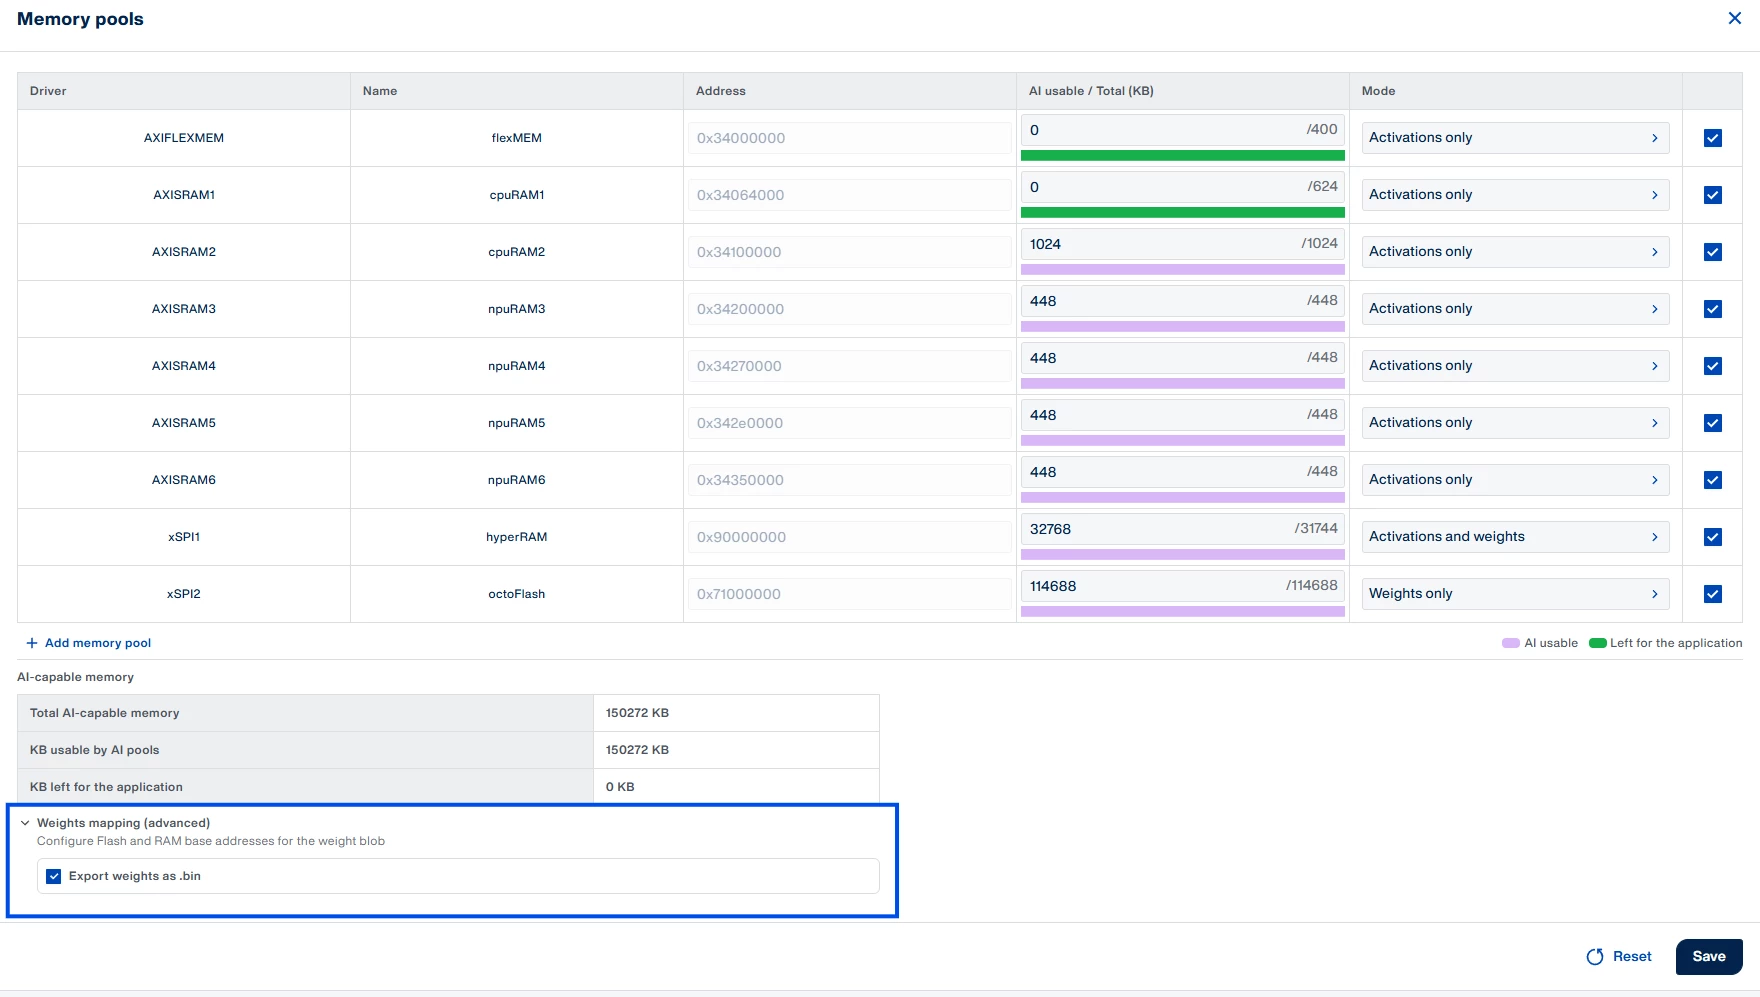
with this new update, STM32Cube AI Studio uses the ability to generate weights as C code instead of binary file.

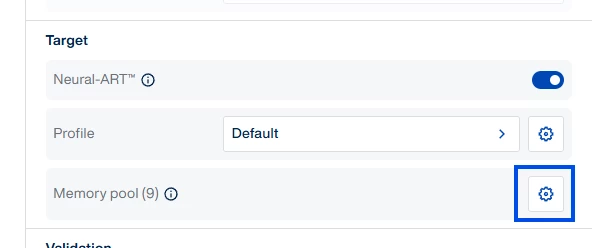
If you want to reuse the same behavior as before, you can go to:

Target > Memory Pool

and, at the far bottom, under Weights Mapping:


d4927bec-24a3-0407-df27-5ecc5469c2a1.png


20bff9e4-ff07-c88a-377a-ca34239e49aa.png


Usage of C file is easier to integrate in your application since you can ship one unique .elf / .bin file containing the whole app. However, it means you need to edit your linker script and add a macro to map the weights where you want.


Best regards,

Yanis


3 replies

pawatJoyAuthor
Associate III
August 22, 2026

Thank you for your useful information.

Can I ask another question? If I want to use that C file, how should I edit my Linker script (.ld)?

hamitiya
ST Technical Moderator
August 22, 2026

Hello  @pawatJoy  

It depends how you want to integrate your network, but if you want to map your weights in 0x7100_0000, you will need to do the following. It is only a proposal, and can be fine-tuned based on  your board and what you want to achieve:


- Create a section (memory definition) in your linker script, starting from the address you want:


```

/* Memories definition */
MEMORY
{
RAM (xrw) : ORIGIN = 0x34000000, LENGTH = 0x100000
ROM (xrw) : ORIGIN = 0x70100400, LENGTH = 0x6ffc00
EXTFLASH (rx) : ORIGIN = 0x70180000, LENGTH = 0x71000000 - 0x70180000
NETWORK (rx) : ORIGIN = 0x71000000, LENGTH = 0x40000
}
```
 
in Sections:
 
.AI_NETWORK :
{
. = ALIGN(32);
KEEP(*(.AI_NETWORK))
. = ALIGN(32);
} >NETWORK
 
 
then, in your C Code, you can define this pragma:
 
#define AI_NETWORK __attribute__((section(".AI_NETWORK")))
 
and in your network file in AppliAIAppnetwork_atonbuf.xSPI2.c, add the corresponding pragma to your weights allocation:
 
1b154a73-5baa-46bb-39ea-1013e0ba94a0.png


For more information, you can refer to the LD documentation here, especially the Memory Layout section:

Using LD, the GNU linker - Command Language


If you want to put your weights in the same section as "ROM", you can integrate your C file as-is. No modification needed. However, your ROM should have enough space in order to compile and not have an overflow. 

 
Best regards,
Yanis
 
 
​In order to give better visibility on the answered topics, please click on 'Best answer' on the reply which solved your issue or answered your question.
hamitiya
hamitiyaBest answer
ST Technical Moderator
August 22, 2026

Hello  @pawatJoy  

with this new update, STM32Cube AI Studio uses the ability to generate weights as C code instead of binary file.

If you want to reuse the same behavior as before, you can go to:

Target > Memory Pool

and, at the far bottom, under Weights Mapping:


d4927bec-24a3-0407-df27-5ecc5469c2a1.png


20bff9e4-ff07-c88a-377a-ca34239e49aa.png


Usage of C file is easier to integrate in your application since you can ship one unique .elf / .bin file containing the whole app. However, it means you need to edit your linker script and add a macro to map the weights where you want.


Best regards,

Yanis


​In order to give better visibility on the answered topics, please click on 'Best answer' on the reply which solved your issue or answered your question.